Maintenance of the D-245 diesel engine
To ensure long-term and trouble-free operation of the diesel engine, the following basic provisions should be followed:
- - periodically check the condition of the fastening of the assembly units;
- - before starting the diesel engine, check the oil level in the diesel engine crankcase and the coolant in the expansion tank;
- - after starting, before turning on the load, let the diesel engine run for 2.3 minutes first at minimum idle speed with a gradual increase to maximum speed;
- - load the diesel engine only after the coolant temperature in the cooling system rises to 40 ° C;
- - before turning on a new diesel engine under load, run it in;
- - operate the diesel engine on
- - do not overload the diesel engine during operation and monitor the readings of the control devices;
- - do not stop the diesel engine by blocking the intake tract except in emergency cases;
- - use only those fuel and oil grades recommended by the manufacturer;
- - keep the diesel engine clean, do not allow fuel, oil and coolant leaks, or suck unfiltered air into the cylinders;
- - the diesel engine can operate at longitudinal and transverse inclinations of no more than 35°;
- - before stopping the diesel engine after removing the load, let it run for 3-5 minutes first at medium and then at minimum idle speed to reduce the temperature of the coolant and oil, and then stop the diesel engine by moving the fuel supply control lever to the position corresponding to the cessation of fuel supply (failure to comply with the specified procedure may cause turbocharger failure).
Maintenance of diesel mechanisms consists of regular adjustment of the clearance between the valves and rocker arms, as well as tightening the cylinder head mounting bolts after the first 4,000 km of vehicle mileage.
Procedure for adjusting the valves and tightening the cylinder head mounting.
Maintenance of the lubrication system
The oil level in the diesel crankcase should be checked daily using the oil level indicator located on the right side of the diesel cylinder block.
The oil level should be between the lower and upper marks of the indicator.
The check should be carried out no earlier than 3-5 minutes after stopping the diesel, when the oil has completely drained into the crankcase.
The diesel engine must not be operated with the oil level in the crankcase below the lower and above the upper mark on index.
To change the oil in the diesel crankcase, unscrew the oil sump plug on a warm diesel engine. After all the oil has drained from the crankcase, screw the plug back in.
Oil must be poured into the diesel engine through the oil filler pipe to the level of the upper mark.
Cleaning the rotor of the centrifugal oil filter should be done simultaneously with changing the oil. To do this, do the following:
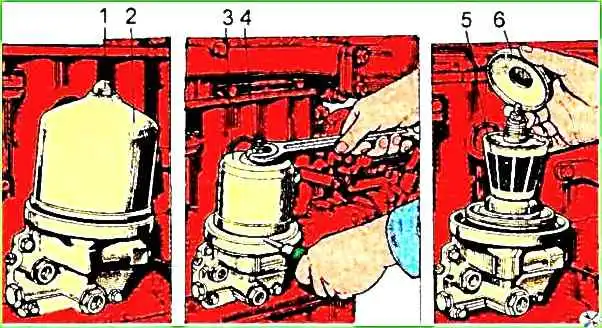
- - unscrew nut 1 (Fig. 1) securing the cap of the centrifugal oil filter and remove it;
- - lock the rotor from turning by inserting a screwdriver or rod between the filter housing and the bottom of the rotor and, turning nut 4 securing the rotor cup with a wrench, remove the rotor cup 3;
- - check the condition of the rotor protective mesh and, if necessary, clean and wash it;
- - use a scraper to remove a layer of deposits from the inner walls of the rotor cup.
Before assembling the cup with the rotor housing, lubricate the rubber sealing ring with engine oil. Then align the balancing marks on the cup and the rotor housing.
The cup mounting nut must be tightened with a little force until the cup is fully seated on the rotor.
- - After assembly, the rotor should rotate easily without jamming from a push by hand.
After this, you need to install the cap of the centrifugal oil filter in place and tighten the cap nut with a torque of 35-50 Nm.
When installing an oil filter with a paper filter element on a diesel engine, it must be replaced as described in the article "ZIL-5301 Oil System Filter".
Maintenance of the cooling system
To check the coolant level, open the tap located in the front part of the expansion tank (for cars manufactured before 2000).
The leakage of coolant indicates about its normal level.
On cars of recent years of production, the coolant in the expansion tank must be poured according to the marks.
Check the fan drive belt tension after 4000 km of car or bus mileage.
The fan belt tension is considered normal if its deflection on the crankshaft pulley - generator pulley branch is within 12-17 mm when pressed with a force of 40 N.
The cooling system must be filled with low-freezing coolant, or clean soft water.
Hard water should be softened by adding 10-12 g of soda ash per 10 liters of water.
The normal operating temperature of the coolant should be 75-95 ° C.
If the temperature rises above normal, check the coolant level in the expansion tank, the tightness of the radiator and the fan belt tension.
If necessary, flush the cooling system from contamination.
For flushing, use a solution of 50-60 g of soda ash per 1 liter of water.
The system should be flushed in the following order:
- - pour 2 liters of kerosene into the radiator and fill the system with the prepared solution;
- - start the diesel engine and run for 8-10 hours, then drain the solution and flush the cooling system with clean water.
Maintenance of the fuel system
Maintenance of the fuel system consists of checking the condition of the system devices, the reliability of their fastening, cleaning, flushing or replacing filters, draining sediment from the coarse filters (FGO) and fine filters (FTO) of fuel cleaning and the fuel tank.
During winter operation, it is recommended to drain sediment from the fuel system more often in the amount of 100-300 ml.
If the sediment from the tank is not drained in a timely manner, the service life of the filter elements of the FTO, the fuel priming pump and the manual fuel pump is significantly reduced.
Increased water content in the fuel during winter operation causes clogging of the fuel intake with ice crystals, which leads to diesel failure during start-up.
Adding gasoline to diesel fuel significantly reduces the service life of the fuel equipment and diesel engine.
Under normal operating conditions, during TO-1, it is necessary to drain the sediment from the coarse fuel filter housing.
When filling the vehicle's tank with unsettled fuel, drain the sediment from the FGO fuel at least once a week.
During maintenance, it is necessary to flush the filter element in clean diesel fuel, and then blow it out with compressed air under a pressure of 0.3-0.4 MPa.
When operating the vehicle in dusty conditions, the FGO should be flushed every 350-400 km.
When filling vehicle tanks with unsettled fuel, the filter element should be replaced when the diesel engine power decreases, but not less often than scheduled maintenance.
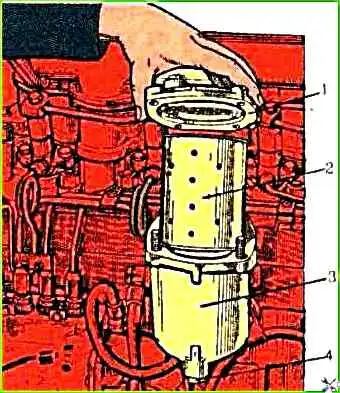
To drain the sediment from the FGO, unscrew the plug 1 (see Fig. 2) at the bottom of the filter cup and drain the sediment until clean fuel appears.
Then tighten the plug.
To clean the filter, do the following:
- - drain the fuel from the filter through the drain plug 1;
- - unscrew the four bolts and remove the cap 2;
- - wash the mesh of the filter element 4 with gasoline or diesel fuel, blow it with compressed air under a pressure of 0.3-0.4 MPa;
- - assemble in the reverse order.

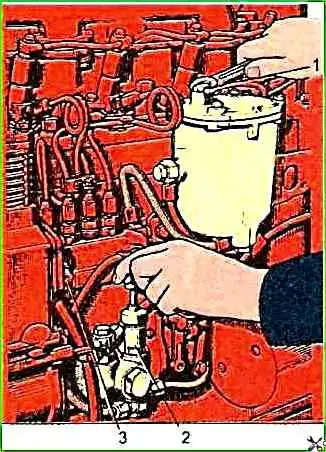
To drain sediment from the fine fuel filter (Fig. 3), unscrew plug 4 at the bottom of the filter and drain the sediment until clean fuel appears. Then tighten the plug.
To replace the filter element, you need to:
- - drain the fuel from the filter by unscrewing the plug at the bottom of the housing;
- - unscrew the nuts securing cover 1 (Fig. 3) and remove the cover;
- - remove the filter element 2 from the housing;
- - flush the inside of the filter housing 3;
- - assemble the filter with a new filter element;
- - unscrew the air bleed plug on the fuel pump housing by 1-2 turns and the nipple on the fine fuel filter;
- - bleed the system using the fuel priming pump (Fig. 4), sequentially closing plug 3 on the fuel pump housing and plug 1 on the fine filter when fuel appears
Maintenance of the high-pressure fuel pump is performed on a stand.
")

")
")
")
")
")
")
")