The service life of the engine depends on timely and thorough lubrication, as well as on the type and quality of the oils and greases used
To prevent dirt from getting into the mechanisms, thoroughly clean the lubrication points and wipe the oilers.
Checking the oil level
Check the oil level using the marks on the oil level indicator, no earlier than five minutes after stopping the engine, by placing the machine on a flat horizontal surface, to check, unscrew the indicator from the threaded part of the tube, wipe its rod with a clean rag and insert it into the tube without screwing it in, then remove the indicator again (Fig. 1) and check the oil level.
If the oil level is close to the "H" mark, add fresh oil of the same brand to the "B" mark.
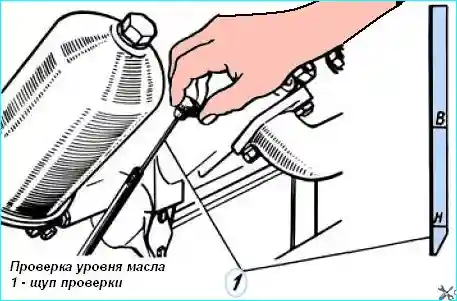
Fig. Checking the oil level of the YaMZ diesel engine: 1 - oil level dipstick
Oil change
To remove deposits from the crankcase along with the oil, drain the oil from the warmed-up engine, observing safety precautions.
To drain the oil, unscrew the drain plug on the crankcase and remove the oil filler cap, having previously cleaned it from dust and dirt. After the oil has completely drained, tighten the plug.
Pour oil into the engine through the filler neck on the cylinder head cover.
Before filling, clean the filler neck from dust and dirt, check the tightening of the oil pan drain plug:
- tightening torque 140-160 Nm (14-16 kgfm).
Pour oil from oil dispensers with dosing guns, and if there are no dispensers, through a funnel with a mesh from a clean filling container. Close the filler cap.
Maintenance of the oil filter
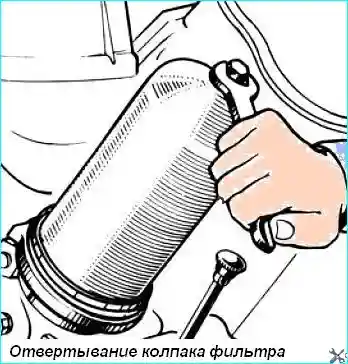
Fig. Unscrewing the YaMZ engine filter cap
Unscrew the filter cap 3-4 turns and drain the oil through the housing channel into a container provided. To unscrew the cap, you can use a wrench, as shown in Fig. 2.
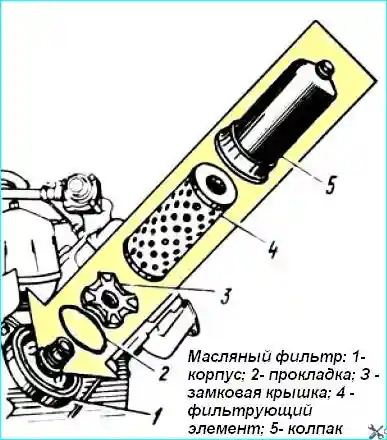
Fig. Oil filter: 1 - housing; 2 - gasket; 3 - lock cover; 4 - filter element; 5 - cap
Fully unscrew and remove cap 5 (Fig. 3) of the filter
Press on the lock cover 3 and, having sunk it into cap 5 by 2-3 mm, turn by 45°, after which it will disengage from the cap flange.
Remove the lock cover and filter element 4 from the cap.
Rinse the inside of the cap with diesel fuel. Cleaning is not allowed even with a clean rag.
Install a new filter element into the cap with the rubber gasket facing out.
Install the lock cover into the gasket hole, ensuring the correct position of the gasket.
Having pressed on the lock cover, sink it together with the element into the cap and turn by 45°. The flange projections of the cap will enter the grooves of the cover, after which the spring will press the cover into the working position.
Screw the cap with the element onto the nipple of the housing 1 and tighten to a torque of 20-40 Nm (2-4 kgfm).
With the engine running, make sure that there is no oil leakage through the cap seal. Replace the sealing gasket 2 after four replacements of the filter element.
Flushing the centrifugal oil filter

Fig. Unscrewing the cap nut
1. Unscrew the filter cap nut (Fig. 4) and remove the cap
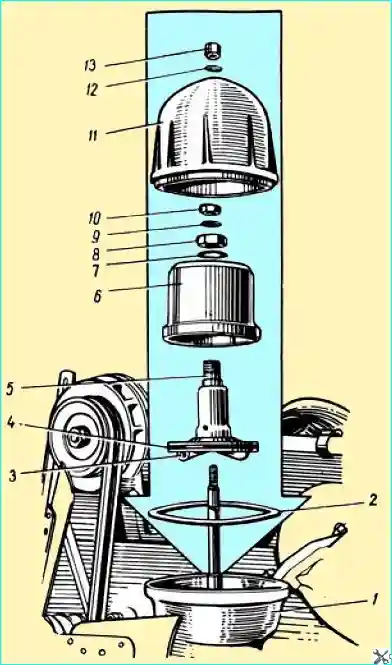
Fig. Centrifugal oil filter: 1 - housing; 2 - cap gasket; 3 - rotor nozzle; 4 - rotor gasket; 5 - rotor; 6 - cap; 7 - washer; 8 - rotor nut; 9 - thrust washer; 10 - rotor fastening nut; 11 - cap; 12 - washer; 13 - cap fastening nut
Unscrew the rotor fastening nut; remove the rotor with the thrust washer 9 (Fig. 5)
- 3. Disassemble the rotor by unscrewing the nut 8, removing the washer 7 and the rotor cap 6.
- 4. Remove deposits from the cap 6 and the rotor 5 and wash them in diesel fuel.
- 5. Assemble the filter in the reverse order, checking the condition of the gaskets 2 and 4, the nozzles 3 of the rotor and the washer 12. If necessary, replace the gaskets and clean the rotor nozzles.
Removing and washing the valves of the lubrication system
If the pressure reducing valve or differential valve of the lubrication system is jammed, they must be removed by unscrewing the mounting bolts.
Wash the valves in diesel fuel m fuel, without disassembling, and install it in place. In case of malfunctions (spring breakage, etc.), replace the valve assembly.
Lubrication of the bearings of the compressor drive tensioner pulley
Regularly fill the bearing cavity of the compressor drive tensioner pulley with grease in accordance with the lubrication table.
Pump grease with a mechanical or manual grease gun through a grease nipple (Fig. 6) located on the pulley axis on the cylinder block side until grease begins to appear through the seal on the rear end of the pulley (4-5 strokes when filling with a manual syringe).
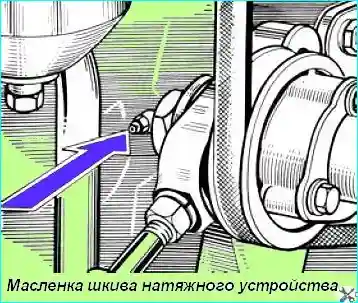
Fig. Lubricating the bearings of the compressor drive tensioner pulley
It is recommended to flush the tensioner bearings once a year in the following sequence:
- 1. Unscrew the tensioner pulley axle nut and the tensioner bolt nut.
- 2. Unscrew the tensioner bolt from the pulley axle and remove the pulley with the axle.
- 3. Unscrew the three bolts and remove the pulley cover.
- 4. Remove old grease from the pulley (without disassembling it) and wash it in kerosene or diesel fuel.
- 5. Place grease in the bearings and in the cover cavity and install the cover in place.
- 6. Install the pulley with the axle in place, put on the belt, adjust the belt tension and tighten the nut and lock nut of the axle mount.
- 7. Fill the bearing cavity with grease through the grease nipple until grease begins to appear through the seals on the rear end of the pulley.


