Before doubting the quality of the turbocharger, it is necessary to make sure that the engine and other units are in good condition
Each turbocharged engine is characterized by a certain noise level. Therefore, many faults can be detected by a change in the usual noise.
If the noise becomes more abrupt, the cause of the fault may be an air leak (between the turbocharger and the intake manifold) or exhaust gas, as well as a defect in the rotating shaft.
Intermittent noise can be explained by a clogged turbocharger or using too low an engine speed in relation to the load.
The appearance of vibrations may indicate damage to the rotating shaft.
A sharp decrease in the noise level, accompanied by the appearance of black or blue smoke in the exhaust, indicates a complete failure of the turbocharger.
In all such cases, the engine should be stopped immediately to prevent even more serious damage to the engine or turbocharger.
Checking on the car
- Engine at idle running
Check the tightness of the air ducts between the air filter and the turbocharger by spraying with Startpilote liquid. In case of leaks, an increase in engine speed is usually observed.
- Engine at: 1200 rpm.
Check the tightness between the turbocharger and the engine using a leak detector.
Check for exhaust gas leaks (use a retarder on the exhaust), replace the seals if necessary.
An exhaust gas leak can be detected by a change in color at the leak site.
Lack of engine power:
- - clogged air filter;
- - faulty intercooler (clogged tubes);
- - clogged or pinched air intake pipes (between the air filter and turbocharger);
- - clogged or pinched boost air inlet pipes (between turbocharger and engine);
- - foreign objects between the air filter and turbocharger;
- - clogged exhaust system;
- - air or exhaust leak between turbocharger and engine;
- - damaged or clogged turbine housing;
- - damaged turbocharger wheel blades;
- - incorrect operation of turbocharger pressure regulation system (unloader valve).
Black smoke on the exhaust:
- - clogged air filter;
- - clogged or pinched air inlet pipes (between air filter and turbocharger);
- - clogged or pinched boost air inlet pipes (between turbocharger and engine);
- - air or exhaust leak between turbocharger and engine;
- - damaged or clogged turbocharger;
- - incorrect operation of turbocharger pressure regulation system (unloader valve).
Blue smoke in the exhaust:
- - clogged engine breather;
- - oil consumption;
- - damaged or pinched fuel outlet pipe;
- - damaged turbocharger;
- - prolonged engine idling;
- - faulty pneumatic compressor.
Abnormal noise:
- - clogged air filter;
- - poor sealing between the air filter and turbocharger;
- - clogged or pinched air inlet pipes (between the air filter and turbocharger);
- - clogged or pinched booster air inlet pipes (between the turbocharger and engine);
- - foreign objects between the air filter and turbocharger;
- - clogged or pinched exhaust system;
- - air or exhaust gas leak between the turbocharger and engine;
- - insufficient lubrication of the turbocharger;
- - damaged turbocharger;
- - insufficient engine speed in relation to the load;
- - incorrect operation of the turbocharger pressure regulation system (unloader valve).
Excessive oil consumption:
- - clogged air filter;
- - clogged engine breather;
- - clogged or pinched air intake pipes (between the air filter and turbocharger);
- - insufficient lubrication of the turbocharger;
- - clogged or pinched oil return line;
- - turbocharger damage;
- - prolonged engine idling;
- - faulty pneumatic compressor.
Presence of oil in the air intake pipes of the turbocharger:
- - clogged air filter;
- - clogged or pinched air intake pipes (between the air filter and turbocharger);
- - malfunction of the pneumatic compressor a.
- Presence of oil in the air ducts after the turbocharger:
- - clogged air filter;
- - clogged engine breather;
- - clogged or pinched air intake ducts (between the air filter and turbocharger);
- - clogged or pinched oil return line;
- - damaged turbocharger;
- - prolonged engine operation at idle speed.
Presence of oil in the exhaust manifold:
- - prolonged engine operation at idle speed.
Presence of oil in the exhaust lines after the turbocharger:
- - clogged breather engine;
- - clogged or pinched oil return line;
- - damaged turbocharger;
- - prolonged engine idling.
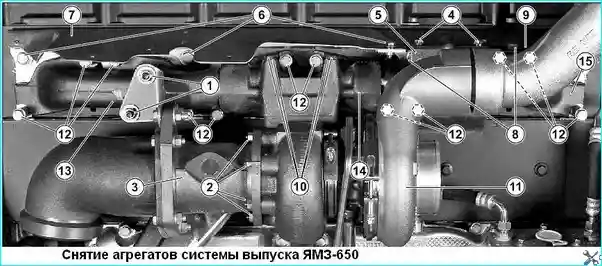
Removing the turbocharger (see Fig. 1)

Fig. Removing the YAMZ-650 exhaust system units
- 1. Unscrew the four turbocharger mounting bolts (10).
- 2. Remove the turbocharger (11) (650.11180 11).
- 3. Remove the turbocharger gasket (650.1118158).
Disassembling and assembling the turbocharger

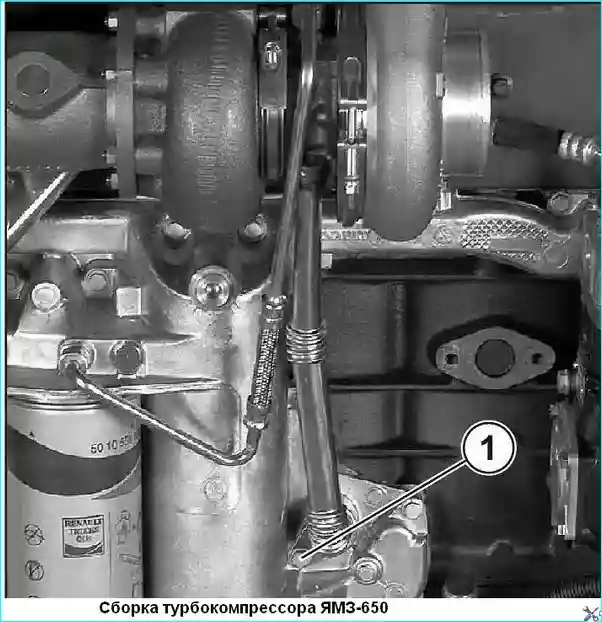
Fig. Assembly of the YAMZ-650 turbocharger
These operations are not difficult at all.
Blow out the air ducts and make sure there are no foreign objects in them.
Before tightening the threaded fasteners of the exhaust manifold, lubricate their threads with heat-resistant lubricant "Loctayte 8009" or "Gleitmo165" or equivalent quality lubricant.
Tighten to the recommended torque:
- - Studs for fastening the flap on the exhaust to the turbocharger (lubricant "Loctayte 8009") 10 ± 2 Nm
- - Bolts for fastening the turbocharger to the exhaust manifold 60 ± 12 Nm
Replacing the turbocharger, reasons, whose faults have not been identified, may lead to further failures and serious damage to the engine.
Do not use sealing pastes on the turbocharger lubrication channel fasteners.
Before installing the turbocharger, pour fresh oil through the oil supply hole and turn the rotor by hand to lubricate the bearings and thrust bearing.
After installing the turbocharger, start the engine and wait 30 seconds before increasing the speed.
During assembly, strictly ensure that the specified length under the bolt head (1), corresponding to 60 mm (see Fig. 2), is maintained.
Ensure tightness using the sealant "Loctite 542"
Installing the turbocharger
Install the turbocharger in the reverse order of removal.
Apply lubricant “Loctite 8009” and tighten to a torque of Mkr = 60 ± 12 Nm, observing the criss-cross tightening order.


