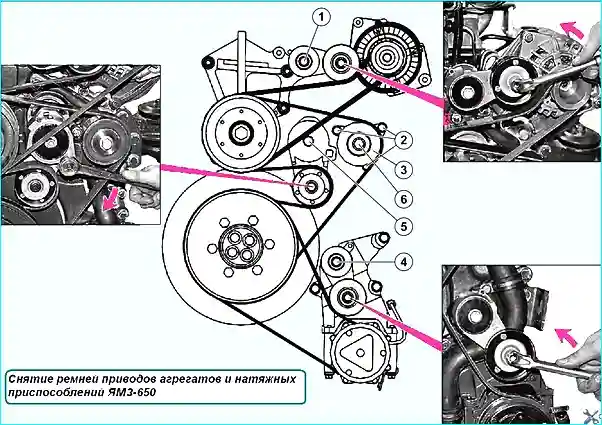
To remove the alternator, fan and air conditioning compressor belts, do the following (see Fig. 1):
- 1. Using a wrench, press the tensioners in the direction shown in Fig. 1.
There are holes on the movable and fixed parts of the tensioner, when aligned, it can be fixed in the pressed state.
- 2. Remove the belts (650.1308020 - fan drive belt; 650.3701032 - alternator drive belt; the air conditioning compressor drive belt is installed by the customer).

- 3. Loosen the tensioner mounting bolts (1, 4, 5).
- 4. Remove the tensioners (650.1308110 - fan drive belt tensioner, 650.3701715 - alternator drive belt tensioner, 650.8114110 - air conditioning compressor drive belt tensioner).
- 5. Loosen the intermediate roller mounting bolt (6).
- 6. Remove the intermediate roller with bearing assembly (3) (650.1308111).
- 7. Remove the intermediate roller bracket (650.1308139) by unscrewing the mounting bolts (2).
Installing the drive belts of the units and tensioners
Install the drive belts of the units and tensioners in the reverse order of removal.
When installing the fan belt tensioner, it is necessary to ensure tightness along the thread of the bolt (5) using the sealant “Loctayte 542”.
Tighten the mounting bolts of the fan and generator drive belt tensioners to a torque of Мкр = 40 ± 8 Nm.
Tighten the intermediate roller mounting bolt to a torque of Мкр = 60 ± 12 Nm.
The belt tension adjustment value is obtained automatically by the tensioning system.
If If, upon external inspection, the belt shows wear on the side edges, delamination of the belt, or cracks and breaks along the compression layer, the belt must be replaced.
When carrying out repairs, avoid getting oil, fuel, coolant, and paint on the belts.


