The power take-off (PTO) is single-stage, attached to the gearbox housing on the right side and is designed to drive auxiliary units
The box is manufactured in two versions: with a pump (Fig. 1) and a flange (Fig. 2).
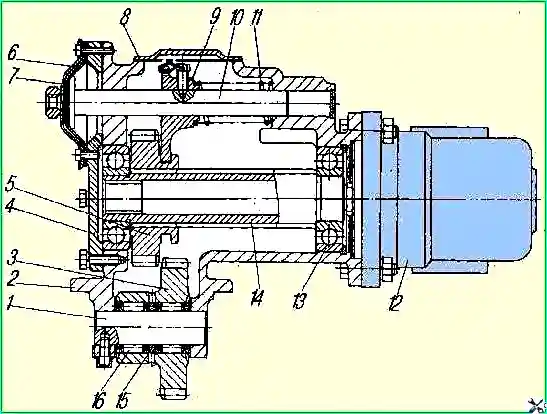
Power take-off with pump: 1 - drive gear axis; 2 - crankcase; 3 - drive gear; 4 - crankcase cover; 5 - driven shaft gear; 6 - switching chamber diaphragm; 7 - switching chamber cover; 8 - cover; 9 - fork; 10 - power fork rod; 11 - spring; 12 - pump; 13 - ball bearings; 14 - driven shaft; 15 - bearing spacer ring
Turn on the power take-off when the air pressure in the vehicle's pneumatic system is at least 500 kPa (5 kgf/cm 2) and the clutch is disengaged.
Adjusting shims are installed between the flanges of the gearbox housing and the power take-off, with the help of which the lateral clearance in the gear mesh is adjusted (for noise).
If it is necessary to replace gaskets with new ones, their thickness must be maintained.
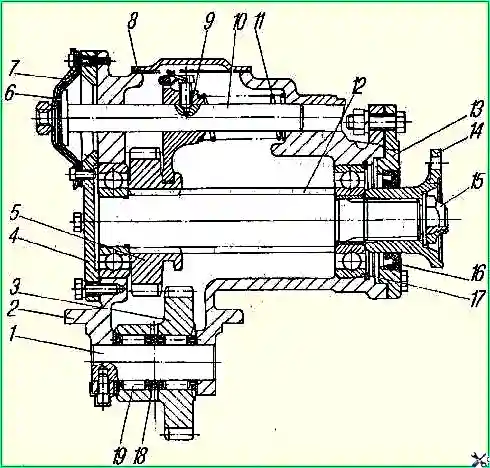
Power take-off with flange: 1 - drive gear axis; 2 - crankcase; 3 - drive gear; 4 - crankcase cover; 5 - driven shaft gear; 6 - switching chamber diaphragm; 7 - switching chamber cover; 8 - cover; 9 - fork; 10 - power fork rod; 11 - spring; 12 - driven shaft; 13 - cover; 14 - flange; 15 - nut; 16 - cuff; 17 - ball bearings; 18 – bearing spacer ring; 19 - roller bearings
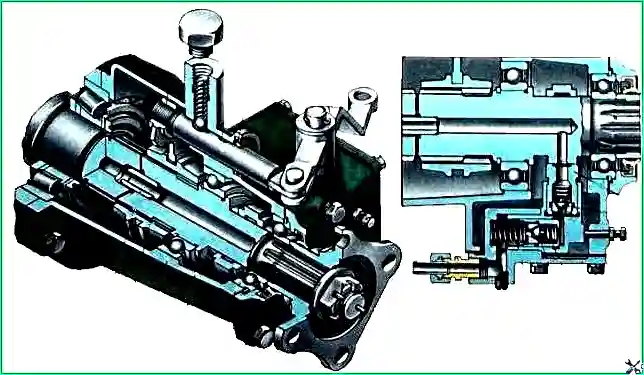
The power take-off control, pneumatic, consists of a control valve, a switching mechanism and air ducts.
To ensure remote activation of the power take-off in the cab to the right of the driver, on the lower edge of the instrument panel, a control valve is installed on the bracket.
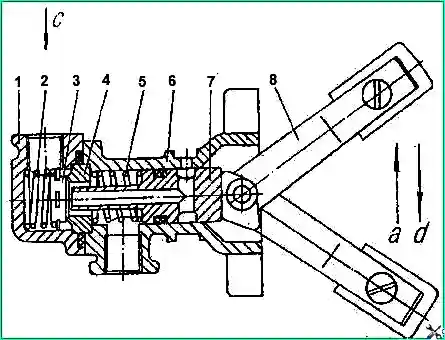
Pneumatic valve: 1 - cover, 2 - valve spring, 3 - valve, 4 - valve seat, 5 - spring, 6 - body, 7 - valve stem, 8 - lever, a - switch, d - on, c - air supply
When the power take-off is turned off lever 8 (Fig. 3) is in the upper position, rod 7 is in the right position.
Valve 3 is pressed against seat 4 under the action of spring 2 and air does not flow through the tap.
When the power take-off is turned on the valve lever 8 is moved to the lower position.
Rod 7 moves to the extreme left position, puts pressure on valve 3 and moves it away from seat 4.
Compressed air flows through air ducts into the diaphragm chamber of the activation mechanism.
Diaphragm 6 (see Fig. 1) through rod 10 with fork 9 engages gear 5 of the driven shaft into engagement with drive gear 3.
When the power take-off is turned off the valve lever 8 (see Fig. 3) is moved to the upper position.
Rod 7, under the action of spring 5, moves to the extreme right position, breaking away from valve 3.
Through the hole in the rod 10 (see Fig. 1), the chamber of the gearbox activation mechanism communicates with the atmosphere, air is released from the chamber and, under the action of a spring, the rod with fork 9 disengages the driven shaft gear 14 from engagement with the drive gear 3.
Simultaneously with the release of air into the atmosphere, valve 3 (see Fig. 3) under the action of spring 2 is pressed against seat 4 and separates the inlet and outlet openings of the valve.
Auxiliary power take-off
Power is taken off from the transfer case input shaft through movable coupling 2 (Fig. 4) and is intended to drive the winch.
Operation of the auxiliary power take-off box is possible when the transfer box gearshift clutch is in neutral position.
To lubricate the gear and shaft bearings, a plunger pump is installed in the additional power take-off box.
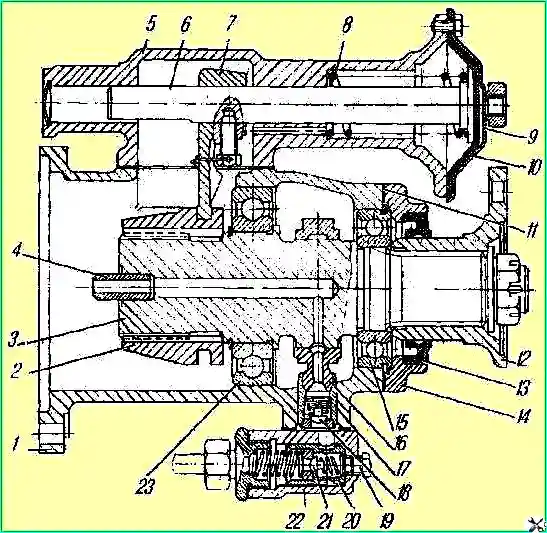
Additional power take-off: 1 - housing; 2 - coupling; 3 - shaft; 4 - shaft sleeve; 5 - switching chamber body; 6 - switch rod; 7 - fork; 8 - spring; 9 cover; 10 - diaphragm; 11 - gasket; 12 - flange; 13 - cuff; 14 - cover; 15, 23 - ball bearings; 16 - pump connecting rod; 17 - piston; 18, 21 - pump valves; 19 - plug; 20 - safety valve; 22 - body valve
The pump consists of a piston 17 with a discharge valve 18, a safety valve 20 and a housing 22.
The piston with connecting rod is mounted on the eccentric of shaft 3 and moves progressively as it rotates.
To prevent excessive pressure with increasing rotation speed, the suction valve is a differential type with a coil spring.
Oil is taken through a tube 1 connected to the transfer case oil bath, and from the pump it goes to the gear bearings through channels made in shaft 3 and in the transfer case input shaft.
Some of the oil penetrates through the gaps and lubricates the shaft bearings.
To ensure remote activation of the auxiliary power take-off box in the cab, to the right of the driver on the lower edge of the instrument panel, a control valve is installed on the bracket.
When the auxiliary power take-off box is turned off, lever 8 (see Fig. 3) is in the upper position, rod 7 is in the right position.
The valve, under the action of its spring, is pressed against seat 4 and air does not flow through the tap.
When the handle is moved to the lower position, rod 7 moves to the extreme left position, puts pressure on the valve and moves it away from the seat.
Compressed air enters the switching chamber and turns on the additional power take-off box, compressing spring 8 (see Fig. 4).
When the auxiliary power take-off box is turned off, the crane lever is moved to the upper position.
The rod, under the action of the spring, moves to the extreme forward position, thereby breaking away from the valve.
Through a hole in the rod, the box switching chamber communicates with the atmosphere, air is released from the chamber, and the spring turns the box off.
Simultaneously with the release of air into the atmosphere, the valve is pressed against the seat under the action of a spring and separates the inlet and outlet openings of the valve.
The control valve lever is fixed in the off position with a screw installed on the valve bracket.
During long-term operation of the auxiliary power take-off box, there should be no increased heating of the bearings of the primary shaft of the transfer case and the power take-off shaft.
Increased heating indicates a malfunction in the oil pump.
Check the serviceability of the pump together.
To check the pump operation:
- - tighten the parking brake lever fully;
- - set the transfer case gear shift lever to the neutral position;
- - turn off the winch by lowering the lever on the right side member of the frame;
- - unscrew plug 19 in the pump housing;
- - start the engine, engage the auxiliary power take-off and one of the gears in the gearbox;
- - determine the serviceability of the pump by closing the hole for the plug with your finger.
If the pump is working properly, you can feel the oil pulsating in the hole for the plug.
Working with a faulty pump is prohibited.


