YaMZ-650 lubrication system mixed with "wet" sump
Gear-type oil pump, with gear drive, drive ratio - 1.31: 1.
Oil pressure (in the cylinder block line) of the engine, warmed up to 80 - 95˚ C, kPa (kgf/cm²):
- - at nominal speed 400 - 650 (4.0 - 6.6);
- - at minimum speed, not less than - 100 (1.0);
- - when the emergency oil pressure sensor is triggered 60 - 80 (0.61 - 0.81).
Oil filter:
- - coarse cleaning - two, full-flow, with replaceable filter elements (650.1012075);
- - fine cleaning - centrifugal, with replaceable cartridge.
Oil filling volume - 36.4 liters.
Relative oil consumption for burnout, % of fuel consumption - no more than 0.1
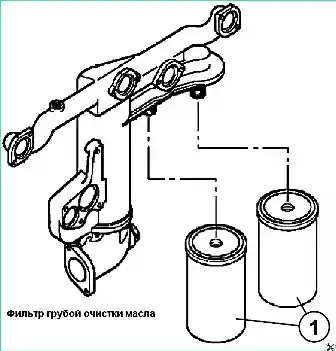
Coarse filter
Replacement of filter elements. (see Fig. 1)

- 1. To replace, unscrew the removable elements (1) (650.1012075).
- 2. Fill the new filter elements with oil.
- 3. Lubricate the seals with oil.
- 4. Screw the removable elements manually until they touch the support side.
- 5. Start the engine and check the reliability of the seal.
- 6. If leaks are observed, dismantle the removable element(s), check the flatness of the sealing gasket and repeat the assembly.
Centrifugal oil purifier. (CMO) (650.1028010)
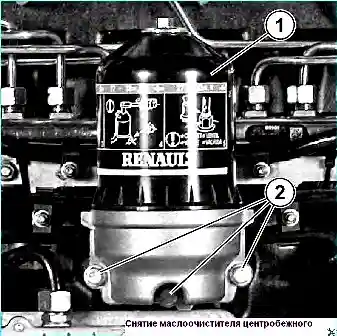
Removing the oil purifier

- 1. Remove the centrifugal oil cleaner (1) (650.102801 0) by unscrewing the 3 bolts (2) securing it (310018).
- 2. Remove the oil cleaner housing gasket (650.1028101).
Disassembling the oil cleaner

- 1. Unscrew the nut (1).
- 2. Remove the seal (2).
- 3. Remove the cover (3).
- 4. Remove the retaining ring (4).
- 5. Set the gasket (5) aside.
- 6. Remove the centrifuge rotor with the sealing ring (6) (650.1028180).
- 7. If necessary, remove the axle (7), heat it in the area of the seat and remove it from the oil purifier housing.
- 8. Thoroughly clean all parts of the oil purifier.
Assembling the oil purifier
- 1. Install the axle (7) using Loctite 542 sealant and tighten to the recommended torque (see table ▼).
- 2. Install the centrifuge rotor with the sealing ring (6).
- 3. Replace the seal (5).
- 4. Replace the retaining ring (4).
- 5. Install the cover (3).
- 6. Install the seal (2), fit the nut (1) and tighten to the recommended torque (see Table ▼).
Installing the oil purifier
Install the centrifugal oil purifier in the reverse order of removal.
Tighten the oil purifier mounting bolts to the recommended torque (see Table ▼).
Tightening torques for units
Oil pan mounting nuts 20 ± 4 Nm
Oil pan mounting studs 20 ± 4 Nm
Centrifugal oil purifier cover mounting nut 30 ± 3 Nm
Cover mounting stud to centrifugal oil purifier support (sealant "Loctite 542") 30 ± 3 Nm
Oil pump mounting bolts 20 ± 4 Nm
Piston cooling nozzle mounting bolts 20 ± 4 Nm
Oil sump drain plug 70 ± 14 Nm
Heat exchanger oil drain plug 20 ± 4 Nm


