The front wheel brakes are disc, with a single-piston floating caliper (when braking, the piston presses the inner pad to the disc, and the caliper, moving in the opposite direction, presses the outer pad).
The minimum permissible thickness of the front brake pads when worn is 3 mm.
The disks are ventilated, mounted on the hubs and secured to them with wheel bolts.
The minimum permissible disc thickness when worn is 19 mm.
The bracket is attached with two bolts to the steering knuckle.
The brake cylinder is made in the caliper body; on the outside it is covered with a rubber cover (boot) to protect it from dirt.
Inside the cylinder there is a groove into which an o-ring (cuff) is inserted.
When the piston moves out of the cylinder during braking, this ring twists slightly and after braking ends, it tends to return the piston to its original position.
Due to this, a constant minimum gap between the discs and brake pads is maintained. The cylinder has a bleed valve.
The design of the front brake mechanism is shown in Figure 1
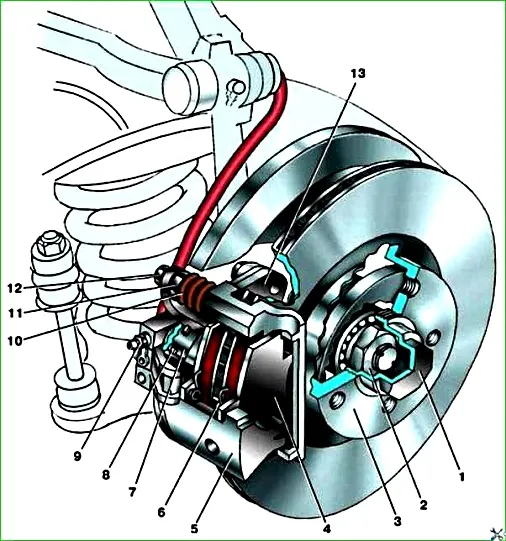
Front brake mechanism: 1 – hub cap; 2 – nut; 3 – brake disc; 4 – brake pad; 5 – bracket body; 6 – pad spring; 7 – piston; 8 – cuff; 9 – bleeding valve; 10 – finger cover; 11 – guide pin; 12 – bracket bolt; 13 – bracket base
Replacing brake pads
Place the vehicle on the parking brake.
Install support bars under the rear wheels.
Loosen the front wheel mounting bolts.
Raise the front of the car and place it on supports.
Remove the wheel.
Rinse the brake with warm water and dry it.
The use of gasoline, diesel fuel or any other mineral solvents for cleaning brakes is unacceptable.
Check the brake pads for wear through the hole in the caliper body.
If the thickness of the friction linings of the pads is less than 3 mm, the pads must be replaced on both sides of the vehicle.

Unscrew the lower bolt securing the bracket body, while holding the guide pin with a wrench.

Rotate the bracket body upward around the axis of the upper pin.

Mark the brake pads if you are installing old pads again, since replacing the inner and outer pads between each other, as well as between the left and right wheels, is unacceptable. This may result in uneven braking.
Remove the brake pads.
Clean brake parts from dirt and rust, especially the brake pad seats.
The use of gasoline, diesel fuel or any other mineral solvents for cleaning brakes is unacceptable.

If new brake pads are installed, you must carefully press the piston into the cylinder. At the same time, make sure that the piston does not warp.
Install the brake pads onto the base of the caliper, ensuring that the pressure springs are vertically upward and parallel to the top edge of the brake pads.
Old pads are installed in accordance with previously made markings.
Lower the bracket body.
Tighten the lower fastening bolt with a torque of 32–39 Nm (3.2–3.9 kgf m), while holding the guide pin with a wrench.
Press the brake pedal several times to set the piston to the working position.
Install the front wheel and tighten the mounting bolts.
Lower the car to the ground and tighten the wheel bolts evenly diagonally to a torque of 100–120 Nm (10.0–12.0 kgf m).
Check the brake fluid level in the reservoir and top up if necessary.
Brake disc
- Clean the brake disc.

- Measure using a caliper to measure the thickness of the disc. The minimum permissible disc thickness is 19 mm. If the disk thickness is less than acceptable, the disk must be replaced.
If there are scratches, the disc can be removed and sanded, but ensure that its final thickness is no less than acceptable.
It is recommended to replace brake discs on both sides.
Removing the brake disc
Unscrew the two fastening bolts, remove the brake caliper assembly and hang it on a wire to the body, making sure that the brake hose does not twist or experience excessive stress.
Remove the brake disc.
Installing the brake disc
Install the brake disc in the reverse order of removal.
Before installation, clean the mating surfaces of the wheel hub and brake disc.
Tighten the two bolts securing the brake caliper to a torque of 32–39 N·m (3.2–3.9 kgf·m). After installation, press the brake pedal several times to set the piston to the working position.
Front wheel caliper
Removal

Unscrew bolt 1 securing holder 2 of the brake hose tip.
Unscrew the connecting bolt 3, disconnect the tip 4 of the brake hose from the bracket and plug the hole in the brake hose.
Unscrew the two bolts 5 securing the bracket body to its base, while holding the guide pins 6 with a wrench, and remove the bracket body.
Disassembling the caliper
Remove the heat-insulating gasket from the piston, if its installation is included in the package.

Remove the protective cover of piston 1. Clamp the bracket body in a vice with soft metal jaws.
Remove piston 2 from the cylinder by applying compressed air through the brake hose fitting and holding the piston with your hand.
Remove the O-ring from the cylinder using a wooden spatula.
The use of metal objects is not recommended, as this may damage the cylinder groove under the sealing ring.
Unscrew the bleeder valve.
Rinse the piston and cylinder with fresh brake fluid.
Inspection of the caliper
Inspect the working surfaces of the piston and cylinder.
If there are signs of wear, corrosion, holes and nicks on the working surfaces of the piston and cylinder, replace the bracket body complete with the piston.
Assembling the wheel caliper
Lubricate the inner surface of the cylinder with new brake fluid.
Lubricate the new O-ring with new brake fluid and insert it into the cylinder bore.
Lubricate the new protective boot with new brake fluid and insert it into the groove on the piston.
Insert the piston into the cylinder using your fingers, without using any tool, and using a screwdriver, carefully insert the outer edge of the protective cover into the groove of the cylinder.
Lubricate the bleeder valve with fresh brake fluid and screw it into the caliper body.
Install a heat-insulating gasket on the piston, if its installation is included in the package.
Install the bracket body in the reverse order of removal. At the same time, tighten the two bolts securing the bracket body with a torque of 32–39 Nm (3.2–3.9 kgcm), while holding the guide pin with a wrench.
Be sure to replace the copper O-rings on the brake hose end. After installation, bleed the repaired brake.
")

")
")
")
")
")
")
")