To glue the windshield glass to the opening, use:
- adhesive-sealant “Terosat-8590” 1NU - ultra-viscous one-component black polyurethane-based sealant, characterized by a high rate of polymerization under the influence of air moisture with the formation of a rubber-like material
Before application, the glue can be heated to a temperature not exceeding 35°C;
- - primer (primer) “Terosat -851 1” for glass;
- - primer (primer) “Terosat -8521” for a painted window opening;
- - solvent "Nefras sch-155/200" for degreasing bonded surfaces.
Primers are black liquids based on polyurethane containing a solvent.
To replace glass:
- - remove the windshield wiper arms from the body, the polypropylene front end linings - side and bottom (around the glass), the linings of the inclined pillars and the instrument panel extension (in the cabin);
- - punch a hole in an accessible place in the adhesive layer between the glass being replaced and the opening; stretch a wire (diameter 20.2 mm, length 0.7-0.8 m) into the hole, cut off the glue around the perimeter of the glass and remove the glass.
You need two people to cut the glue.
Inside the cabin, the wire must be held in a stationary position, and pulled outside along the perimeter of the glass;
- use a knife to smooth out the glue remaining on the window opening, leaving a layer at least 1 mm thick on it.
The glue remaining on the opening serves as an ideal basis for adhesion with liquid polyurethane glue;
- - degrease the window opening and glass with a napkin moistened with gasoline and leave for 5-10 minutes for the gasoline to completely evaporate;
- - shake the vessel with the primer “Terosat-8521” for 2-3 minutes to completely mix the composition and apply a strip of primer 23-25 mm wide with an applicator or a soft brush to the window opening (to those areas where there is no hardened glue left ).
Allow at least 5 minutes for the primer to dry completely;
- install seal 4 on the upper edge of the glass on the lower two stops 1 (at a distance of 400-500 mm from each other);
- shake the container with the primer – “Terosat-8511” for 2-3 minutes and apply a strip of primer 23-25 mm wide onto the glass surface with an applicator or a soft brush.
Allow at least 5 minutes for the primer to dry completely;
- - unscrew the nozzle from the cartouche with glue “Terosat -8590” and make a cutout in it
- - use a knife to separate the bottom of the cartouche with glue, pour in moisture-absorbing powder;
- - pierce a hole for the glue to come out of the cartouche, screw on the nozzle;
- - install the cartouche with glue in the device and apply glue on the surface of the glass in the form of a rope at least 10 mm high, stepping back from the edge of the glass, seal and stops by 5-7 mm.
- - no later than 15 minutes after applying the glue, install the glass in the window opening (two people) so that the upper edge of the glass with the seal in place rests against the upper edge of the window opening flange;
- - fix the glass for 2 hours with rubber bands, threading them around the pillars inside the cabin (with the doors open);
- - after 5-6 hours, check the tightness of the glass installation
- - by pouring water from the outside with a hose around the perimeter of the glass, if necessary, coat the leakage areas with mastic 51-G-7K:
- - install the removed parts on the body.
Removal and installation of windshield in detail in pictures
We do the work together.
Remove the inner trim of the windshield pillars and the lining of the outer front panel.

Use a screwdriver to unscrew the four screws securing the outer trim of the windshield pillar

Remove the cover.

Remove the seal from the top edge of the glass.

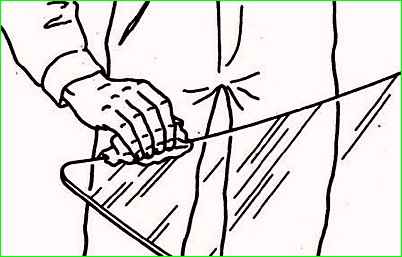
Use an awl or a thick needle to pierce the adhesive seam.

Pass a steel string through the puncture

Attach handles from scrap materials to its ends

Tighten the string and, working with it like a two-handed saw, cut the adhesive seam along the entire perimeter of the glass.
We cut carefully, without damaging the paint on the body, the headliner and the instrument panel.

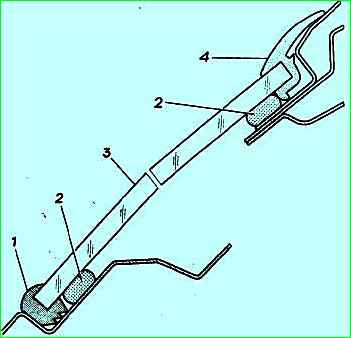
Two rubber stops are installed under the lower edge of the windshield.
They provide an even gap between the glass and the body.
We save them when removing the glass.
Instead of a string, you can use wire from a semi-automatic welding machine.

Having removed the windshield, use a sharp knife to cut off the excess of the old adhesive seam, leaving a layer 1–2 mm thick.

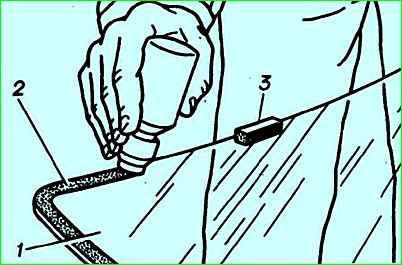
To glue new glass, we use a special set and a “gun” device for squeezing glue out of the tube
If there is no device, then the glue can be squeezed out, for example, with the handle of a hammer.

Cut off the tip of the tube nozzle and make an angular cut, as shown in the figure.

We put a seal on the upper edge of the glass, and two stops on the lower edge.

Degrease the edge of the glass on the side that will be adjacent to the opening, and the remaining adhesive layer on the window opening.

Apply primer to the edge of the glass along its perimeter and to the body opening.

Squeeze the glue out of the tube along the edge of the glass, stepping back 6–7 mm from the edge

Apply glue along the entire perimeter with a continuous roller 10–12 mm high
We apply the glass to the window opening, ensuring that the gaps with the mating glass are even and body panels and proper fit of the seal to the body panels.

Opening the doors, wrap a cloth tape or cord around the cabin pillars several times.

We place two tire tubes under the tape on both sides of the glass.
If the tape is thin, we place wide wooden strips under it on top of the chambers.
Inflate the chambers so that the glass is pressed tightly against the opening.
Polymerization of the glue lasts several hours (see instructions included with the glue).
During this time, the car should not be moved, the door windows should not be closed or slammed, as any increase in air pressure inside the car may cause the glass to break off.
After waiting at least 6 hours, we remove the cameras and ropes.
We pour water from a hose from the outside onto the glass around the entire perimeter. If a leak is detected, lubricate the leakage area with sealant.
You can operate the car no earlier than 24 hours after gluing the glass.
")

")
")
")
")
")
")
")