The service life of the engine depends on the timely and thorough lubrication, as well as on the grade and quality of the oils and greases used
To avoid the penetration of dirt into the mechanisms, carefully clean the lubrication points and wash the oilers.
Checking the oil level and topping up
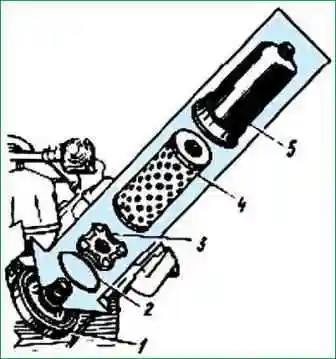
Clean the filler neck from dust and dirt. Remove the oil measuring rod 2 (Fig. 1), wipe it with a rag and insert it into the tube until it stops.
Then remove the rod again and determine the oil level: it should be between the marks "B" and "H", closer to the mark "B".
If the engine was running, the oil level should be checked 3-5 minutes after it was stopped.

If the level is close to the “H” mark, add fresh oil to the filler neck 1, located in the front of the engine, behind the fan drive hydraulic clutch.
When checking the oil level, pay attention to its quality.
If marks are visible on the dipstick through the oil film, the oil is suitable for further use.
If the marks are not clearly visible due to the dark color of the oil, it must be replaced.
The degree of oil contamination can also be assessed by the color of the oil stain on white filter paper.
If only the middle of the stain is black, the oil filter elements should be replaced and the centrifugal filter rotor cap should be washed, and if the entire stain is black, the oil should be changed.
Changing the oil and flushing the lubrication system
To remove deposits from the crankcase along with oil, drain the oil from a warm engine, observing safety measures.
To drain the oil, unscrew the drain plug on the crankcase 3 and remove the oil filler cap, having previously cleaned it of dust and dirt.
After the oil is completely drained, tighten the plug.
Fill the engine with a flush mixture consisting of 10 liters of diesel fuel and 6 liters of oil.
Start the engine and let it run for 5 minutes at the minimum crankshaft speed.
Stop the engine and drain the flush fluid.
Replace the two replaceable filter elements and wash the oil filter caps and the centrifugal oil filter in diesel fuel. Fill the engine with fresh oil.
Pour oil into the engine through the neck on the cylinder head cover.
Before filling, clean the neck from dust and dirt, check the tightness of the oil sump drain plug: tightening torque 140-160 Nm (14-16 kgf m).
Pour oil from oil dispensers with dosing guns, and in the absence of dispensers - through a funnel with a net of clean filling dishes.
Close the lid. 32 liters of oil are poured into the system.
Changing the filter elements of a full-flow oil filter
1. Unscrew the filter cap by 3-4 turns and drain the oil through the housing channel into the substituted container.
You can use a wrench to unscrew the cap, as shown in fig. 2.

2. Unscrew completely and remove cap 5 (Fig. 2) of the filter.
- 3. Press the lock cover 3 and, sinking it into the cap 5 by 2-3 mm, turn it 45º, after which it will disengage from the cap flange.
Remove the lock cover and filter element 4 from the cap.
- 4. Rinse the inside of the cap with diesel fuel. Do not clean even with a clean cloth.
- 5. Install a new filter element into the cap with the rubber gasket facing out.
Insert the lock cover into the gasket hole, ensuring the correct position of the gasket.
Having pressed the lock cover, sink it together with the element into the cap and turn it 45º.
The protrusions of the cap flange will enter the grooves of the cover, after which the spring will press the cover into the working position.
- 6. Screw the cap with the element onto the housing fitting 1 and tighten with a torque of 20-40 Nm (2-4 kgf m).
- 7. With the engine running, make sure there is no oil leakage through the cap seal.
After four replacements of the filter element, replace the seal 2.
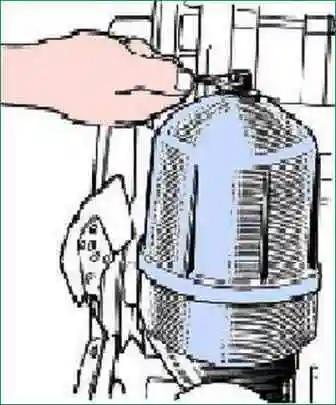
Flushing the centrifugal oil filter
1. Unscrew the nut of the filter cap (Fig. 4) and remove the cap.
2. Unscrew the rotor mounting nut; remove the rotor with thrust washer 9 (Fig. 5).
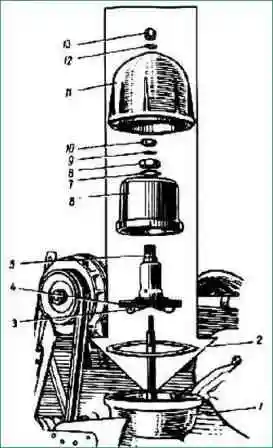
- 3. Disassemble the rotor, for which unscrew the nut 8, remove the washer 7 and the cap 6 of the rotor.
- 4. Remove deposits from cap 6 and rotor 5 and wash them in diesel fuel.
- 5. Assemble the filter in reverse order, checking the condition of gaskets 2 and 4, rotor nozzles 3 and washer 12.
If necessary, replace the gaskets and clean the rotor nozzles.
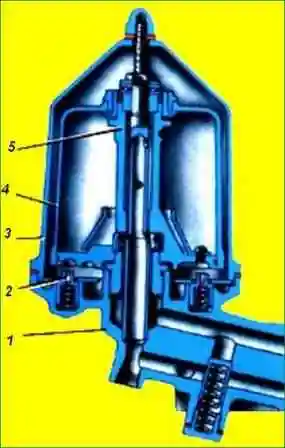
Maintenance of lubrication system valves
If the pressure reducing valve or the differential valve of the lubrication system may be stuck, they must be removed by unscrewing the mounting bolts. Wash the valves in diesel fuel without disassembling and reinstall.
In case of malfunctions (spring breakage, etc.), replace the valve assembly.
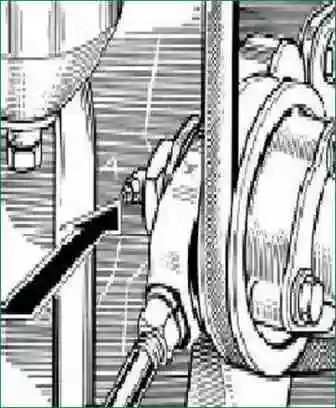
Lubricating the compressor drive tensioner pulley bearings
Regularly fill the bearing cavity of the compressor drive tensioner pulley with grease.
Inject the lubricant with a mechanical or manual supercharger through a grease fitting (Fig. 7) located on the pulley axis from the side of the cylinder block until lubricant appears through the oil seal on the rear end of the pulley (4–5 strokes when filling with a manual syringe).
Lubrication interval 500 hours of operation.
It is recommended to flush the tensioner bearings once a year in the following sequence:
- 1. Unscrew the nut securing the tensioner pulley axle and the nut of the tensioner bolt.
- 2. Unscrew the tensioner bolt from the pulley axle and remove the pulley with the axle.
- 3. Unscrew the three bolts and remove the pulley cover.
- 4. Remove the old grease from the pulley (without disassembling it) and wash it in kerosene or diesel fuel.
- 5. Apply grease to the bearings and cover cavity and replace the cover.
- 6. Install the pulley with the axle in place, put on the belt, adjust the belt tension and tighten the nut and locknut of the axle.
- 7. Fill the bearing cavity with grease through the grease fitting until grease appears through the oil seals at the rear end of the pulley.
")

")
")
")
")
")
")
")