We remove the instrument panel to access the heater and for other repairs
The panel of a car manufactured before 2009 (How to remove and install the panel of a car before 2009) is not very different, but there are some features.
Therefore, let's consider this work in as much detail as possible.
Disconnect the negative terminal of the battery.
Remove the mounting block for this:

Using a Phillips screwdriver, unscrew the two screws securing the mounting block cover

Pressing the top edge of the cover, remove it from engagement with the instrument panel

Moving the cover up, we remove the pins from the rubber bushings

Removing the cover.

Use a Phillips screwdriver to unscrew the screw securing the mounting block

Remove the block holders from the brackets
Disconnect five pads of the instrument panel wiring harness from the mounting block.

Using a screwdriver to press the retainer of the remote relay socket

We move it off the block guides and remove the pads together with the relay.
We also remove the remaining pads from the remote relay.

Removing the mounting block
To make it easier to remove the dashboard, remove the front seats.

Bending back edge of the seal, squeeze out the trim of the left front pillar

And remove the trim, removing three pins of its fastening from the holes of the pillar.
Also remove the trim of the right front pillar.

Using a Phillips screwdriver, unscrew the screw securing the left side of the dashboard insert.
Also unscrew the screw securing the right side of the dashboard insert.

Lifting the dashboard insert, disengage its spring holders and remove the insert.
Lower the steering column to the floor (see the article - "Removing and installing the steering column of a car VAZ-2123").

Using a Phillips screwdriver, unscrew the two screws securing the console trim panel on the right side.
Also unscrew the two screws on the left side of the console.

Using a Phillips screwdriver, unscrew the two screws securing the upper console trim panel.

Remove the container of the head unit of the audio accompaniment.

Move the cover away from the console of the dashboard.

Disconnect the wiring blocks from the cigarette lighter, the outside mirror control unit and the front seat heating switch unit.

Removing the dashboard console trim
Removing the glove compartment for this:

Open the lid of the glove compartment, and lifting the lid, remove the end of the cord from the slot in the lid.
Also disconnect the cord from the other side of the glove compartment lid.

Use a Phillips screwdriver to unscrew the screw that secures the side lining of the glove compartment.

Unscrew the two screws that secure the screen of the console of the dashboard

unscrew the two screws of the lower screw of the lower fastening of the box to the console of the dashboard.

After opening the lid of the box, on the left side unscrew the two screws of the side fastening of the box body to the console of the dashboard.

Unscrew the screw of the upper left mount

Unscrew the screw of the upper middle mount of the glove compartment body

On the right side, unscrew the two screws securing the trim of the drawer.

Having moved the trim away from the drawer body, on the right side, unscrew the screw securing the upper casing of the drawer

Using a short Phillips screwdriver, unscrew the two screws that secure the lower mount of the glove compartment body.

Tilting the glove compartment, disconnect the wire blocks from the terminals of the glove compartment light switch

Disconnect the terminals from the light itself

Removing the glove box
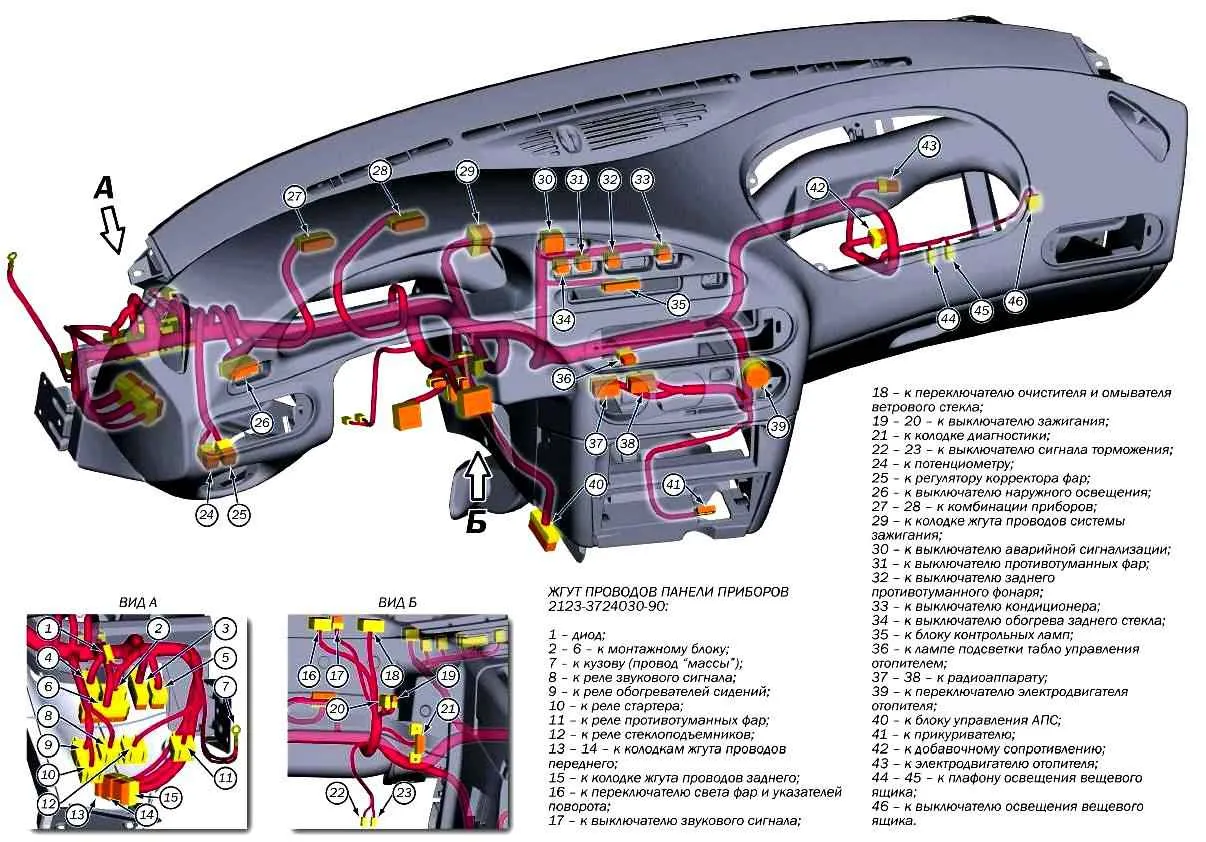
Arrangement of wiring and wiring blocks of the instrument panel: 1 - diode; 7 - to the body (ground wire); 2-6 - to the mounting block; 8 - to the horn relay; 9 - to the seat heater relay; 10 - to the starter relay; 11 - to the fog light relay; 12 - to the window lift relay; 13 - 14 to the front wiring harness connectors; 15 - to the rear wiring harness connector; 16 - to the headlight and turn signal switch; 17 - to the horn switch; 18 - to the windshield wiper and washer switch; 19-20 - to the ignition switch; 21 - to the diagnostic connector; 22-23 - to the brake light switch; 24 - to the potentiometer; 25 - to the headlight range control regulator; 26 - to the outside lighting switch; 27-28 - to the instrument cluster; 29 - to the ignition system wiring harness connector; 30 - to the hazard warning light switch; 31 - to the fog light switch; 32 - to the rear fog light switch; 33 - to the air conditioning switch; 34 - to the rear window heating switch; 35 - to the control lamp unit; 36 - to the heater control panel backlight lamp; 37-38 - to the radio unit; 39 - to the heater electric motor switch; 40 - to the APS control unit; 41 - to the cigarette lighter; 42 - to the additional resistor; 43 - to the heater electric motor; 44-45 - to the glove compartment light; 46 - to the glove compartment light switch.
Using a Phillips screwdriver, unscrew the five screws securing the console screen and remove the screen.

Remove the instrument cluster (see Features of the Niva Chevrolet instrument cluster).
Remove the heating, ventilation and air conditioning control unit (see Removing the air conditioning control unit in the VAZ-2123 cabin).

Using a Phillips screwdriver, unscrew the four screws of the upper fastening of the dashboard.

Using a Phillips screwdriver, unscrew the screw of the side fastening panels on the right side.
Also unscrew the screw on the left side of the instrument panel.

Unscrew the six screws of the lower instrument panel mount.

Disconnect the wiring blocks from the instrument lighting regulator and the headlight corrector regulator.
Remove the instrument panel
Install the instrument panel in the reverse order.