The rear wheel brakes are drum brakes, with two-piston wheel cylinders with automatic adjustment of the gap between the shoes and the drum
Thrust rings are inserted into the cylinder with interference, limiting the free movement of the pistons (after braking is completed), thereby maintaining a constant gap between the pads and the drum.
As the pads wear, the rings shift by the amount of wear.
In the lower hole of the brake pads there are eccentrics for adjusting the position of the pads after replacing them.
The minimum permissible thickness of the rear brake pads when worn is 1 mm. The maximum permissible internal diameter of the brake drum is 283 mm.
The rear brake mechanism is shown in the figure.
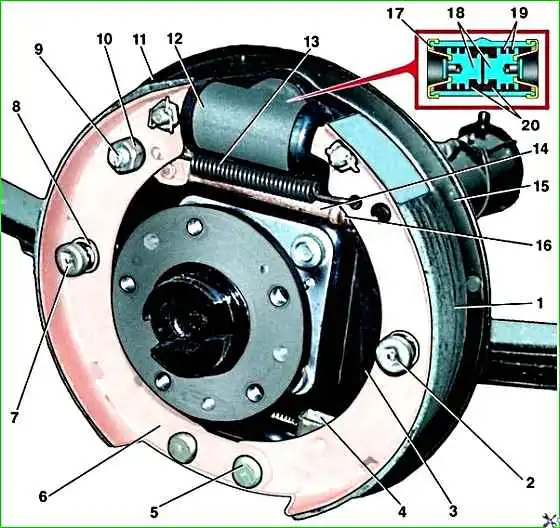
Rear brake mechanism: 1 – brake pad; 2 – spring cup; 3 – drive lever; 4 – parking brake cable; 5 – support pin of the pads; 6 – support pin plate; 7 – spring cup rod; 8 – pressure spring; 9 – adjusting eccentric of the parking brake; 10 – nut; 11 – protective cap; 12 – wheel cylinder; 13 – tension spring; 14 – expansion lever; 15 – brake shield; 16 – release lever spring; 17 – protective ring; 18 – piston; 19 – cuff; 20 – piston thrust ring
Removing and installing the brake drum
Removal:
Check the position of the parking brake lever, which should be in the lowest position.
Unscrew the lock nut 1 and loosen the adjusting nut 2 of the equalizer, thereby loosening the tension of the parking brake cable on the corresponding side.


Unscrew the three mounting screws and, if necessary, remove the brake drum using a screwdriver.
Inspection:
Clean the brake drum.
Measure the diameter of the working surface of the drum with a caliper. The maximum permissible drum diameter is 283 mm.
If the diameter is more than acceptable, the drum must be replaced.
If there are scratches, the drum can be bored, but taking into account that after boring the diameter of its working surface is no more than permissible.
It is recommended to replace the brake drums on both sides.
Installation:
Install the brake drum in the reverse order of removal. In this case, it is necessary to lubricate the seat on the axle shaft flange with graphite grease or Litol-24 grease.
Replacing brake pads
Install support bars under the front wheels.
Loosen the rear wheel bolts.
Raise and place the rear of the vehicle on supports.
Remove the wheel.
Check the position of the parking brake lever, which should be in the lowest position.

Unscrew the lock nut 1 and loosen the adjusting nut 2 of the equalizer, thereby loosening the tension of the parking brake cable on the corresponding side.
Remove the brake drum.

Press the upper cup 1 of the pressure spring and, turning it 90°, remove it together with the spring 2, while holding the rod of the cup 3 on the back side of the brake shield.
Then remove the lower cup 4 of the pressure spring, turning it 90°, and remove the rod 3.
In the same way, remove the spring and cups from the other pad.

Disconnect the upper tension spring 1 from the pads 2.

Remove the toes of the 2 pads from the grooves of the pistons of wheel cylinder 1.
Spread the pads 3 and remove b spring 5 from release lever 4.

Unscrew the nuts 1 of the support pins 2 of the pads on the reverse side of the brake shield 3.

Remove the pads together with the support pins and eccentrics and disconnect the tip of the parking brake cable 1 from the drive lever 2 of the rear pad.

Remove the eccentrics from the pads.
Remove the cotter pins, unscrew the fastening nuts and remove the expansion and drive levers from the pads.

Unscrew the nut and remove the parking brake adjusting eccentric 1
Install the pads in reverse order, taking into account that the length of the friction lining of the front pad is 300 mm, and the length of the rear pad is 250 mm.
When installing support fingers 1, point their flats (arrows in the photo) towards each other.

Press the pistons inside the wheel cylinder.
If difficulties arise with installing the brake drum, it is necessary to set the adjusting eccentric 2 of the parking brake so that this corresponds to the required free play of the drive lever.
After finishing work, press the brake pedal vigorously several times to set the required gaps between the pads and the working surface of the drums.
Removing the brake cylinder
Remove the brake drum.
Unscrew nut 1 securing the tube from the back of the brake shield and disconnect tube 2 from the wheel brake cylinder fitting.

Plug the hole in the tube. Unscrew the two mounting bolts 3 and remove the wheel brake cylinder.
Disassembling the brake cylinder
Use a screwdriver and remove the protective caps 1 on both sides of the cylinder with polyurethane foam gaskets.

Rotate pistons 2 90° in any direction and remove them from the cylinders. If necessary, unscrew bleeding valve 3.
Inspection:
Wash the wheel brake cylinder parts with clean brake fluid and dry.
The cylinder mirror should not have marks, cavities or areas of corrosion.
If these defects are present, the cylinder must be replaced.
There should be no mechanical damage on the threaded parts of the cylinder.
The wheel cylinder cuffs must be resilient and elastic.
Torn, swollen and hardened cuffs, as well as those with marks on the working surfaces, must be replaced.
The surfaces of the pistons in contact with the cylinder bore must not show signs of one-sided wear. Otherwise, it is recommended to replace the wheel cylinder assembly.
The thread of the brake pipe tip must not be mechanically damaged.
The tip fitting should not have cracks or signs of visible deformation.
Assembly:
Lubricate the inner surface of the cylinder with new brake fluid.
Lubricate the pistons with cuffs with new brake fluid and insert them into the cylinder so that the protrusions on the rear ends of the pistons fit into the grooves of the thrust rings.
Rotate the pistons 90°. Lubricate the protective rings with new brake fluid and install them in the cylinder until they touch the pistons.
Turn the outer edges of the protective caps inside out and install them with the inner edge into the grooves on the pistons.
Tuck the outer edges of the protective caps into the outer grooves on the cylinder.
Installation:
Install the brake wheel cylinder in the reverse order of removal.
Tighten the wheel cylinder mounting bolts to a torque of 8–18 Nm (0.8–1.8 kgf m).
After installation, it is necessary to bleed the brake mechanism being repaired.
")

")
")
")
")
")
")
")