Removing the heater
Disconnect the wire from the negative terminal of the battery.
Drain the coolant.
Remove the instrument panel - article - "Removal of the GAZ-3110 instrument panel"
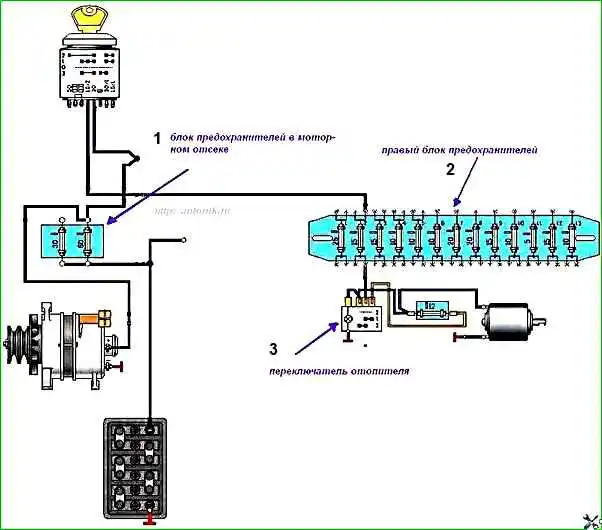
Figure 1 shows a diagram of the connection of the electrical parts of the heater.
Next:

Remove the spring holder 2, loosen the fastening bolt 1 and disconnect the heater valve rod 3 from the valve drive lever.
If an air intake damper is installed, it is necessary to disconnect its rod from the lever in the same way.

Remove holder 1 from the rod by turning it around its axis.
Disconnect heater damper rod 2, holding the holder.
Remove the spring holder, loosen bolt 4 of the fastening and disconnect rod 3 of the ventilation damper from the lever.

Disconnect block 1 with the heater motor wires.
Disconnect the two terminals 2 from the resistor.

Loosen the clamps and disconnect the drain and fluid supply hoses from the heater tap from the engine compartment.

Remove the central air blower 1 from the heater pipes.
Unscrew two bolts 4 of the fastenings and remove both pipes 2 for blowing the windshield together with corrugated hoses 3 on both sides of the heater.

Unscrew the three heater mounting nuts
Lower the right side of the heater until it comes off the studs. This must be done carefully so as not to damage the heater radiator pipes
Remove the heater by pulling it towards you
Disassembling the heater
Remove the mounting spring bracket by picking it up with a screwdriver.

Unscrew the five bolts securing the upper casing on both sides of the heater housing.

Remove the upper casing 1 with the rubber gasket 2 (glued), taking the upper radiator pipe 3 out of the casing hole.

Pull up the radiator with the foam gasket from the lower casing.

Turn the impeller cover 1 upward by 90° and disengage the two plastic fastening latches.
Pull up the lower flap together with axis 2.

Donkey beat the locking screw 1 and remove the turbine 2 from the heater motor shaft.

Unscrew the two engine mounting nuts located under the turbine and remove the engine
Replacing heater motor brushes

Remove lock ring 1 with washer 2 from the armature shaft.

Unscrew two screws 1 from the opposite end of the engine and remove two cage nuts 2.

Pressing the anchor, push cover 2 with brush holder 3 out of the body.
Unsolder the harnesses of brushes 1, remove the brushes, insert new ones and solder the harnesses.

Hold the brushes in the brush holder with two screwdrivers and pull out the shaft so that the commutator comes out of the housing.
Place the brushes on the commutator and push the cover onto the shaft until it stops
Push the anchor together with the cover into the housing.
Turn the cover so that the protrusions on it fit into the grooves on the body. Please note that the protrusions and grooves have different sizes.
Insert the cage nuts and tighten the two screws securing the cover.
Install the washer and retaining ring on the armature shaft.
Assemble and install the heater in the reverse order.
From operating experience
Of course, on the Volga the stove is not a fountain. Because the engine on these cars operates in completely different temperature conditions compared to VAZ cars. Therefore, you need to take this into account in winter.
To achieve a comfortable temperature inside the car, you need to shade the engine radiator and insulate both the engine compartment itself and the interior. Ensure the tightness of doorways, etc.
Recently, many Volga drivers have begun to install an additional electric pump on the small circle of the cooling system. Pretty good results.
And of course you need to check the condition of the stove radiator. Many people think that their radiator is clogged. Although upon opening and disassembling it turned out that the radiator honeycombs were simply clogged with leaves and dust on the outside.
You should not forget that the coolant flows through the heater radiator in a small circle. The thermostat forces it to do this, which must be closed while the engine is warming up.
And if for some reason the thermostat was removed or does not work correctly, then the proper temperature of the stove cannot be achieved.
")

")
")
")
")
")
")
")