Die Instrumententafel eines Wolga-Autos wird normalerweise bei Karosseriearbeiten sowie bei der Reparatur der Heizung usw. entfernt.
Ausbau der Instrumententafel
Trennen Sie das Kabel vom Minuspol der Batterie.
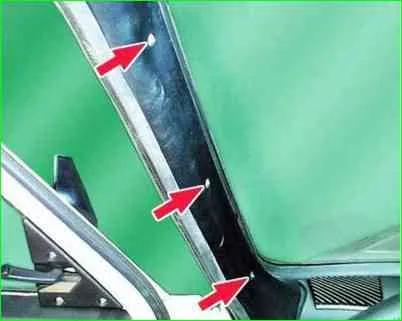
Lösen Sie die drei Befestigungsschrauben und entfernen Sie die A-Säulenverkleidung auf beiden Seiten.
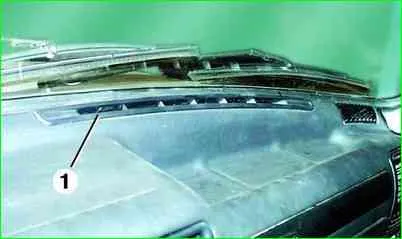
Ziehen Sie mit einem Schraubendreher die Verlängerung 1 der Instrumententafel auf beiden Seiten nach oben und zu sich heraus.
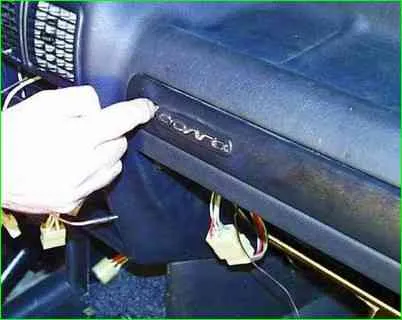
Bewegen Sie die Zierleiste mit der Aufschrift „Wolga“ auf der Abdeckung der Sicherungsblöcke nach rechts.
Führen Sie Ihren Finger in das Loch ein und ziehen Sie die Abdeckung des Sicherungskastens zu sich hin, um sie zu entfernen.
Wenn sich die Abdeckung nur schwer entfernen lässt, können Sie sie mit einem Schraubenzieher abhebeln.
Entfernen Sie zwei Schrauben, mit denen beide Sicherungsblöcke befestigt sind.
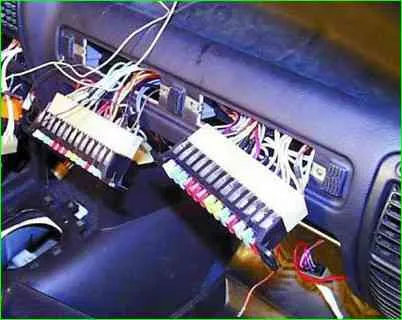
Ziehen Sie die Sicherungsblöcke von der Schalttafel zu sich hin, sodass die Steckerblöcke der Blöcke aus der Schalttafel herauskommen.
Markieren Sie die Anschlüsse, trennen Sie sie und schieben Sie sie zurück in das Loch in der Instrumententafel.
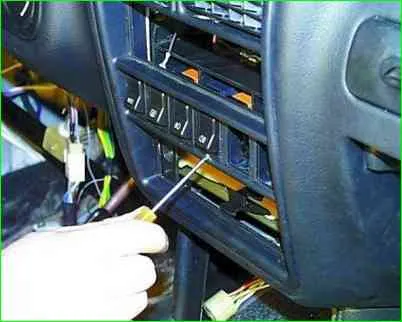
Entfernen Sie den Empfänger. Wenn der Empfänger nicht installiert ist, entfernen Sie den Stecker.
Benutzen Sie einen Schraubenzieher und ziehen Sie die Schalter zu sich hin.
Ziehen Sie die Schalter heraus, sodass die Anschlüsse vollständig herauskommen.
Markieren Sie die Anschlüsse, trennen Sie sie und schieben Sie sie zurück in das Loch in der Instrumententafel.
Drehen Sie die Stecker um 90° durch das Loch für den Radioempfänger und ziehen Sie sie hinter der Instrumententafel heraus.
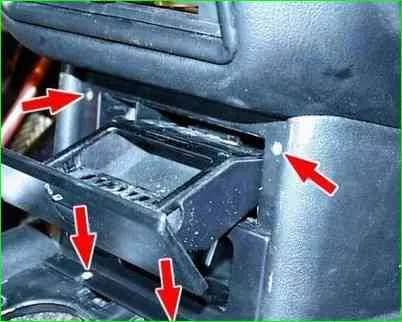
Entfernen Sie die Abdeckung vom Schalthebel. Der Einfachheit halber können Sie den Schalthebel abnehmen.
Lösen Sie die beiden unteren Schrauben, mit denen die vordere Aschenbecherverkleidung befestigt ist.
Öffnen Sie den Aschenbecher und lösen Sie die beiden oberen Schrauben, mit denen die vordere Aschenbecherverkleidung befestigt ist
Ziehen Sie die vordere Aschenbecherverkleidung zu sich hin.
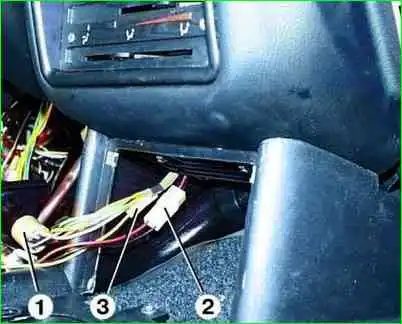
Trennen Sie die Anschlüsse des Warnblinkschalters 1, des Zigarettenanzünders 2 und der Glühbirne des Zigarettenanzünders 3.
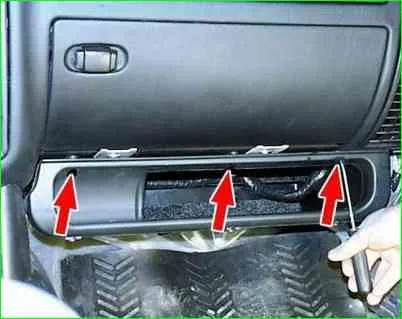
Lösen Sie die drei Befestigungsschrauben und entfernen Sie die untere Ablage, indem Sie sie zu sich ziehen.
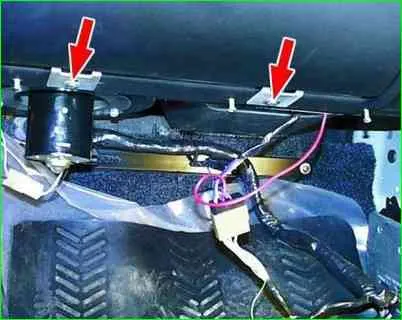
Lösen Sie die beiden Schrauben und ziehen Sie das Handschuhfach zu sich hin.
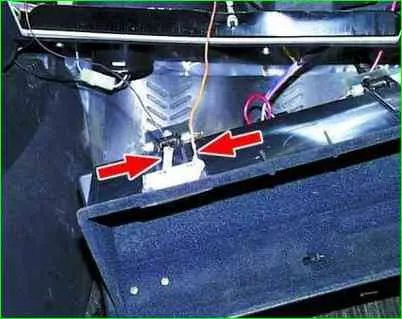
Trennen Sie die beiden Steckverbinder mit Drähten von den Kontakten der Handschuhfachleuchte.
Stecken Sie einen kleinen Schraubendreher in das Loch im Griff des Heizklappen-Bedienhebels und entfernen Sie den Griff durch Drücken der Verriegelung vom Hebel.
Entfernen Sie auf die gleiche Weise den Griff des Heizhahn-Bedienhebels.
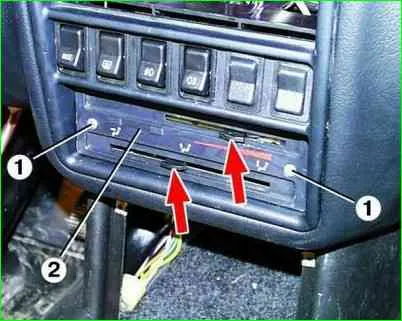
Die beiden Schrauben 1 herausdrehen und die Verkleidung 2 des Heizungs-Lüftungsantriebs entfernen.
Schieben Sie den Antrieb in die Instrumententafel.
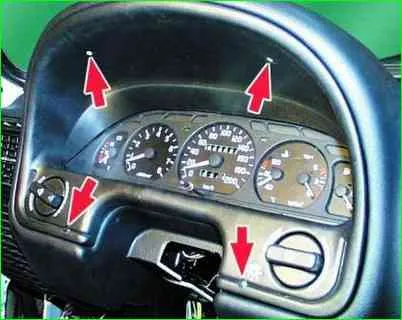
Entfernen Sie die oberen und unteren Lenksäulenverkleidungen sowie die Verstärkung der Instrumententafel.
Schrauben Sie die Befestigungsschrauben der Lenksäule ab, senken Sie sie auf den Vordersitz ab und entfernen Sie die Lenksäulenschalter.
Lösen Sie die vier selbstschneidenden Schrauben und entfernen Sie die Verkleidung des Kombiinstruments, indem Sie sie zu sich ziehen.
Stecker für Zentrallichtschalter 1 und Leuchtweitenregulierung 2 markieren und trennen.
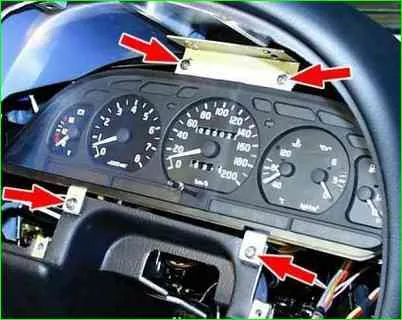
Lösen Sie die vier selbstschneidenden Schrauben, mit denen das Kombiinstrument befestigt ist.
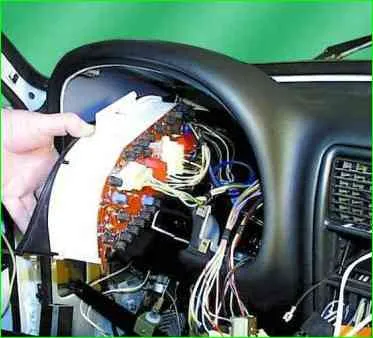
Drehen Sie das Kombiinstrument um 90° und entfernen Sie es von der Instrumententafel.
Markieren und trennen Sie die Steckverbinder vom Kombiinstrument.
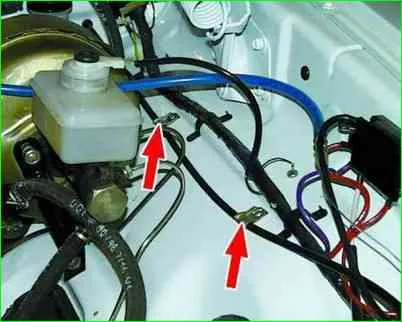
Lösen Sie die Motorhaubenverriegelungsstange im Motorraum, indem Sie die beiden Halterungen trennen.
Schieben Sie die Stange ein wenig in die Kabine hinein.
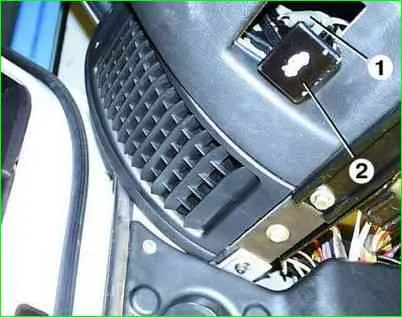
Trennen Sie die Rückholfeder 1, lösen Sie die beiden Schrauben, mit denen der Haubenverriegelungsgriff 2 befestigt ist, und eine Schraube, mit der der Antriebsabdeckungshalter befestigt ist.
Ziehen Sie den Griff von der Instrumententafel zu sich und trennen Sie ihn durch Drehen von der Stange.
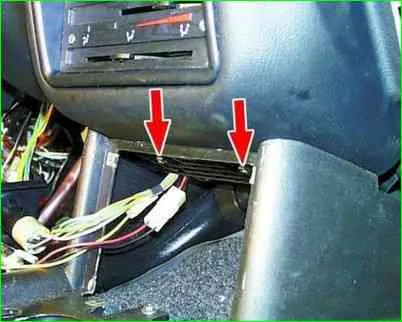
Lösen Sie die beiden Muttern, mit denen die Instrumententafel von der Konsole befestigt ist, von unten durch das Loch für den Aschenbecher.
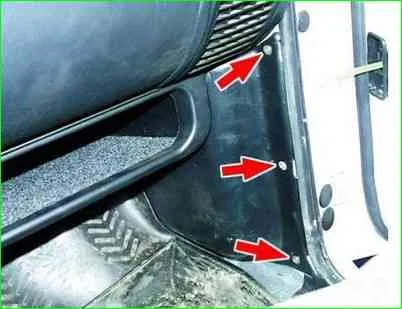
Lösen Sie die drei Befestigungsschrauben (vier auf der linken Seite) und entfernen Sie die Seitenverkleidungen des Vorderteils auf beiden Seiten.
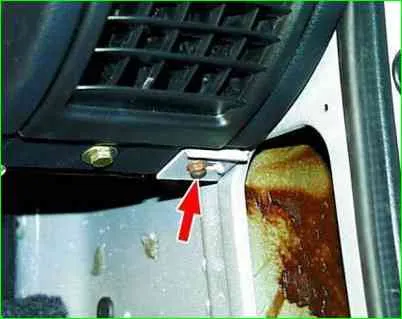
Lösen Sie eine selbstschneidende Schraube von unten, um die Instrumententafel auf beiden Seiten an den Halterungen an der Karosserie zu befestigen.
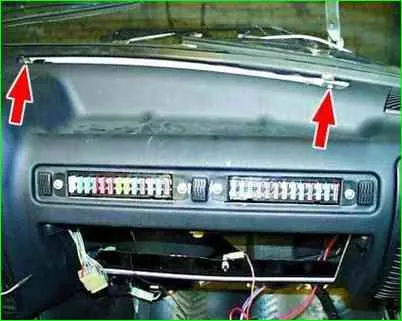
Lösen Sie zwei selbstschneidende Schrauben der oberen Plattenbefestigung auf beiden Seiten
Schieben Sie die Verkleidung zu sich hin, sodass zwischen der Verkleidung und der Trennwand genügend Abstand zum Entfernen der Kabelbäume vorhanden ist.
Trennen Sie die Wellschläuche der seitlichen Luftrohre von den Windschutzscheibengebläserohren 1.
Wenn sich die Schläuche nicht von den Rohren entfernen lassen, lösen Sie die selbstschneidenden Schrauben, mit denen die Rohre 1 zum Blasen der Windschutzscheibe befestigt sind.
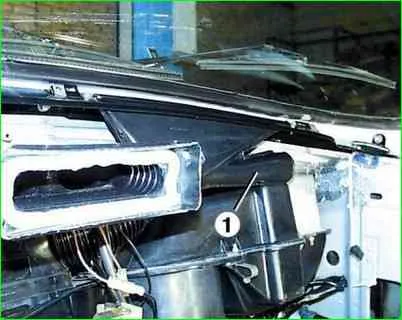
Lösen Sie die drei selbstschneidenden Schrauben der unteren Befestigung des Halters 1 des Kabelbaums hinter den Sicherungsblöcken und entfernen Sie den Kabelbaum durch Biegen des Halters 1 daraus.
Wenn der Kabelbaum nicht entfernt werden kann, entfernen Sie die Halterung vollständig, indem Sie die drei oberen Schrauben der Befestigung 2 lösen.
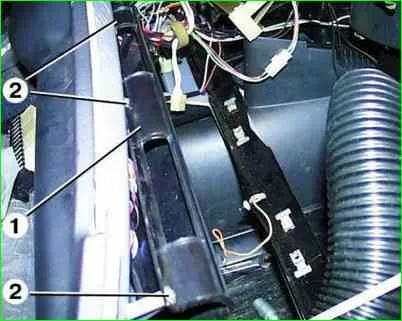
Trennen Sie die beiden Metallhalterungen des Kabelbaums 1 vom mittleren Teil der Platte, indem Sie die selbstschneidenden Schrauben lösen.
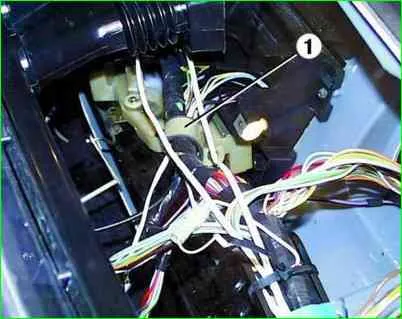
Entfernen Sie die Kunststoffklemmen, mit denen die Kabelbäume an der Halterung hinter dem Kombiinstrument befestigt sind.
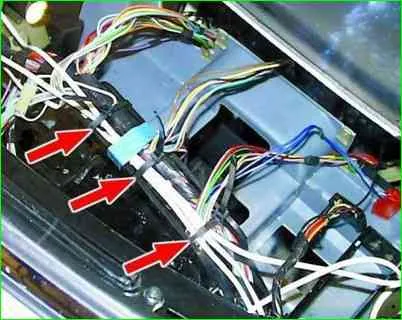
Wenn sich die Klammern nicht entfernen lassen, müssen sie abgeschnitten werden.
Entfernen Sie die Kabelbäume aus der Halterung und führen Sie sie hinter die Instrumententafel.
Entfernen Sie die Instrumententafel, indem Sie sie zu sich ziehen. In diesem Fall ist etwas Kraftaufwand erforderlich, da das Paneel mit leichter Spannung zwischen den Türdichtungen hindurchgeht.
Entfernen der Mittelkonsole
Trennen Sie das Kabel vom Minuspol der Batterie.
Entfernen Sie den Schalthebel.
Lösen Sie die vier Schrauben und entfernen Sie die vordere Aschenbecherbaugruppe, während Sie gleichzeitig die Steckverbinder mit den Kabeln vom Zigarettenanzünder und dem Warnblinkschalter trennen.
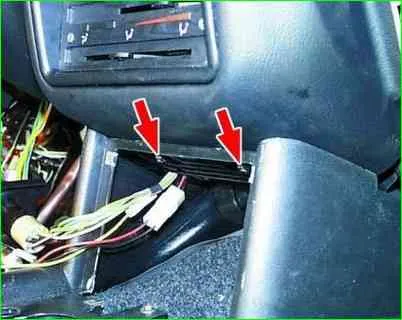
Lösen Sie die beiden Muttern, mit denen die Konsole an der Instrumententafel befestigt ist.
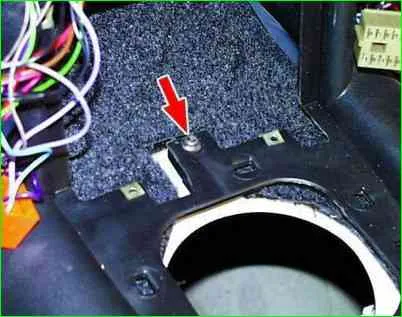
Lösen Sie die zentrale Schraube, mit der die Konsole befestigt ist.
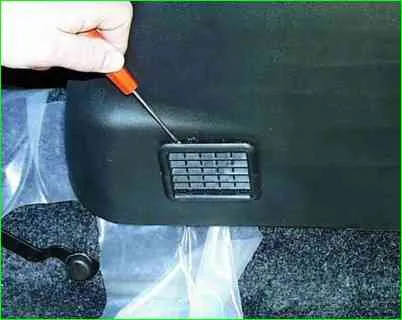
Bewegen Sie die Vordersitze nach vorne und entfernen Sie die beiden Verteilerrohre auf beiden Seiten der Konsole
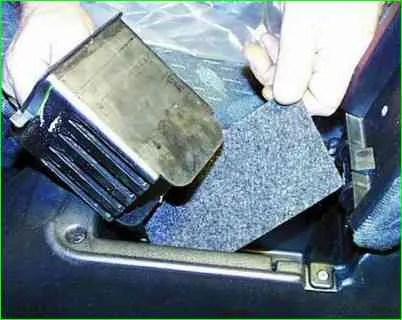
Öffnen Sie den Boxdeckel und entnehmen Sie die Kassettenbox mit Einsatz
Lösen Sie die beiden Befestigungsschrauben.
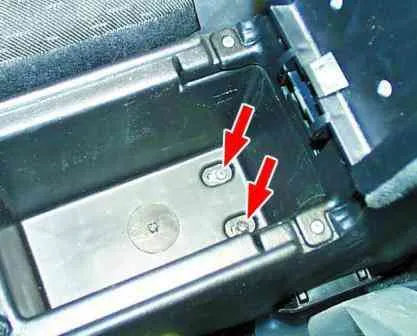
Entfernen Sie die Mittelkonsole, indem Sie die Steckverbinder mit den Kabeln davon trennen.


