The buses are equipped with rear axles manufactured by Ryazan Avtoagregat LLC (abbr. RAA) or KAAZ OJSC
The design of the bridges does not differ significantly.
When servicing the rear axle, the oil level in the crankcase is checked and the oil is changed, the fastenings of the axle shaft flanges, the gearbox housing, the drive gear bearing couplings, the drive gear flange nuts are checked, the breather is cleaned, the tightness of the axle seals is checked, and the adjustment of the wheel hub bearings is checked.

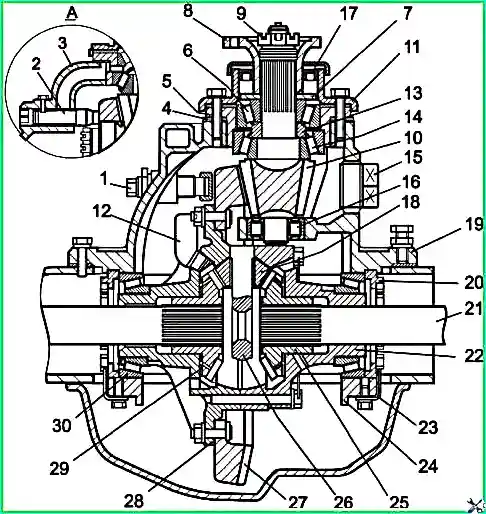
Main gear ("KAAZ"): 1 - adjusting screw; 2 - bushing; 3 - upper channel; 4 - adjusting shims; 5 - coupling; 6, 14, 16, 30 - bearings; 7 - oil removal ring; 8 - flange; 9 - nut; 10 - drive gear; 11 - cover; 12 - oil catcher; 13 - adjusting ring; 15 - filler plug; 17 - cuff; 18 - satellite; 19 - crankcase; 20 - nut; 21 - axle shaft; 22, 28 - satellite boxes; 23 - locking plate; 24 - cover; 25 - axle gear; 26 - cross; 27 - driven gear; 29 - support washer; A - cross-section along the oil channel of the drive gear bearings
Oil is poured into the axle housing through filler hole 15 (Fig. 1).
Oil is poured until a leak appears:
- - from the control hole in the rear crankcase cover (for the “PAA” bridge);
- - from the filling hole (for the KAAZ bridge).
The used oil is drained after preheating the unit through the drain hole with the filler plug removed.
For the rear axle manufactured by RyazanAvtoagregat LLC, during the first maintenance-1 and first maintenance-2, it is recommended to check the tightness of the nut securing the flange of the main gear drive gear.
The tightening torque of the nut should be (350-440) Nm.
The main drive bearings, side clearance and contact in the gear mesh are adjusted at the factory and, as a rule, do not require adjustments in operation.
Their adjustment is necessary when replacing any parts or when there is a lot of wear on the bearings and requires special care.
Incorrect adjustment leads to accelerated wear of the main gears.
The increased lateral clearance in the meshing of the main gears, resulting from wear of the teeth, cannot be reduced by adjustment, as this will lead to a violation of the relative position of the worn-in surfaces of the teeth and will cause increased noise or breakage of the teeth.
It is not recommended to change the position of adjusting screw 1 during operation.
Adjustment must be made only if the nut is loosened.
To do this, adjusting screw 1 (KAAZ bridge) must be screwed in completely, then unscrewed 1/6 of a turn and secured with a nut.
The bridge breather should be periodically washed and blown out with compressed air.
If the breather is clogged, the pressure in the axle crankcase may increase and oil may leak through the cuffs and flange connections.
Adjust the bearings of the front and rear wheel hubs only if the axial clearance in the bearings increases by more than 0.15 mm or if the hub heats up due to excessive tightening of the bearing nut.
Adjusting the tightening of the rear wheel hub bearings ("RAA"):
- Raise the wheel with a jack and make sure that the brake pads do not touch the drum when the wheel rotates.

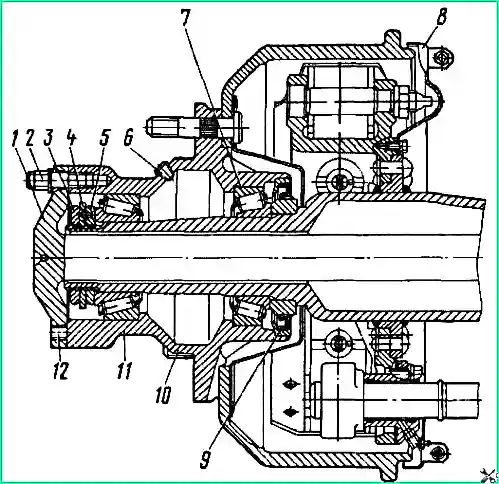
Rear wheel hub "RAA": 1 - axle shaft; 2 - axle shaft fastening nut; 3, 5 - hub bearing nuts; 4 - lock washer; 6 - oil filler plug; 7 - hub; 8 - wheel mounting stud; 9 - cuff; 10 – hairpin; 11 - hub; 12 - hole for the axle shaft puller bolt
- Unscrew nuts 2 (Fig. 2) securing the axle shaft, remove the conical bushings and remove the axle shaft.
To remove the axle shaft, screw M12 bolts into two special holes 12.
- Unscrew the lock nut 3 and remove the lock washer 4.
- Turning the wheel in both directions, tighten nut 5 to a torque of (60-80) Nm.
- Unscrew nut 5 by (1/4-1/3) turn until the nut pin aligns with one of the holes in lock washer 4.
- Tighten locknut 3 to a tightening torque of (250-300) Nm.
When adjusted correctly, the wheel should rotate evenly and freely in both directions.
Adjusting the tightening of the rear wheel hub bearings ("KAAZ")
- Raise the rear axle with a jack so that the tires do not touch the floor.

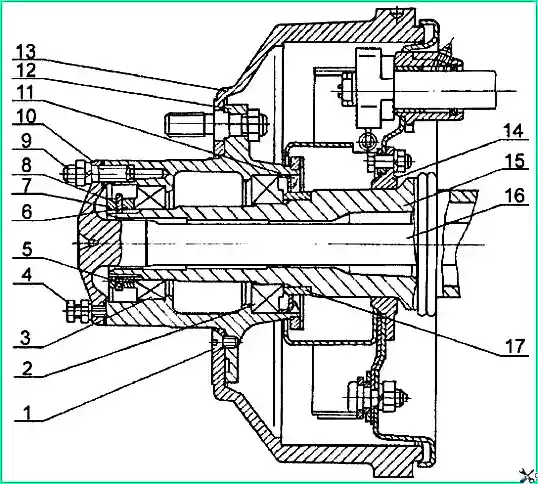
Rear wheel hub "KAAZ": 1 - brake drum fastening screw; 2, 3 - bearings; 4 - axle shaft puller bolt; 5 - lock washer pin; 6 - hub bearing nut; 7 - lock nut; 8 - lock washer ; 9 - axle shaft mounting stud; 10 - gasket; 11 - oil seal; 12 - hub; 13 - brake drum; 14 - axle shaft housing flange; 15 - axle shaft housing; 16 - axle shaft; 17 - bushing
- Remove axle shaft 16 (Fig. 3) by loosening the lock nut and screwing in the bolt puller 4.
- Unscrew the lock nut 7, remove the lock washer 8 and, loosening the nut 6 securing the bearings by (1/3-1/2) turn, check whether the wheel rotates freely. If the wheel rotates poorly, eliminate the cause (brake pads catching, oil seal sticking, etc.).
- Tighten the nut 6 securing the bearing with a wrench with a wrench length (350-400) mm by hand until the wheel rotates tightly on the bearings.
The wheel tightened in this way should stop immediately after a push by hand.
- Loosen nut 6 securing the bearings by 1/8 turn.
- Install lock washer 8 and make sure that lock pin 5 fits into one of the slots in washer 8.
If the pin does not fit into the slot, turn the nut one way or the other so that the pin fits into the nearest slot in the lock washer.
- Screw and tighten lock nut 7. When tightened correctly, the wheel should rotate freely without noticeable axial play.
- Insert axle shaft 23, install spring washers and tighten the nuts of studs 9 securing the axle shaft.
Lubrication of the rear wheel hub bearings of PAZ-32053-07 buses with an axle produced by JSC KAAZ is carried out with transmission oil coming from the rear axle housing along the axle housings.
When changing the oil in the rear axle, fill the hub cavity by raising the right and left wheels alternately to a height of at least 200 mm.
Do not add other oils to the rear wheel hubs.
Lubrication of the rear wheel hub bearings of PAZ-4234 buses with an axle produced by JSC KAAZ is carried out with Litol-24 grease.
Lubrication of rear wheel hub bearings ("RAA") is carried out, depending on the design of the hub, in two options:
- - with bearings lubricated with grease;
- - with oil lubrication used for the rear axle gearbox.
Externally, the hubs can be distinguished by the presence or absence of plug 6.
If there is no plug, then the bearings should be lubricated with grease.
If there is a plug, use the same oil as for the main gear.
In this case, to change the oil, you should jack up the wheel, unscrew plug 6, turn the wheel with the hole down and drain the oil.
Turn the wheel with the hole facing up and fill in 0.6 liters of oil.
To replace the lubrication of the front and rear wheel hub bearings, if grease is used, the hubs must be removed.
The hubs should be removed carefully so as not to damage the cuff 9.
Rinse the bearings thoroughly and apply lubricant between the rollers and cages evenly throughout the entire bearing cavity, and also apply a thin layer of lubricant to the inner surface of the seal.
Possible rear axle malfunctions and troubleshooting methods
Increased noise
- Incorrect adjustment of the main gear gear engagement
Adjust
- Wear or scuffing of gear teeth
Replace faulty parts
- Misalignment or bearing wear
Adjust or replace faulty parts
Large angular play of drive gear
- Wear of axle shaft splines
Replace faulty parts
- Wear of gear teeth
Replace faulty parts
- Misalignment or bearing wear
Adjust or replace faulty parts
Oil leak
- Worn seals, loose tightening or clogged breather
Replace faulty parts, tighten bolts, clean breather


