The cardan transmission of the bus consists of two shafts (Fig. 1), an intermediate support and three cardan joints

Cardan drive: 1 - driveshaft flange; 2 - balancing plate; 3 - intermediate cardan shaft; 4 - oiler; 5 - intermediate shaft support cushion; 6 - bearing; 7 - sealing ring; 8 - spline fork seal; 9 - splined cardan fork; 10 - cardan shaft; 11 - cardan shaft cross
The intermediate driveshaft support consists of a ball bearing mounted in a rubber cushion.
In the rear cover of the support there is an oiler on the side for lubricating the bearing.
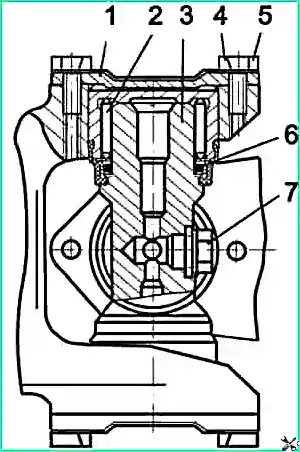
The design of the bearings of the cardan joint crosspieces is shown in Fig. 2.

Cardan cross: 1 - bearing cover; 2 - bearing; 3 - cardan cross; 4 - locking plate; 5 - bolt; 6 - sealing ring; 7 - plug or oiler
When servicing the cardan transmission, the bearings of the crosspieces and supports are lubricated, the grease in the spline joint is replaced, and the fastening of the flanges and supports is checked.
Depending on the design of the cardan drive, lubrication of the joints of the crosspieces can be done through grease fittings, or by replacing the lubricant after disassembling the joint.
The corner oiler is screwed into the central part of the cross. The hinges have a flow lubrication system (valveless).
During the next maintenance, excess lubricant with wear products is squeezed out through the bearing seal.
If the bus has a cardan drive without crosspiece grease nipples, then the lubricant is replaced.
To replace the grease in the hinges, you need to disassemble them, remove the old grease and wash the parts.
Then you need to put 5 g of grease No. 158 ((1/3-1/2) of the bearing volume) into each bearing and assemble the hinges.
The lubricant in the joints must be replaced after 60 thousand km. mileage, but at least once every five years.
The intermediate shaft support bearing is lubricated through grease nipple 15 until fresh grease appears through the inspection hole in the rear bearing cover.
Replacing the grease in the spline joint must be done while replacing the grease in the cardan joints.
To change the lubricant, you need to disassemble the spline joint, wash the splines of the fork and spline bushing in kerosene, then evenly lubricate the fork splines with 200 g of lubricant.
Checking cardan shafts in operation is carried out for shaft runout and angular play of cardan joints.
For the intermediate propeller shaft, the runout along the length of the pipe should not exceed 1 mm, and for the rear propeller shaft, 1.2 mm.
The angular play of the cardan joint is formed as a result of wear of the joint parts and wear of the spline joint.
The permissible play is no more than 0.25 mm at a radius of 35 mm for the intermediate shaft and no more than 0.25 mm at the same radius for the rear shaft with a torque of 7 Nm.
Permissible play of the spline connection is no more than 0.25 mm at a radius of 49 mm.
A control check is carried out before balancing
To prevent imbalance when disassembling the shafts, all parts should be marked so that during assembly they can be installed in the same places and in the same position.
You should also pay attention that the arrows indicating the relative position of the shafts along the spline connection lie in the same plane.
When replacing forks, flanges or parts of the universal joint, it is necessary to dynamically balance the intermediate and rear driveshafts as a set.
The dynamic imbalance of the cardan transmission should be no more than 0.05 kg cm.
The imbalance is eliminated by welding balancing plates 2 to the pipe from the front, middle and rear hinges.
Balancing is carried out at a shaft rotation speed (2000...2200) min -1.
The intermediate and rear driveshafts are not balanced separately, so the driveshaft can only be changed as an assembly.
Possible malfunctions of the cardan transmission and methods of elimination
Knock in the cardan shafts when the rotation speed changes suddenly
- Worn needle bearings or spline joint. Loose fastening of cardan shafts.
Check the cardan shafts by turning them by hand. If play is detected, replace worn parts.
Tighten the cardan shaft mounting bolts.
Vibration of cardan shafts
- Bending of pipes, incorrectly assembled spline joint (marks on parts are not aligned), loose bearing caps
Check the correct assembly and fastening of the cardan shafts, Replace damaged parts.
Lubricant leakage from hinges and spline joint
- Worn or damaged seals
Replace oil seals
Increased noise in the intermediate support
- Destruction of the support bearing cage
Replace the bearing


