The steering column switch is secured with a clamp to the steering shaft bracket
The left switches control the turn signals (short) and headlights (long), while the right controls the windshield washer and wiper. (The rear window wiper and washer is activated by a button on the instrument panel)
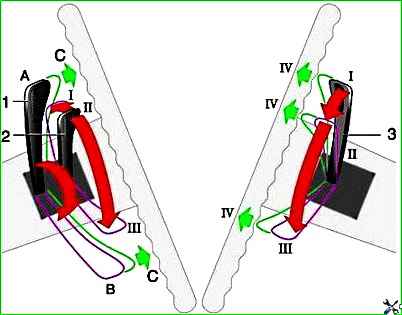
Headlight switch lever (1) (voltage is supplied to the headlight circuit when the exterior lighting switch key on the instrument panel is turned to the second position):
A – low beam headlights are on;
B – high beam headlights are on;
C – high beam headlights are on (move the lever towards you – non-fixed position). The headlights will remain on as long as the lever is in this position.
Turn signal switch lever (2):
III – right turn indicators are on;
III – initial position to which the lever automatically returns when the car exits a turn;
III – left turn indicators are on.
Wiper switch lever (3):
III – windshield wiper is turned off;
III – the windshield wiper operates intermittently;
III – the windshield wiper operates continuously;
IV – the windshield washer is turned on (by pressing the lever “towards you”, regardless of its position - non-fixed position).
Removing the steering column three-lever switch
Disconnect the negative cable from the battery.
Remove the steering wheel. To do this:


Use a slotted screwdriver to pry up the decorative trim of the horn switch cover and remove it.

Use a 24mm socket to unscrew the steering wheel mounting nut.

By rocking, pull towards yourself and remove the steering wheel.

If the steering wheel sits very tightly on the splines of the upper shaft, then pull the wheel towards you, striking the end of the shaft through a soft metal drift.

Using a Phillips screwdriver, unscrew the self-tapping screw securing the lower part of the casing to the steering column switch and the four screws connecting the upper and lower parts of the casing


Lowering the lower part of the casing, remove the hazard warning switch

Using a screwdriver, disconnect the clamp securing the wires of the steering column switch.

Remove the lower part of the casing

Remove the rubber ring from the ignition switch

Remove the upper part of the casing

Disconnect the wiring harness of the steering column switch.

Using an “8” socket, loosen the bolt of the clamp securing the steering column switch.

Remove the steering column switch.
Assembly is carried out in reverse order

Before installing the steering wheel, we install the movable ring (switching) of the steering column switch so that the protrusion with the hole (for clarity, the hole is filled with white paint) is located on top, and we put on the steering wheel in the straight-line driving position.
")

")
")
")
")
")
")
")