Design features and possible malfunctions of the clutch were discussed in the article - “Features and malfunctions of the clutch”
Adjustment of the clutch drive is necessary after replacing clutch parts or as a result of natural wear of mating parts (drive disc linings, minor abrasions and deformation of metal drive parts).
An unadjusted clutch drive leads to premature wear of transmission parts.
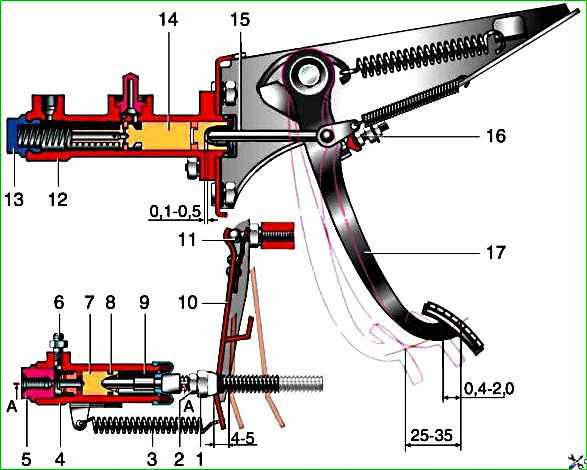
Pedal, master and slave cylinders of the clutch release drive 1 - adjusting nut; 2 - lock nut; 3 - tension spring; 4 - working cylinder body; 5 - housing plug; 6 - bleeder fitting; 7 - piston; 8 - seal; 9 - pusher; 10 - clutch release fork; 11 - ball joint fork; 12 - main cylinder body; 13 - plug; 14 - piston of the main cylinder; 15 - main cylinder pusher; 16 - clutch pedal travel limiter; 17 - clutch pedal
The gap between the pusher and the master cylinder piston, required to completely disengage the clutch, should be 0.1–0.5 mm.

To adjust using a “10” wrench, loosen the locknut of the clutch pedal travel limiter, holding the limiter with a wrench of the same size (the pedal assembly has been removed for clarity).
By rotating the limiter, we achieve the required gap.
In this case, the free play of the clutch pedal is 0.4–2.0 mm.
The free play of the working cylinder pusher should be 4–5 mm.

To determine it, we use a simple template, for which we use, for example, a pencil.
We carry out the work on an inspection ditch or a lift.
Remove the release spring and rest the end of the pencil against the boss of the lower fastening of the clutch slave cylinder.
On a pencil we make one mark opposite the end of the fork (pressed against the adjusting nut), and a second mark to the right, at a distance of 5 mm from the first.
Pull the clutch release fork back as far as it will go, that is, select free play of the working cylinder pusher (the front driveshaft has been removed for clarity).

During normal free stroke of the pusher, the fork will position opposite the second mark.
Otherwise, adjustment is necessary:
- - use a 13mm wrench to unscrew the lock nut, holding the adjusting nut with a 17mm wrench;
- - holding the pusher with pliers, rotate the adjusting nut, achieving normal free play of the pusher.
Secure the connection.
After adjustments, the free play of the clutch pedal until it starts to disengage should be 25–35 mm
We finally check the operation of the clutch with the engine running: with the clutch depressed, the gears should shift easily, and the car should start moving when the pedal is released from the floor by one to two thirds of its travel.
")

")
")
")
")
")
")
")