The car is equipped with two rectangular headlights with a halogen double-filament lamp AKG12-60+55-1, power 55/60 W (low/high beam) and a side light lamp A12, power 4 W
Some cars are equipped with an electric headlight corrector, which allows you to adjust the direction of the beams depending on the vehicle load.
The electric corrector control knob is located on the left side of the instrument panel.
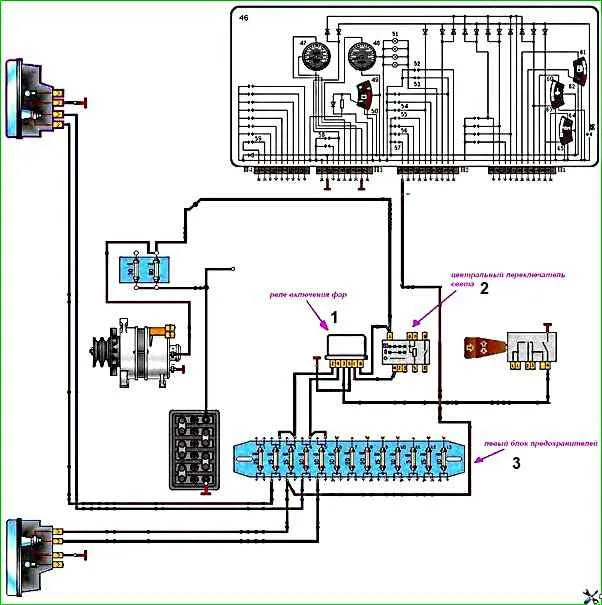
The side lights, instrument lights and headlights are switched on by a central light switch, which contains a resistor for adjusting the brightness of the instrument lamps.
The headlights are switched from low to high by the left steering column switch via the PC711 relay, which is installed in the relay block.
Replacing the headlight bulb
Disconnect the wire from the negative terminal of the battery.
Turn in any direction and remove cover 1 of the headlight housing.

Disconnect the block with wires from the lamp socket.

Press the spring clip

Remove socket 1 with lamp.
Replace the lamp, insert the socket into place and secure it with a spring clip.
When installing a halogen lamp, in order to extend its service life, do not touch the bulb with your fingers; you should only handle the lamp by the bulb with clean gloves or a clean rag.
Connect the block with wires to the socket and install the headlight housing cover.
Replacing the side light bulb
Disconnect the wire from the negative terminal of the battery.
Turn in any direction and remove the headlight housing cover.

Remove the cartridge by turning it 90°.
Replace the lamp, insert the socket into place and turn 90°. Install the headlight housing cover.
Removing the headlight
Disconnect the wire from the negative terminal of the battery.

Disconnect the connectors with wires from connector 1 on the headlight housing and from the corrector 2.

Unscrew bolt 1 securing the headlight bracket to the body, unscrew two bolts 2 of the upper headlight mounting and remove the headlight
Installation
Install the headlight in the reverse order of removal. After installation, you need to adjust the headlights
Adjusting the light
Screen layout for headlight adjustment.
Mark the screen as shown in the figure. In this case, draw the line of the headlight centers “M” on the screen at a distance “h” equal to the height of the headlight centers above the floor level.
Distance (h) must be measured with the vehicle unladen with an additional weight of 75 kg in the driver's seat.

Check and, if necessary, adjust tire pressure to normal.
Place the car on a horizontal platform perpendicular to the screen at a distance of 5 m.
In this case, the longitudinal plane of symmetry of the car should pass along the line (0) on the screen.
Set the headlight range control knob located in the instrument cluster to position “0”.
Turn on low beam.
It is recommended to adjust the direction of the light spot for each headlight separately.
Cover the second headlight with opaque material during adjustment.

Adjust screws 1 (in the horizontal plane) and 2 (in the vertical plane) for manual adjustment of the light beam to the position of the light spot for each headlight on the screen, if the location of the light spots on the screen does not correspond to the picture.
Headlights are considered adjusted shaped when the upper boundaries of the left parts of the light spots coincide with the line (N), and the vertical lines (A) and (B) pass through the points (C1) and (C2) of intersection of the horizontal and inclined sections of the light spots.