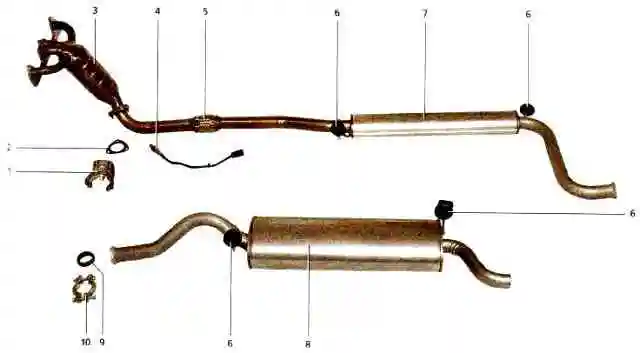
The exhaust system consists of an exhaust manifold, integral with the catalytic collector, additional and main mufflers and pipes connecting them
An oxygen concentration sensor (lambda probe) is installed in the upper part of the catalytic collector.
For Euro-3 vehicles, two oxygen concentration sensors are used.
The diagnostic sensor is installed after the neutralizer in the lower part of the collector.

The exhaust gas catalytic converter is designed to reduce emissions of carbon monoxide, nitrogen oxides and unburned hydrocarbons.
The vehicle is equipped with a neutralizer with a metal carrier. It consists of many honeycombs made of corrugated foil and coated with afterburning catalysts.
Passing through the honeycomb of the neutralizer, carbon monoxide is converted into low-toxic carbon dioxide, and nitrogen oxides are reduced to harmless nitrogen.
The degree of gas purification in a working neutralizer reaches 90-95%.
For normal operation of the converter, the composition of the exhaust gases (in particular, the oxygen content in them) must be within strictly specified limits.
This function is performed by the electronic engine control unit - a controller that determines the amount of fuel supplied depending on the readings of the oxygen concentration sensor.
If there are lead compounds in the exhaust gases, the catalytic converter and oxygen concentration sensor quickly fail.
Therefore, operating a car on leaded gasoline is strictly prohibited, even for a short time.
Also, the cause of failure of the converter may be a faulty ignition system.
If sparking is missed, unburned fuel enters the converter, burns out and cokes the cells, which can lead to complete blockage of the exhaust system and engine stop (or severe loss of power).
The controller has the function of protecting the converter from misfires, which can be detected in one or two cylinders at the same time.
The controller turns off the fuel supply to these cylinders, and the engine management system malfunction indicator located in the instrument cluster lights up in a flashing mode.
In this case, it is necessary to stop driving, stop the engine, try to find the cause and eliminate the malfunction.
If this cannot be done, you will need to have the vehicle towed to the nearest service station.
Mufflers and catalytic collector are non-separable units; if they fail, they must be replaced with new ones.
A metal-reinforced heat-resistant gasket is installed between the catalytic collector and the cylinder head (common for the catalytic collector and the intake pipe).
An additional muffler pipe is attached to the catalytic collector on three studs.
The connection is sealed with a heat-resistant gasket.
A metal compensator is built into the additional muffler pipe.
It reduces the transmission of power unit vibrations to the exhaust system.
The rear part of the additional muffler pipe is hingedly connected to the main muffler pipe.
Between their flanges there is a metal ring with a spherical outer surface.
The inner surface of the flanges is also spherical, the flanges themselves are tightened with a clamp. Heat-protective covers are installed on the body, above the additional muffler and metal compensator.
The exhaust system is suspended from the body on four rubber cushions.
Maintenance of the exhaust system consists of periodically inspecting it, checking for tightness of connections and the presence of through corrosion, and includes tightening loose connections.
Removing the additional muffler
To avoid burns, it is recommended to start work after the exhaust system has cooled.
We carry out the work on an inspection ditch or overpass.
Disconnect the pipes of the additional and main mufflers.

To separate the flanges of the additional muffler pipe and catalytic collector, use a chisel to bend the edge of the locking plate of the lower nut and the edges of the heat shield, which lock the other two nuts.

Using a 13mm socket with an extension, unscrew the three nuts securing the flange of the additional muffler pipe to the flange of the catalytic collector

Remove the locking plate and heat shield.

Lift the additional muffler and remove the front muffler bracket from the rubber cushion

In the same way we remove the rear muffler bracket from the rubber cushion

Remove the flange of the additional muffler pipe from the studs of the catalytic collector
Remove the sealing gasket

After each removal of the additional muffler pipe flange from the studs of the catalytic collector, the sealing gasket should be replaced with a new one.
Install the additional muffler in reverse order. After installation, lock the nuts securing the pipe flange and catalytic collector by bending the edges of the locking plate and the heat shield.
Removing the main muffler

Using a 13mm wrench, unscrew the nut of the bolt securing the clamp connecting the pipes of the additional and main mufflers

Remove the clamp

We take the main muffler pipe back, move it to the side and remove the sealing ring of the connection.

Lower the main muffler pipe onto the rear suspension beam.

We remove the main muffler bracket from the rubber cushion of the front muffler suspension

Hooking up the rear muffler suspension cushion with a mounting blade, remove the muffler bracket from the cushion

Remove the main muffler, bringing the exhaust pipe out from behind the rear suspension beam.

To replace the rubber cushion of the front suspension of the main muffler, remove the cushion from the body bracket. We replace the pillow with a new one.

To replace the rear suspension cushion of the main muffler, use a mounting blade to bend the whiskers of the bracket welded to the body

Remove the pillow
Installing a new pillow. After installation, we bend the bracket's mustache.
We install the main muffler in the reverse order, making sure that the exhaust system elements do not touch the body elements during vibrations.
")

")
")
")
")
")
")
")