To hold the hood in the closed position when the car is moving, use a pin-type hood lock 9, which is attached to the top panel of the radiator
To open the hood lock there is a remote drive mounted on the left front pillar of the cab under the instrument panel.
To open the hood lock, you need to pull the drive handle towards you; The hood lock latch should move all the way and release the hood lock pin - the hood will rise by 30-36 mm.
After opening the lock, the drive handle must be returned to its original position; accordingly, the lock latch must return to its original position, but under the action of the latch spring.
The hood pin, pin flange, spring and pin stopper are secured to the hood.
If the hood is installed correctly and the necessary adjustments are made, the hood pin should fit freely into the lock cup and be clearly secured with the latch in the closed position.
When the pin is correctly adjusted, the hood should move 1-2 mm along the edge in the closed position.
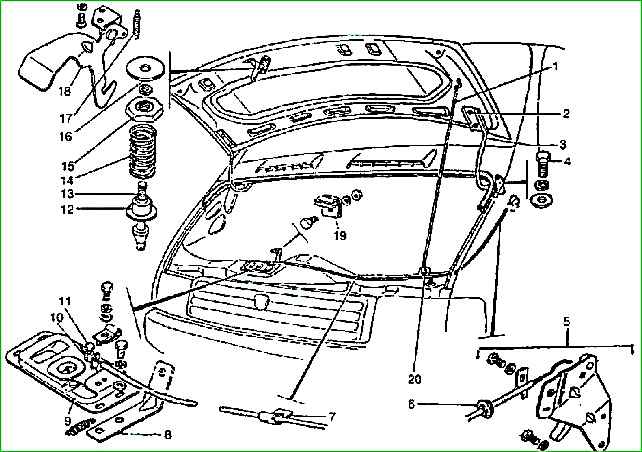
To protect against accidental opening of the hood when driving, a safety hook is attached to the hood and engages with the hood latch.
Adjust the engagement of the safety hook with the lock by bending the hook.
Adjustment of the hood lock and its parts is carried out in cases of replacement (repair) of the hood, the lock itself and the lock drive.
In the first case, mainly adjustments are made to the hood lock pin and the safety hook and a small longitudinal adjustment of the lock.
In the second and third cases, first adjust the operation of the drive (so that the lock latch moves all the way), and then adjust the pin and safety hook.
Before operating the car, with the hood open, check the operation of the lock itself, to do this, move the lock latch to the right by hand, and then release it; under the action of the spring, the latch should return to the extreme left position until it stops against the body.
If this does not happen, then you need to remove the lock and saw the groove for the latch so that it reaches the lock body. After this, install the lock in its original place.
After checking the operation of the lock itself, check the operation of the drive, for which, with the hood open, pull the drive handle towards you and leave it in this position; The lock latch should move to the right and completely release the lock cup for the hood pin to exit.
If this does not happen, then it is necessary to straighten the end of the hood lock drive rod, loosen bolt 11 and remove nut 10.
Return the hood lock drive handle to its original position, take pliers and pull the rod towards you as far as possible, and then secure it with nut 10 and bolt 11 and check the operation of the drive again.
If the result is positive, bend the end of the drive rod to prevent movement of nut 10.
The lock does not require special maintenance.
If the force when opening the hood lock increases during operation, it is necessary to disconnect the lock drive from the lock, as described above, the drive brackets, the drive mounting bolts, remove the entire drive from the car, release the rod, clean it and wipe it, then lubricate it with CIATIM- grease 201, or LITA, or Litol-24.
Assemble the drive, install it in place and follow the recommendations given above.
Hood fastening
To open the hood to a given angle, two-link hood hinges are used, secured to the front panel with bolts and to the hood with bolts.
The hinges are unbalanced, and therefore a rigid stop is used to hold the hood in the open position.
One end of it is fixed to a special bracket using a bushing; the second rests on the hood (fits into a special shaped hole).
In the folded lower position, the stop is fixed in a special clamp.
After opening the hood lock, the hood is lifted up until it stops on the hinge, held with the left hand, and the stop is released from the clamp with the right hand, lifted up, inserted into the figured hole on the hood and the hood is released. Folding the stop is done in the reverse order.
For correct installation of the hood in terms of gaps and surface in relation to the wings, trims, etc., adjustments are provided in the horizontal plane on the hinges, and in the vertical plane on the hinge brackets.
The hood hinges are a non-separable unit. Therefore, if a creaking (“squeaking”) occurs, it is necessary to lubricate the joint with machine oil.
If significant axial movements appear in the hinge, which leads to the hood moving when moving, it is necessary to remove the hinges and additionally rivet the hinge or replace it with new ones.
To repair the hinges, you need to remove the hood, then release (unscrew) the hinge fastenings from the front panel and remove the hinges.
After repairing the hinges, install them in the reverse order and adjust the hood and hood latch.
Look at the article on removing and installing the hood and its lock: - “Removing and installing the hood and hood lock of a Gazelle car”