Steering column switches
The car uses two steering column switches mounted on the steering column.
On some vehicles, the sound signal is turned on by the turn signal and headlight switch, and on others - by the windshield wiper and washer switch
Left turn signal switch
The switch automatically returns to position I or II after turning. A – non-fixed position of the lever for briefly turning on the turn signal.
When the lever is moved from position I towards you to the non-fixed position, the high beam headlights turn on while the lever is held in this position.
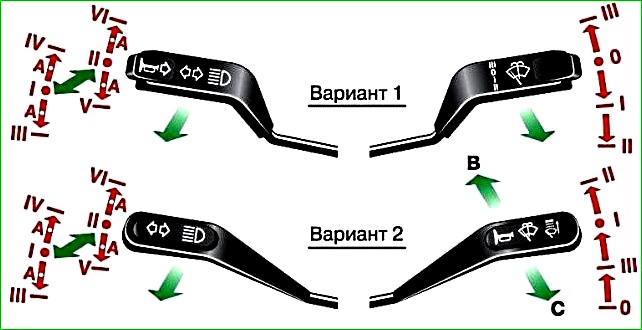
The sound signal (option 1) is activated by pressing the lever button from any position.
For a switch without a sound signal (option 1), moving the lever toward you (arrow) from position 0 briefly turns on the washer and wiper.
For a switch with an audible signal (option 2), the washer and wiper are switched on briefly by moving the lever away from position 0 (arrow B).
The sound signal is activated by moving the lever towards you from any position (arrow C).
The washer and signal can be turned on at any position of the lever.
Replacing steering column switches
Remove the steering column covers (see article - “Removing and disassembling the steering column”).

Using a slotted screwdriver, unscrew the two screws securing the turn signal and headlight switch.

Remove the switch and, disconnecting the wires from its terminals, sketch or write down the order of their connection.
You don’t have to write down, but immediately disconnect the wires one by one and connect them to the new switch.

It is best to immediately connect the wires to the new switch. Switches can be changed complete with wires. To do this, remove the instrument cluster.
Disconnect the plug blocks of the corresponding switch

Remove the plug block through the opening between the instrument panel and the steering column.
Replace the wiper, windshield washer and horn switch in the same way
Replacing the hazard warning switch
Disconnect the battery.
Remove the instrument cluster. (See the article - How to remove and install the instrument cluster of a Gazelle car)
From inside the dashboard, disconnect the plug block from the switch terminals.

Push the switch out of the hole with your hand.

Install the switch in the following order:
Hold the connecting block in front of the hole in the dashboard and insert the switch terminals into it.

To check, connect test lamps to the switch in accordance with the diagram.
Turn on the switch by pressing the button. In this case, the switch backlight lamp in the button as well as lamps 1 and 4 should be on.
Turn off the switch, the lamp in the button and lamp 4 should go out, and lamps 1 and 3 should be on.
If at least one of the lamps does not light up in the corresponding position of the switch, then the switch is faulty and needs to be replaced
After this, push the switch into the hole in the instrument panel until its spring clips snap into place.
Replacing the brake light switch

Under the instrument panel, remove two plugs from the switch terminals

Use a 19mm wrench to loosen the locknut.

Use the same wrench to unscrew the nut

Remove the switch
Install the new switch in the reverse order. Connect the wires in any order.
Replacing the central light switch
Remove the instrument cluster.

Use a thin slotted screwdriver to loosen the locking screw and, turning counterclockwise, remove the switch knob.

Using round-nose pliers, unscrew the switch mounting nut
Remove the switch.

Mark the order of connecting the wires and remove their terminals from the switch terminals.
Install the new switch in the reverse order.
Removing the interior light and rear fog light switches
Remove the instrument cluster trim.

Remove the connecting block from the switch terminals (you don’t have to remove the instrument cluster for this).

Squeezing the clamps on both sides, remove the passenger compartment light switch. Similarly, remove the fog light switch
The switch can be removed from the panel by prying it with a screwdriver. This must be done carefully so as not to damage the switch latches.

Install the switches in the reverse order.
")

")
")
")
")
")
")
")