On cars of the GAZelle family of different years of production and configurations, three combinations of instruments can be installed: the old model produced before 2003, the new model produced since 2003 for cars with engines ZMZ-4063, ZMZ-40522, UMZ-4215 and new production model since 2003 for cars with ZMZ-40524 and UMZ-4218 engines
The instrument cluster combines all the instrumentation of the vehicle.
It includes a speedometer, total and daily mileage counters (in combinations of the old model produced before 2003 and the new model produced since 2003 for cars with engines ZMZ-4963 ZMZ-40522 and UM Z-4215 mechanical type counters
And in the combination of a new model produced since 2003 for cars with ZMZ-40524 and UMZ-4218 engines, the counters are located on the first liquid crystal display), an electronic tachometer (from 0 to 6000 min -1), clock and voltmeter on the second liquid crystal display (in combination with a new model produced since 2003 for cars with ZMZ-40524 and UMZ-4218 engines), coolant temperature indicator, fuel level indicator, control and warning lamps, backlight lamps.
Electromagnetic type temperature and fuel level gauges.
In the instrument cluster of a new model produced since 2003 for cars with ZMZ-40524 and UMZ-4218 engines, a sound alarm function is provided in the event of an emergency.
In addition, it uses “night” and “day” backlight modes for liquid crystal displays for easy viewing of readings
The developers of the instrument cluster have also introduced a self-test mode, which allows you to monitor the proper operation of the pointer indicators, the display of information on liquid crystal displays, and the functionality of the alarms
Removing the instrument cluster for cars produced before 2003
The instrument cluster cannot be repaired, therefore, if the instruments fail, it is replaced as an assembly.
The instrument panel is equipped with a combination of instruments, which combines in one housing:
- - speedometer (with total and daily mileage counters);
- - tachometer;
- - indicators of coolant temperature, fuel level (with fuel reserve indicator), oil pressure (with emergency pressure indicator);
- - voltmeter;
- - a block of indicators for battery charge, high beam headlights, turn indicators, side lights, emergency drop in the level of brake fluid and parking brake, overheating of the coolant, activation of the center differential lock of the transfer case (for the 4x4 modification).
1. Disconnect the battery.

2. Using a short Phillips screwdriver, unscrew the two screws for the upper fastening of the instrument cluster trim

3. Using a screwdriver, unscrew the two screws of the lower fastening of the instrument cluster trim

4. Remove the lining.

5. Using pliers, unscrew the nut securing the trip odometer reset handle.

6. We recess the handle into the control panel.

7. Using a long slotted screwdriver, unscrew the two screws from the ends of the instrument cluster

8. Having removed the instrument cluster from the panel, unscrew the nut securing the speedometer drive cable.

9. Disconnect the three connectors from the terminals of the instrument cluster. The pads vary in color and number of connectors, so there is no need to mark them.

10. To replace the instrument lighting bulbs, turn the socket counterclockwise and remove it from the instrument cluster

11. We replace the faulty lamp.

12. To replace the warning lamp, turn the socket counterclockwise and remove it from the instrument cluster

13. We replace the faulty lamp together with the socket
Assemble and install the instrument cluster in the reverse order.
To remove the instrument cluster of a car manufactured since 2003, do the following
1. Disconnect the wire from the negative terminal of the battery.

2. We pry up the edge of the right plug at the bottom of the instrument cluster trim

3. Removing the plug

4. We also remove the plug on the left side of the cladding.

5. Remove the bottom right screw

6. Turn out the lower left screw

7. We unscrew the two upper screws securing the instrument cluster trim

8. Removing the instrument cluster trim

9. We unscrew the four bolts securing the instrument cluster

Remove the instrument cluster from the socket in the instrument panel, disconnect the wiring harness blocks from it and remove the combination
Install in reverse order.
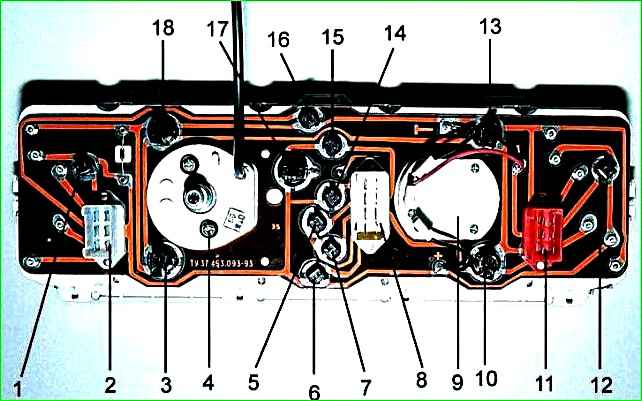
Replacing lamps in the instrument cluster
The figure shows the location of the lamps in the instrument cluster of a car manufactured since 2003.
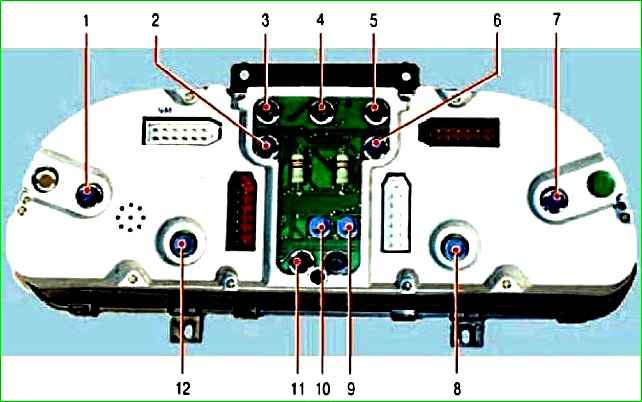
Replacement of these lamps is provided by the combination manufacturer. Those symbols that are not shown in the figure are illuminated by LEDs that cannot be replaced.
The LEDs are located on the reverse side of the printed circuit board and are replaced as an assembly with the instrument cluster.
Disconnect the wire from the negative terminal of the battery.
Remove the instrument cluster

To replace the instrument illumination lamp, turn its socket counterclockwise

Remove the socket from the instrument cluster circuit board.
Lamps in the instrument cluster of cars manufactured in 2003 are replaced as an assembly with a socket, since the lamp contacts are soldered to the contact plates of the socket.
")

")
")
")
")
")
")
")