Removing the camshaft
Remove the cylinder head cover
Disconnect the engine management system wiring harness block from the phase sensor and coolant temperature sensor.

Using a 10mm wrench, unscrew two nuts 1 and one bolt 2 securing the cylinder head plug.

There is a rubber O-ring under the bolt head.

Remove the cylinder head plug along with the sensor.

A rubber O-ring is installed in the groove of the plug flange.

Remove the camshaft timing pulley

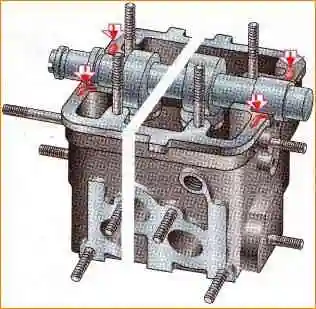
Using a “13” wrench, evenly, in several steps (until the pressure of the valve springs is relieved), unscrew the ten nuts securing the camshaft bearing housings.

Remove both camshaft bearing housings from the studs

Having slightly moved the rear timing belt cover away from the cylinder head, remove the camshaft.
Remove the oil seal from the camshaft toe.
Install the camshaft in the following sequence:
We clean the mating surfaces of the cylinder head and bearing housings from old sealant and oil.
Lubricate the camshaft bearing journals and cams with engine oil
Place the shaft on the cylinder head supports so that the cams of the first cylinder are directed upward.
In this case, the pistons of the 1st and 4th cylinders must be at TDC


On the surfaces of the cylinder head, mating with the bearing housings in the area of the outer supports, apply a thin layer of silicone sealant.
Install the bearing housings and tighten the nuts securing them in two steps
Pre-tighten the nuts in the sequence shown in the figure until they fit surfaces of the bearing housings to the cylinder head.
In this case, it is necessary to ensure that the installation sleeves of the housings fit freely into their sockets
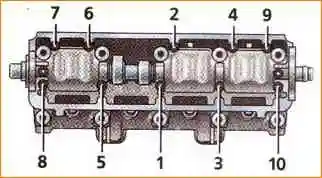
Procedure for tightening the camshaft bearing housing nuts
Finally tighten the nuts in the same sequence
After tightening the nuts, carefully remove any remaining sealant squeezed out of the gaps.
Press in the new camshaft oil seal.
Before installing the plug, put an O-ring on it.
Check the clearances in the valve mechanism. (The clearances must be checked, especially if the distribution parts have been changed. To do this, see the article - “Adjusting valve clearances”)
We carry out further assembly in reverse order
")

")
")
")
")
")
")
")