Removing and checking the rear brake drum
Place the car on a lift.
Apply the parking brake and turn off the ignition
Remove the rear wheel and release the handbrake lever.
Raise the car to a height convenient for performing work.
Using a mounting blade, remove the hub cap.
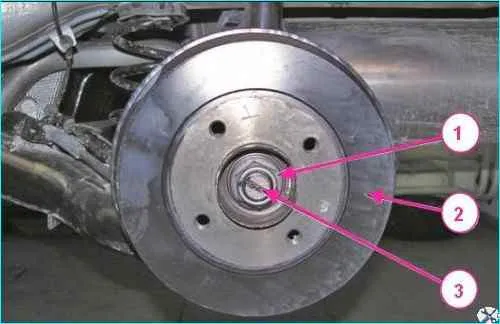
Removing the rear brake drum: 1 - brake drum fastening nut; 2 - brake drum; 3 - rear wheel hub axle
Using a 30 mm head, unscrew nut 1, Figure -1, securing the brake drum to axle 3 of the rear wheel hub and remove drum 2.
Checking the technical condition of the brake drum
The brake drums must be the same diameter.
When boring one of the drums, be sure to bore the second drum.
When replacing the brake drum on one side, be sure to replace the brake drum on the opposite side.
When replacing the brake drums, be sure to replace the brake pads.
Using a caliper, measure the inner diameter of the brake drum in two mutually perpendicular directions.
Compare the measurement results with the data below.
When replace the brake drum if necessary.
Nominal inner diameter of the brake drum, mm 203.2
Maximum permissible inner diameter of the brake drum, mm 204.45
If there are deep scratches or waviness on the working surface of the brake drum, bore the drum. Take measurements again.
Compare the measurement results with the data in the table. Replace the brake drum if necessary.
Installing the brake drum
Clean the rear brake components.
When replacing the brake drum, check the outer diameter of the brake shoes and adjust if necessary.
Install the brake drum on the rear wheel hub axle and secure it with a nut. Tightening torque of the nut 158 - 192 Nm (15.8 - 19.2 kgf.m).
Check the operation and, if necessary, adjust the parking brake drive.
Install the rear wheel.
Press the brake pedal 2-3 times, check and, if necessary, bring the brake fluid level in the brake hydraulic drive reservoir to normal.
Check the efficiency of the working brake system.
Replacing the rear wheel brake pads
The brake pads must be replaced as a set on both rear wheels.
Place the car on a lift and brake with the parking brake.
Remove the rear wheels.
Release the hand brake lever.
Lift the car to a height convenient for performing work.
Remove the rear brake drums as described above.
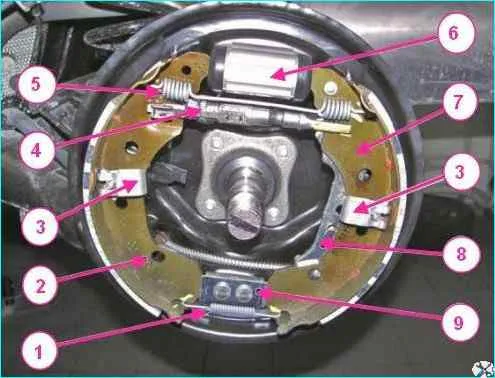
Replacing the brake pads: 1 - lower tension spring; 2 - pads; 4 - spacer bar with mechanism; 7 - brake pads; 3 - automatic clearance adjustment guide mounting bracket; 5 - upper tension spring; 6 - brake cylinder; 8 - manual pad drive lever; 9 - stop
Remove the lower, then the upper tension springs 1 and 5, figure 2.
Using pliers, remove the brackets 3 of the guide shoes.
Remove the spacer bar 4 with the automatic adjustment mechanism in assembly.
Remove the brake shoes 2 and 7, disconnecting the hand brake drive cable from the drive lever 8.
Installing the rear brake shoes
Clean the rear brake components.
Apply Litol-24 grease to the threaded surface of the spacer bar.
Install the shoes on the brake shield.
Install the upper and lower tension springs.
Using screwdrivers and pliers install the brackets of the 3 guide pads, as shown in Figure 2.
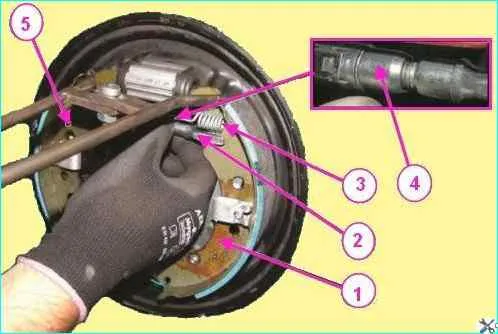
Rear brake components: 1, 5 - rear brake pads; 2 - spacer bar with automatic clearance adjustment mechanism; 3 - upper tension spring; 4 – adjusting nut of the spacer bar
We spread the brake pads 1 and 5 with pliers, figure 3, install the spacer bar 2 and adjust the outer diameter of the pads by turning the nut 4 of the spacer bar.
The outer diameter of the pads should be 202.2 - 202.7 mm.
Damage to any elements of the spacer bar is not allowed, as this may t cause failure of the adjusting mechanism.
Install the brake drum as described above.
Press the brake pedal 10 - 15 times to set the rear brake mechanisms to the working position.
Check and, if necessary, bring the brake fluid level in the brake hydraulic reservoir to normal.
After this, adjust the parking brake.
Replacing the rear wheel brake slave cylinder
Place the car on a lift and brake the rear wheels with the parking brake.
Remove the rear wheel.
Release the hand brake lever.
Remove the brake drum.
Remove the upper tension spring.
Spread the brake shoes.
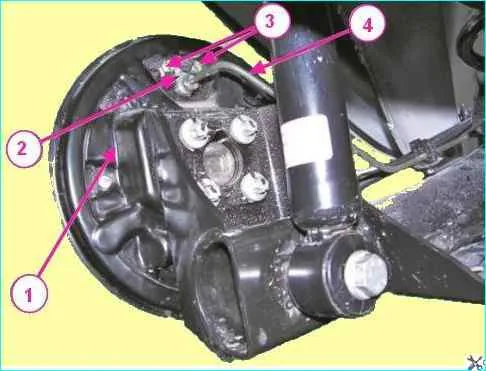
Removing the rear brake wheel cylinder: 1 - rear brake shield; 2 - rear brake wheel cylinder; 3 - wheel cylinder mounting bolts; 4 - brake pipe
Unscrew the nipple of the brake pipe 4, figure 4, to the wheel cylinder 2 of the rear brake and install the plugs on the brake pipe and in the hole of the wheel cylinder.
Using a 10 head, unscrew the bolts 3 fastening the wheel cylinder 2 to the shield 1 of the rear brake and remove the cylinder.
Installing the working cylinder
Clean the rear brake components.
Install the wheel cylinder on the rear brake shield and secure it with bolts. The tightening torque of the bolts is 7 - 11 Nm (0.7 - 1.1 kgf.m).
Remove the plugs from the holes of the wheel cylinder and the brake pipe and screw the nipple of the brake pipe into the hole of the wheel cylinder. Tightening torque of the nipple 14 - 20 Nm (1.4 - 2.0 kgf.m).
Install the upper tension spring.
Install the spacer bar.
Check the outer diameter of the brake shoes and adjust if necessary.
Install the brake drum as indicated above.
Install the rear wheel.
Bleed the brake system and, if necessary, the clutch hydraulic drive.
After that, check the effectiveness of the brakes.
")

")
")
")
")
")
")
")