Exhaust gases are discharged from the engine through the exhaust pipe of the muffler with the neutralizer assembly, the additional muffler and the main muffler
A sealing gasket is installed between the flanges of the exhaust pipe and the additional muffler.
There is a vibration compensator on the pipe of the additional muffler.
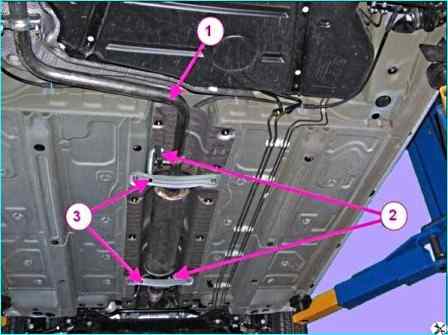
The pipes of the main and additional mufflers are connected to each other with flared ends through an intermediate ring using a clamp.
The exhaust system is attached to the car body using muffler suspension cushions.
Removing and installing the exhaust pipe with the neutralizer assembly
Preparing the car for work. Place the car on a lift or inspection pit.
Disconnect the negative terminal of the battery.
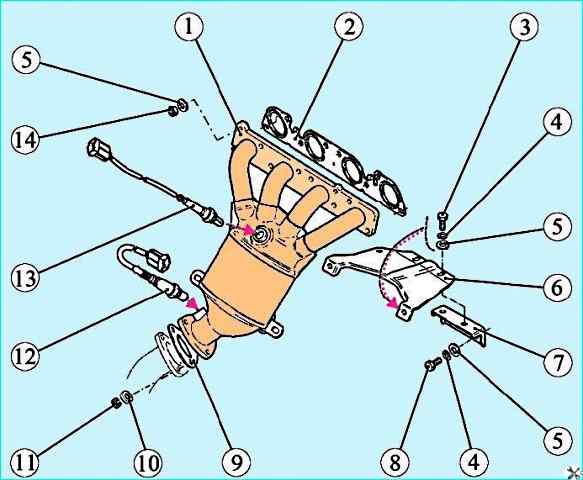
Assembled exhaust pipe with neutralizer: 1 - exhaust pipe with neutralizer assembly; 2 - gas line gasket; 3 - bolt М8х18; 4 - spring washer 8; 5 - washer 8; 6 - exhaust pipe bracket; 7 - exhaust pipe bracket support; 8 - bolt М8х16; 9 - muffler flange gasket; 10 - lock washer; 11 - muffler mounting nut; 12 - diagnostic oxygen concentration sensor; 13 - control oxygen concentration sensor; 14 - М8 nut
Disconnect the connectors of the wiring harnesses of sensors 12 and 13, Fig. 1, oxygen concentration from the brackets on the power unit and from the connectors of the wiring harness of the ignition system.
Raise the car to a height convenient for work (if the car is on a lift), and remove the engine protection.
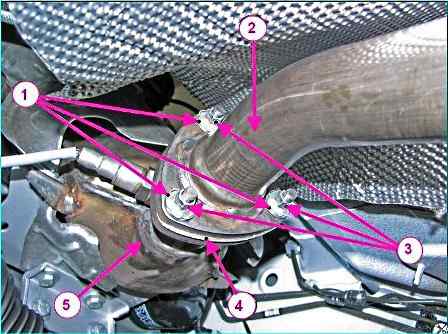
Unlock washers 1, figure 2, and unscrew three nuts 3, studs fastening additional muffler 2 to exhaust pipe 5 with neutralizer assembly
(used: flat screwdriver, 10 spanner, 10 replaceable head, extension and ratchet).
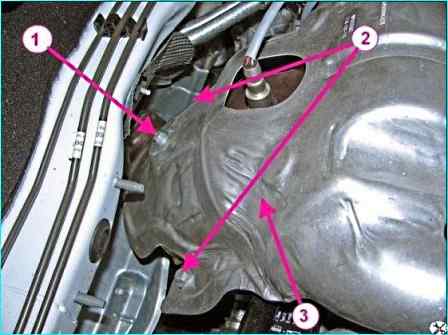
Unscrew bolt 1, figure 3
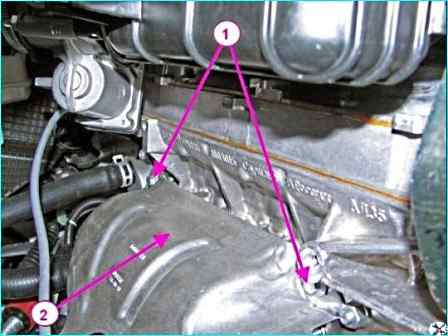
Unscrew two bolts 2, two bolts 1, figure 4, with washers and remove the heat shield of the exhaust pipe with neutralizer in assembly (used: replaceable head 10, 13, extension, ratchet).
Unscrew the M8 nut securing the bracket of the water pump inlet pipe, remove the washer (replaceable head 13, extension, ratchet).
Using a 13 spanner, loosen the nut securing the exhaust pipe on the stud securing the bracket of the water pump inlet pipe.
Unscrew seven nuts 14, (see figure 1), remove washers 5, remove the exhaust pipe 1 with neutralizer in assembly, remove gasket 2 of the gas pipeline and gasket 9 of the muffler flange.
Replace the nuts of the studs fastening the inlet pipe to the cylinder head with new ones (used: replaceable head 13, extension, ratchet).
Using a 22 open-end wrench, unscrew the oxygen concentration sensors 12 and 13 from the inlet pipe 1 of the muffler with the neutralizer in the assembly.
Installation
Install the sensors 12 and 13, Fig. 1, oxygen concentration on the inlet pipe 1 of the muffler with the neutralizer in the assembly.
Tightening torque of the sensors 40-60 Nm (4.0-6.0 kgf.m).
Install a new gas line gasket 2, inlet pipe 1 of the muffler with the neutralizer in the assembly, washers 5, screw on and tighten the new nuts 14 studs for fastening the inlet pipe to the cylinder head.
Tightening torque of the nuts 21-25 Nm (2.1-2.5 kgf.m).
Install the washer and screw on the M8 nut for fastening the bracket of the water pump inlet pipe. Tightening torque of the nut 21-25 Nm (2.1-2.5 kgf.m) (replaceable head 13, extension, ratchet, torque wrench).
Install the heat shield of the muffler inlet pipe with neutral analyzer assembly and secure with bolts 1 and 2, Figure 3, bolts 1, Figure 4, fasteners with washers.
Bolt tightening torque: M6 – 7-9 Nm (0.7-0.9 kgf.m); M8 – 18-24 Nm (1.8-2.4 kgf.m).
Install a new gasket 4, Fig. 2, of the exhaust pipe flange, attach the flange of the additional muffler 2, install lock washers 1, install and tighten three nuts 3 of the studs securing the additional muffler to the exhaust pipe and lock.
Tightening torque of the nuts 21-25 Nm (2.1-2.5 kgf.m).
Install the engine protection.
Lower the car, connect the connectors of the harnesses of the oxygen concentration sensors 12 and 13 to the connectors of the ignition system wiring harness and the brackets on the power unit.
Connect the terminal of the ground wire to the battery
Removing and installing the additional muffler
Prepare the car for work.
Place the car on a lift or inspection pit.
Disconnect the negative terminal of the battery.
Raise the car to a height convenient for work and remove the engine protection.

Unlock washers 1 (see figure 2) and unscrew three nuts 3, studs fastening additional muffler 2 to exhaust pipe 5 with neutralizer assembly (use: flat screwdriver, 10 spanner, 10 replaceable head, extension and ratchet).
Remove gasket 4 of exhaust pipe flange (use: flat screwdriver).
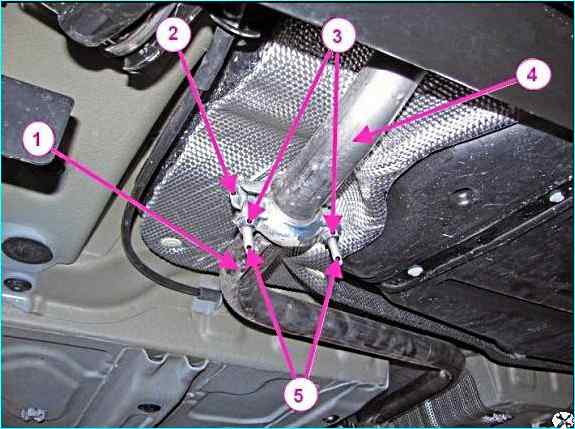
Unscrew two nuts 3, see figure 6, bolts 5, tightening clamp 2, remove the bolts, remove the clamp and the sealing ring (use: open-end wrench 10, spanner 13, replaceable head, extension, ratchet).
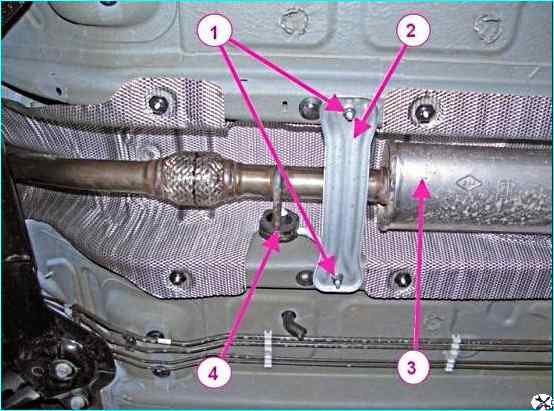
Unscrew the four nuts 1, (see Figure 7), fastening the brackets 2 to the body and remove the additional muffler 3 with the suspension cushions 4 and brackets in assembly.
Perform the operation with an assistant (use: replaceable head 13, extension, ratchet).
Lubricate with soapy water and remove the suspension cushions from the additional muffler and the muffler suspension brackets.
Installation
Lubricate with soapy water and install on the muffler brackets 3, Figure 7, additional and brackets 2 of the muffler suspension cushions 4 of the suspension.
Install the additional muffler 3 using the brackets 2 of the muffler suspension on the mounting studs on the body and secure with four nuts 1.
Tightening torque of nuts 18…24 Nm (1.8-2.4 kgf.m).
Perform the operation with an assistant (use: replaceable head 13, extension, ratchet, torque wrench).
Install a new gasket 4, Figure 2, of the flange of the exhaust pipe of the muffler, attach the flange of the additional muffler 2, install lock washers 1, install and tighten three nuts 3 of the studs for fastening the additional muffler to the exhaust pipe and lock.
Tightening torque of nuts 21-25 Nm (2.1-2.5 kgf.m) (use: spanner 10, replaceable head 10, extension, ratchet wrench, torque wrench, blunt chisel, hammer).
Install the sealing ring between the flanges additional 1, figure 8-6, and main 4 mufflers, install the connecting clamp 2, as shown in the figure, screw on two nuts 3 of the bolts 5 of the clamp.
Tightening torque of the clamp bolt nuts 14-16 Nm (1.4-1.6 kgf.m) (we use: ring spanner 10, open-end wrench 13, replaceable head 13, ratchet, torque wrench).
Install the engine protection.
Removing and installing the main muffler
Preparing the car for work. Place the vehicle on a lift or inspection pit.
Raise the vehicle to a height convenient for work, unscrew two nuts 3 (see Figure 6),
bolts 5, tightening clamp 2, remove the bolts, remove the clamp and sealing ring (use: ring spanner 10, spanner 13, replaceable head 13, extension, ratchet).
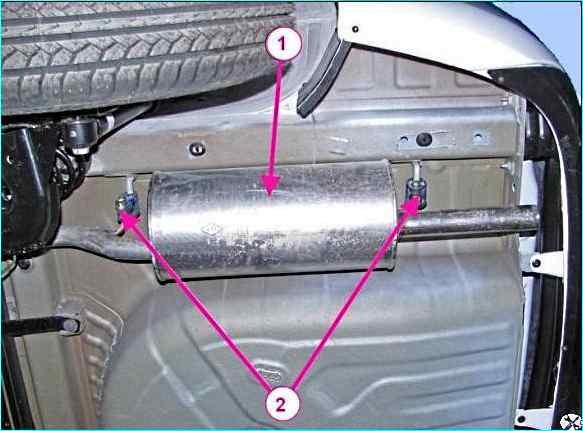
Lubricate with soapy water and remove the brackets of the main muffler 1, Figure 8, from the holes of the cushions 2 of the muffler suspension and remove the main muffler.
Installation
Lubricate the brackets of the main muffler with soapy water and hang the main muffler 1, Figure 8, on the cushions 2 of the suspension.
Install the sealing ring between the flanges of the additional 1, (see Figure 6), and the main 4 mufflers, install the connecting clamp 2, as shown in the figure, screw on two nuts 3 of the bolts 5 of the clamp.
Tightening torque of the nuts of the clamp bolts 14-16 Nm (1.4-1.6 kgf.m) (we use: ring spanner 10, spanner 13, replaceable head 13, ratchet, torque wrench)


