Replacing lamps and external lights on the rear fenders
Preparing the car for repair. Turn off the ignition.
Lift the hood and use a 10 spanner to disconnect the negative terminal from the battery.
Open the trunk lid.
Open the window in the trim 1 (Fig. 1), the trunk at the attachment point of the rear light.
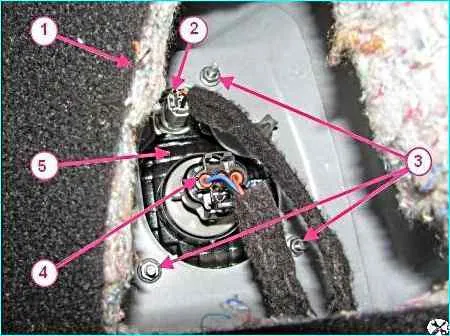
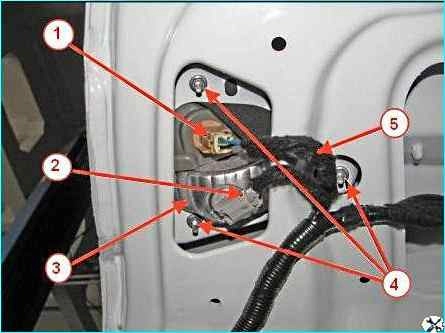
Fastening the outer rear light (view from the trunk): 1 - trunk trim; 2 - connector for the rear wiring harness to the turn signal lamp; 3 - rear outer light mounting nut; 4 - rear wiring harness connector to brake light/side light; 5 - outer rear light
Using an 8 mm socket, unscrew the three nuts 3 securing the outer rear light to the body
Carefully, overcoming the resistance of the side retainer, remove light 1, figure 2, rear outer complete with retainer.
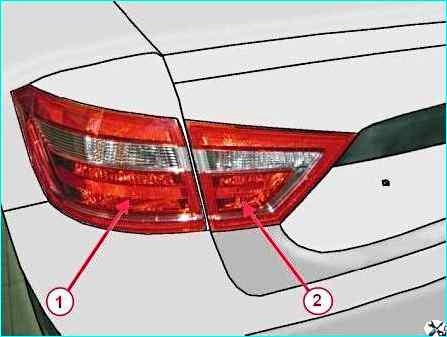
Rear lights: 1 - outer rear light; 2 – inner rear light
Installation of the outer rear light is performed in the reverse order of removal.
During installation, ensure:
- entry of the retainer 2, Figure 3, into the hole in the rear wing;
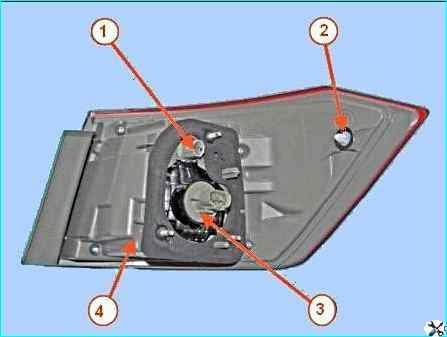
Location of lamps and retainer on the rear side light: 1 - turn signal lamp socket; 2 - retainer; 3 - brake signal / side light lamp socket; 4 - outer rear light
- seal of the light at the junction with the body.
Tightening torque of the nuts 2 - 3 Nm (0.2 ... 0.3 kgf.m).
Replacing the bulbs
To replace the turn signal bulb on the outer light 1, Figure 2, located on the wing of the car, you must:
- - open the window in the trunk trim, providing access to the turn signal bulb socket;
- - turn the socket 1, Figure 3, counterclockwise and remove it from the seat assembled with the bulb;
- - remove the bulb from the socket by pulling it towards you.
To replace the brake signal / parking light bulbs on external lamp, located on the wing of the car, it is necessary to:
- - open the window in the trunk trim, providing access to the socket of the brake signal / parking light bulb;
- - turn the socket 3 counterclockwise and remove it from the seat together with the lamp;
- - remove the lamp from the socket by turning it counterclockwise.
Install new lamps in the rear external lights in the reverse order of removal.
The type of the installed lamp must correspond to the table.
Repair of the internal rear light, on the trunk lid
We carry out work to prepare the car for repair.
Open the lid 1, figure 4, of the trunk.
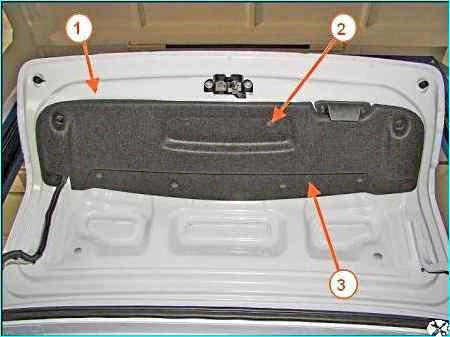
Trunk lid: 1 - trunk lid; 2 - buttons - trim fastenings; 3 - trunk lid trim
Using a flat-head screwdriver, remove 10 buttons 2 securing the trim and remove the trunk lid trim 3.
Disconnect the 5 wire harness connectors of the rear additional light from sockets 1 and 2, Figure 5.
Fastening the rear inner light: 1 - parking light bulb socket; 2 - reversing light bulb socket; 3 - rear inner light; 4 – nut for fastening the rear inner light; 5 – rear additional wiring harness
Using an 8 mm head, unscrew the three nuts 4 securing the rear inner light to the trunk lid and remove the light.
Install the rear inner light in the reverse order of removal.
When installing, ensure that the light is sealed against the trunk lid.
Tightening torque for the nuts is 2-3 Nm (0.2-0.3 kgf.m).
Replacing bulbs
To replace the parking light bulb on the inner light located on the trunk lid, you must:
- - remove 10 buttons 2, Figure 4, securing the trim and remove the trim 3 of the trunk lid;
- - turn the socket 1 counterclockwise and remove it from the seat assembly with the lamp;
- - remove the lamp from the socket by pulling it towards you.
To replace the reversing light bulb on the inner lamp 2, Figure 2, located on the trunk lid, you must:
- - remove 10 buttons 2, Figure 4, trim fasteners and remove the trim 3 of the trunk lid;
- - turn the socket 1 counterclockwise and remove it from the seat assembly with the lamp;
- - remove the lamp from the socket by pulling it towards you.
Install new lamps in the inner rear lights in the reverse order of removal. The type of the installed lamp must correspond to the table.
Replacing the rear fog light and its lamps
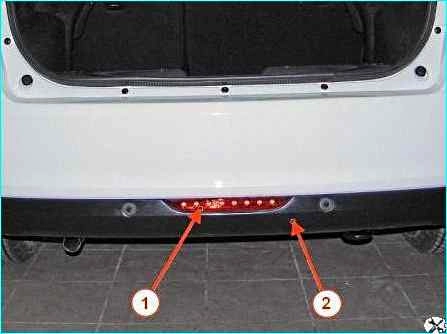
Rear fog light: 1 - rear fog light; 2 - rear bumper
Lamp 1, figure 6, rear fog light is installed in the lower part of the rear bumper 2 of the car.
Light emitting diodes are used as light sources in the rear fog light.
The design of the light is non-separable.
In case of failure of 2 or more light sources, the rear fog light is replaced as an assembly.
To remove the light, place the car on a lift or on an inspection ditch and turn off the ignition.
Disconnect the negative terminal from the battery.
Rear fog light mount: 1 - self-tapping screw; 2 - rear fog light; 3 - rear bumper wiring harness connector; 4 – rear bumper
Using a T20 attachment, unscrew the two screws 1, Figure 7, that fasten the rear fog light 2 to the rear bumper 4 and remove the rear fog light from its socket in the rear bumper.
Disconnect the connector 3 of the rear bumper wiring harness from the connector of the rear fog light 2 and remove the light.
Install the rear fog light 1, Figure 6, in the reverse order of removal.
Repairing the additional brake light
The additional brake light 1, Figure 8 is installed on the luggage compartment shelf behind the rear window glass.
Light emitting diodes are used as light sources for the signal.
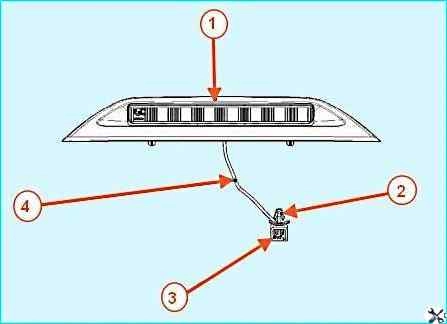
Additional brake light: 1 - additional brake light; 2 - retainer; 3 - connector for additional brake light wiring harness; 4 - additional brake light wiring harness
The additional brake light is not detachable. In case of failure of 2 or more light sources, the additional brake light is replaced as an assembly.
To remove the additional brake light, prepare the car for work and disconnect the negative terminal from the battery.
Open the trunk and disconnect the rear wiring harness connector from connector 3 of the additional brake light wiring harness.
Disconnect the clamp 2 securing the connector of the additional brake light wiring harness from the car body.
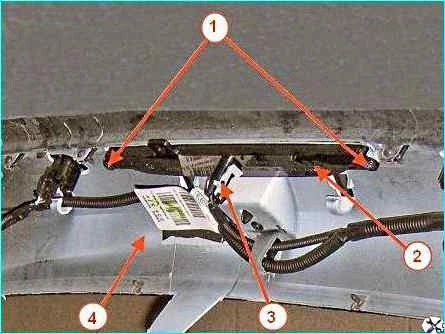
Remove shelf 1, Figure 9, of the trunk as an assembly with additional brake light 2 as an assembly.
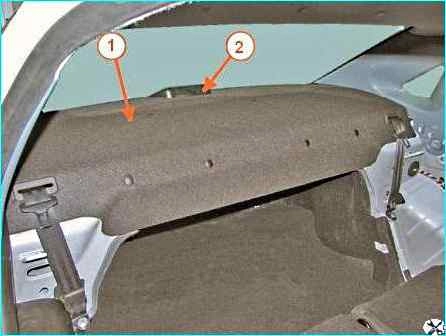
Luggage compartment shelf with additional brake light, assembled on the vehicle: 1 - luggage compartment shelf; 2 - additional brake light
Using a T20 replacement attachment, unscrew the two screws 1, Figure 10, self-tapping and remove the additional brake light 2 from the shelf 3 of the trunk.
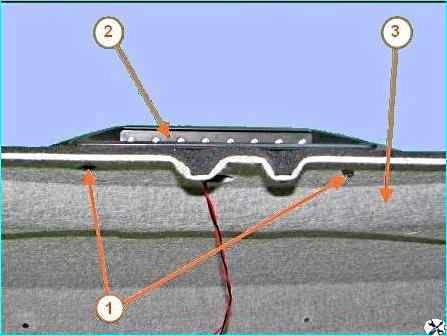
Fastening the additional brake light to the shelf of the trunk: 1 - self-tapping screw; 2 - additional brake light; 3 - trunk shelf
Installing signal 1, figure 8, additional braking is performed in the reverse order of removal.
Removing and installing the license plate light
Prepare the car for work.
The light is held in the socket of the trunk lid trim by a retainer and a spring latch.
Insert a flat screwdriver into the groove on the left side of the light 1, figure 11, Carefully move it to the right, disengage the lock and remove the license plate light from the socket in trim 2 of the trunk lid.
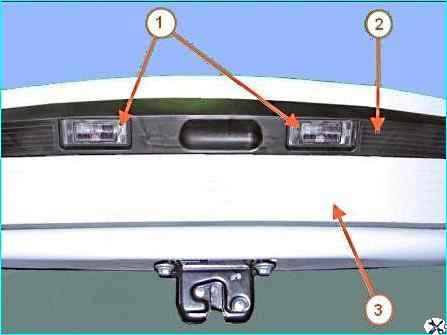
Installing license plate lights on a vehicle: 1 - license plate light; 2 - trunk lid trim; 3 – trunk lid
Disconnect block 1, figure 12, of the rear additional wiring harness from socket 2 and remove lamp 4 of the license plate illumination.
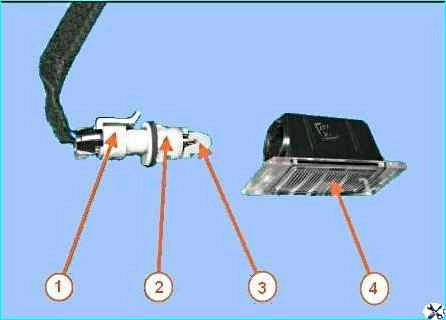
License plate illumination lamp: 1 – block of the rear additional wiring harness; 2 – socket; 3 – W5W bulb; 4 - license plate light
To replace the license plate light bulb:
- - using a flat-head screwdriver, remove the license plate light 1, Figure 11, from the socket in the trim 2 of the trunk lid 3;
- - turn the socket 2, Figure 12, counterclockwise and remove it together with the bulb from the housing of the license plate light 4;
- - remove the bulb 3 from the socket by pulling it towards you.
Install the new bulb in the license plate light in the reverse order of removal.
The type of bulb to be installed is W5W.
Install the lamp 1, Figure 11, license plate light in the reverse order removal.
When installing, ensure that the license plate light is securely fixed in the socket of the trunk lid trim.
Lamp installation location - Lamp type
Outer rear light:
- - turn signal lamp WY16W
- - brake signal / parking light lamp P21/5W
Inner rear light:
- - reversing lamp W16W
- - parking light lamp W5W
")

")
")
")
")
")
")
")