Replacing the trunk light
Prepare the car for work. Disconnect the negative terminal from the battery using a 10 spanner
Open the trunk lid of the car.
Lamp 1, figure 1, trunk light is held by a clamp and a spring latch in the socket of panel 2 of the rear shelf.
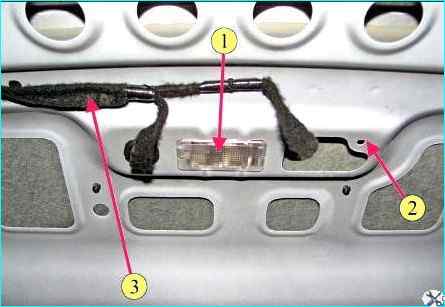
Installing the trunk light on the car: 1 - trunk light; 2 - rear shelf panel; 3 - rear additional wiring harness
Insert a flat-head screwdriver into the slot on the right side of the trunk light, carefully press the light housing and remove it from the socket on the rear shelf panel.
Disconnect connector 1, Figure 2, of the rear additional wiring harness from the connector and remove trunk light 2.
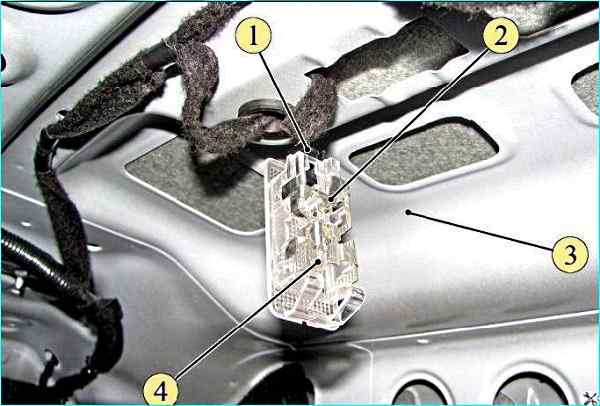
Replacing the trunk light bulb: 1 - rear additional wiring harness connector; 2 - trunk light; 3 - rear shelf panel; 4 - W5W lamp
To replace the trunk light bulb, do the following:
- - use a flat-head screwdriver to remove lamp 2, Figure 2, of the trunk light from the socket in the panel 3 of the rear shelf;
- - use a flat-head screwdriver to remove lamp 4 from the spring contacts of the trunk light.
To install a new lamp in the trunk light, perform the installation in the reverse order of removal.
The type of lamp to be installed is W5W.
To install lamp 1, Figure 1, of the trunk light, perform the installation in the reverse order of removal.
When installing, ensure that the lamp is securely fixed in the socket in the panel of the rear shelf.
Replacing the lamp glove compartment lighting
Prepare the vehicle for the work as described above.
Open the glove compartment lid.
Glove compartment lighting lamp 1, Figure 3, is held in place by a retainer and a spring latch in the socket on the glove compartment body 2.
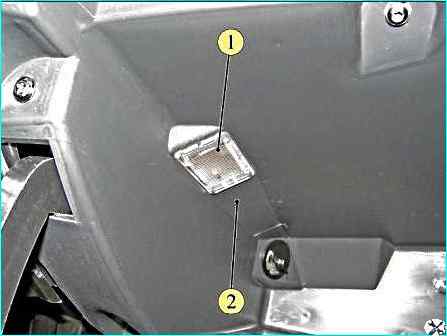
Installing the glove compartment lighting lamp on the vehicle: 1 glove compartment lighting lamp; 2 - glove compartment housing
Insert a flat-head screwdriver into the slot on the front side of the glove compartment light, carefully press the light housing and remove it from the socket on the glove compartment housing.
Disconnect connector 1, Figure 4, of the instrument panel wiring harness from the connector and remove glove compartment light 2.
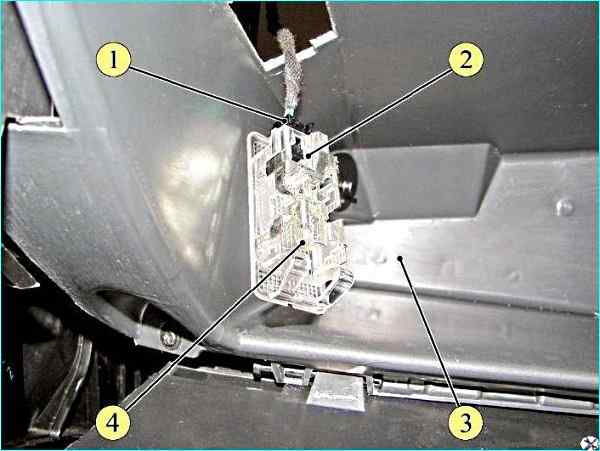
Replacing the glove compartment light bulb: 1 - connector of the instrument panel wiring harness; 2 - glove compartment light; 3 - glove compartment body; 4 - W5W lamp
To replace the glove compartment light bulb, do the following:
- - use a flat-head screwdriver to remove the glove compartment light 2, Figure 4, from the socket in the glove compartment housing 3;
- - use the same screwdriver to remove the lamp 4 from the spring contacts of the glove compartment light.
Install the new lamp in the glove compartment light in the reverse order of removal.
The type of lamp to be installed is W5W.
Install the glove compartment light 1, Figure 3, in the reverse order of removal.
When installing, ensure that the lamp is securely fixed in the socket in the glove compartment housing. box.
Replacing the car interior light
Prepare the car for the work as described above.
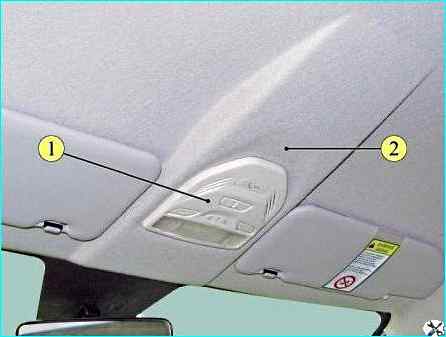
Interior light: 1- interior light frame; 2 - roof trim
Insert a flat-head screwdriver into the slot between frame 1, Figure 5, of the interior light and the roof trim 2 from the front side of the frame, carefully press the interior light frame, release the clips from the engagement and remove the frame from the socket in the roof trim.
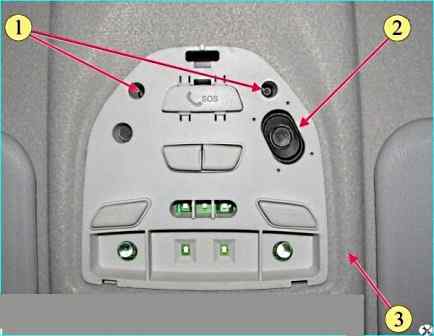
Interior light with the frame removed: 1 - screw itself cutting; 2 - interior lighting lamp; 3 - roof trim
Using a T20 bit and a screwdriver, unscrew the two screws 1, Figure 6, self-tapping fasteners of the interior light.
Using a flat screwdriver, through the hole in the back of the light, disengage the spring clip 1, Figure 7, from the body and remove the interior light 4 from the socket in the car roof trim.
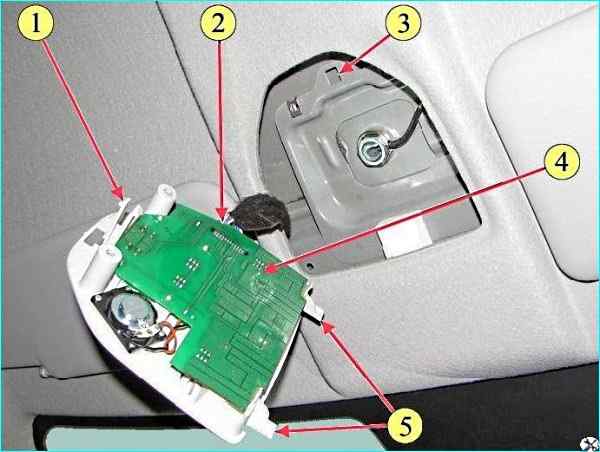
Removing the interior light: 1 - spring clip; 2 - wiring harness connector; 3 - spring retainer socket; 4 - interior light; 5 - retainer
Disconnect wiring harness connector 2 from interior light connector 4 and remove the light.
The interior light is non-separable, and if any of its components (interior light bulb, loudspeaker, microphone, function on/off button) fail, the light is replaced as an assembly.
Install the interior light in the reverse order of removal.


