Prepare the car for work.
Place the car on a lift or in an inspection pit.
Disconnect the negative battery terminal.
Remove the drive belt, article - "How to replace the drive belt"
Stop the flywheel from turning.
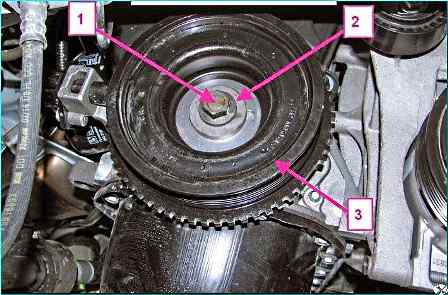
Crankshaft damper: 1 - damper mounting bolt; 2 - washer; 3 - crankshaft damper
Using a 17 mm head, unscrew bolt 1, Figure 1, fastening the damper, remove washer 2 and damper 3 of the crankshaft.
Reinstall the damper fastening bolt.
Remove the flywheel locking device (if used).
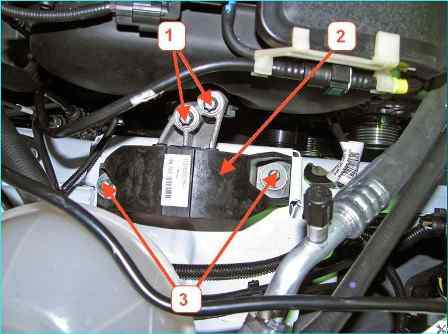
Right support of the power unit suspension: 1 - bolt fastening the power unit to the right support; 2 - right support of the power unit suspension; 3 - bolt for fastening the right support of the power unit suspension to the body
We install the crossmember 1, figure 2, on the car for hanging the engine, insert the hook 2 of the crossmember into the eye 3 of the right eye, and hang the power unit on the right side.
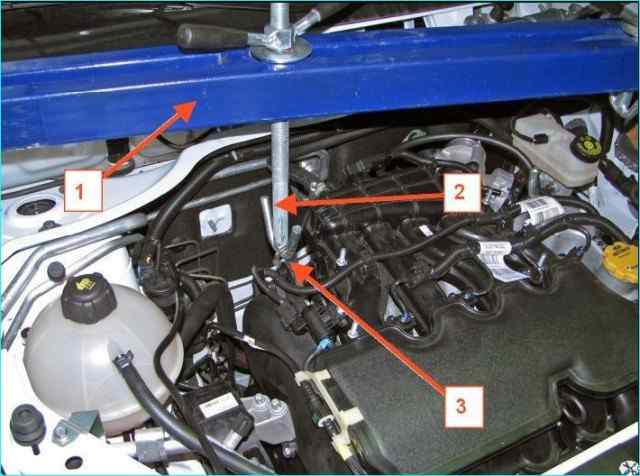
Hanging the power unit: 1 - crossmember for hanging the power unit; 2 - crossmember hook; 3 - engine eye
Using a TorxE12 head, unscrew and remove two bolts 1, Figure 3, securing the power unit to the right support 2 of the engine mount.
Mark the position of the right support with a marker.
Using the same head, unscrew two bolts 3 securing the right support of the power unit mount to the body and remove the right support.
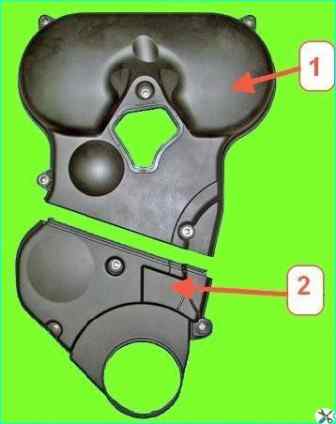
Front timing belt cover for engine 21129: 1 - front upper protective cover of the timing belt drive; 2 - front lower protective cover of the timing belt drive
Using a 5 mm Allen key, unscrew the five bolts with washers and remove the upper protective cover 1, Figure 4.
Using the same key, unscrew the three bolts and remove the lower protective cover of the timing belt.
Using a 17 mm key, turn the crankshaft by the damper mounting bolt until the mark on the toothed pulley of the crankshaft coincides with the mark on the oil pump housing.
In this case, the marks on the camshaft pulleys must coincide with the marks on the rear protective cover.
Removing the timing belt on the 21129 engine: 1 - automatic tensioner mounting bolt; 2 - automatic toothed belt tensioner; 3 - timing belt toothed belt; "A", "B", "C", "D" - installation marks
Loosen bolt 1, Figure 5, for fastening automatic tensioner 2 by unscrewing it by 2 - 3 turns, and remove the spacer washer and timing belt 3 from the crankshaft pulley (use a 17 mm open-end wrench and a flat screwdriver)
Installing the timing belt
When installing the belt, keep in mind that the tension and tension control of the timing belt must be performed with a cold engine (15 - 35˚).
If the car is equipped with a VAZ-11189 engine:
Align the installation mark "C" of the camshaft pulley with the mark "D" on the protective rear timing belt cover, and the mark "A" on crankshaft pulley marked "B" on the oil pump housing by turning the crankshaft by the damper mounting bolt in the shortest angular direction, as shown in Figure 6 (use a 17 mm replaceable head, ratchet, and extension).

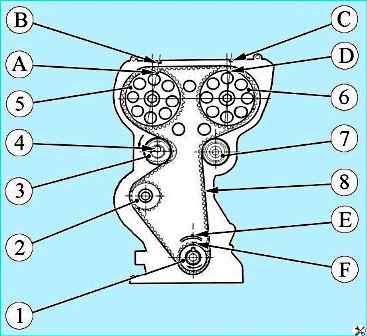
Timing mechanism drive parts for engine 11189: 1 - crankshaft pulley; 2 - water pump pulley; 3 - automatic toothed belt tensioner; 4 - automatic tensioner mounting nut; 5 - camshaft pulley; 6 - timing belt; "A", "B", "C", "D" - installation marks; (a) - belt branch
Install timing belt 6, Figure 6, on crankshaft pulley 1 and, while pulling both branches of the belt, put one branch on water pulley 2 pump and put it behind the automatic tensioner 4.
Tightening branch "a" put the belt on pulley 5 of the camshaft.
If necessary, turn the camshaft pulley towards the smallest stroke until the belt teeth coincide with the depressions of the camshaft pulley.
Tighten nut 4 of the automatic tensioner fastening with a torque of 5 Nm (0.5 kgf.m) (use a replaceable head 15, a torque wrench).
If the VAZ-21129 engine is installed:
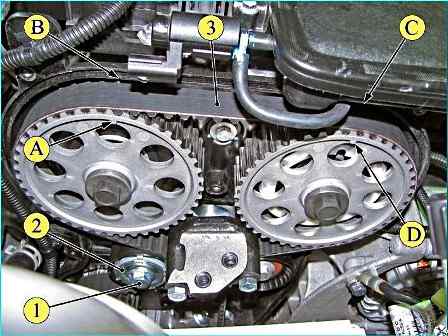
Timing mechanism drive parts of engine 21129: 1 - crankshaft pulley; 2 - water pump pulley; 3 - automatic toothed belt tensioner; 4 - automatic tensioner mounting bolt; 5 - exhaust camshaft pulley; 6 - intake camshaft; 7 - support roller; 8 - timing belt; "A", "B", "C", "D", "E", "F" - installation marks
Align the installation marks "A" and "D" on the camshaft pulleys with the marks "B" and "C" on the rear timing belt cover, as shown in Figure 7, and secure the pulleys using tool 67.7811-9516 (use tool 67.7811-9516 to secure the camshaft pulleys).
Align the installation mark "F" on the crankshaft pulley with the mark "E" on the oil pump cover by turning the crankshaft by the damper mounting bolt in the shortest angular direction (use a 17 mm socket, ratchet, or extension).
Tighten bolt 4 for fastening the automatic tensioner with a torque of 5 Nm (0.5 kgf.m) (use a 15 replaceable head and a torque wrench).
Install the timing belt 8 on the pulleys 5 and 6 of the camshafts, the support roller 7, the automatic tensioner 3, the pulley 2 of the water pump and the pulley 1 of the crankshaft, as shown in Figure 7, maintaining the position of the installation marks on the pulleys.
For all vehicle trim levels
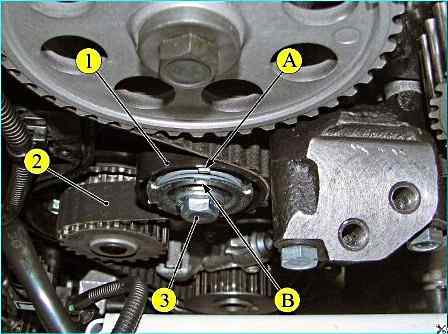
Tensioning the drive belt Timing belt: 1 - automatic toothed belt tensioner; 2 - timing belt; 3 - automatic tensioner mounting bolt; A, B - installation marks
Install the tensioning key into the grooves of the support plate of the automatic tensioner 1, Fig. 8, turn the tensioner counterclockwise to the extreme position of lightly touching the tensioner lever stoppers.
Turn the key clockwise until the automatic tensioner marks are aligned and tighten the tensioner mounting bolt.
Bolt tightening torque 30-36 Nm (3.0-3.6 kgf.m) (used: - key 67.7812.9573-01 for automatic timing belt tensioner, replaceable head 15, torque wrench).
Warning. When tensioning the belt, do not turn the crankshaft by rotating the camshaft pulley.
Remove tool 67.7811-9516 (for vehicles with engine 21129).
Turn the crankshaft two turns using a 17 key.
If mark "A" deviates beyond mark "B", re-tension the belt, first unscrewing the automatic tensioner mounting bolt and tightening it with a torque of 5 Nm (0.5 kgf.m) (socket wrenches for 15, 17; replaceable head 15, torque wrench).
Install a spacer washer on the crankshaft pulley.
Attention. When installing the timing belt from spare parts, check the condition of the automatic tensioner. If damaged, replace the automatic tensioner.
Install the front timing belt cover one by one, first the lower one 2, Figure 4, then the upper one 1, while the upper cover should enter the grooves of the lower cover and mate with it (use a 5 mm Allen key).
Install the right support 2, Figure 3, of the powertrain suspension on the body.
Install, without tightening, two bolts 1 securing the right support of the powertrain suspension to the powertrain suspension bracket (replaceable Torx E12 head, extension, ratchet).
Install, without tightening, two bolts 3 securing the right support of the powertrain suspension to the body (use: - replaceable Torx E12 head, extension, ratchet).
Tighten the two bolts securing the right support of the powertrain suspension unit to the power unit suspension bracket with a torque of 53 - 71 N m (5.3 - 7.1 kgf.m) (replaceable Torx E12 head, extension, torque wrench).
Install the right support of the power unit suspension according to the marks on the body made during its removal, and tighten the two bolts securing the right support of the power unit suspension to the body with a torque of 53 - 71 N m (5.3 - 7.1 kgf.m) (replaceable Torx E12 head, extension, torque wrench).
Remove hook 2, Figure 2, from the crossbar for hanging the power unit regatta from the right eye 3 on the engine and remove the crossmember 1 from the car.
Install the device for locking the engine flywheel in the holes of the starter mounting bolts on the gearbox (device for locking the engine flywheel).
Unscrew the crankshaft damper mounting bolt.
Install the damper, washer on the crankshaft and secure with a bolt. Tightening torque of the damper mounting bolt 95-115 Nm (9.5-11.5 kgf.m) (used: - replaceable head 17, ratchet wrench, torque wrench).
Install the drive belt of the auxiliary units and the starter.
Additionally for vehicles with a manual transmission:
Install the bracket for mounting the clutch hydraulic cylinder and the clutch hydraulic cylinder.
For vehicles of all configurations:
Install the engine mudguard.
Install the right front fender shield.
Install the right front wheel.
Connect the ground wire terminal to the battery.
")

")
")
")
")
")
")
")