An external sign of wear on the valve stem seals is the short-term appearance of blue smoke from the exhaust pipe after starting the engine, as well as when braking the engine after prolonged driving under load
In this case, constant smoking is usually not observed.
Indirect signs are increased oil consumption in the absence of external leaks and oily spark plug electrodes.
To replace the valve stem seals, you must remove the cylinder head from the engine.
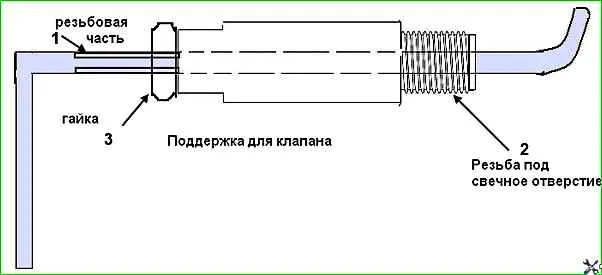
You can, of course, change the valve stem seals without removing the cylinder head.
To do this, you will need a valve support, which is screwed into the spark plug hole of the cylinder in which we change the caps.
And before changing the caps in a certain cylinder, you need to set the piston of this cylinder to the upper position. In this case, you need to work with an assistant.
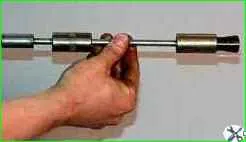
An assistant must support the valve. If you support the valve as shown in the figure, you can do without an assistant.
You will need: the same tools as when replacing the head gasket, as well as pliers, a device for compressing valve springs, pliers or tweezers for removing valve cotters, a mandrel for pressing oil seals, a hammer.
Remove the cylinder head (see “Replacing the head gasket ZMZ-406 GAZ-3110”)

Remove the hydraulic pusher.
It is more convenient to remove the hydraulic pusher using a strong magnet or suction cup.
Compress the valve springs with a tool, placing a suitable stop under the valve plate on the back of the head, and remove the crackers from the spring plate.

To make the spring plate easier to remove from the crackers, you can apply a light blow with a hammer to the persistent bipod of the desiccant.

Remove the device and take out the spring plate
Remove the springs.

Use a puller to remove the oil seal

The puller shown has a mandrel on the other end for pressing on the caps.
Do not remove the cap by using pliers or prying it off from both sides with screwdrivers.
The guide sleeve on which the cap is placed is made of cermet, and its edge breaks off easily.

Place the mandrel from the valve stem seal set onto the valve stem, protecting the working edge of the cap from damage by the edges of the grooves on the valve stem for the crackers
Lubricate the inside surface of the new valve stem seal with engine oil and slide the cap along the valve stem to the guide sleeve.
Install the mandrel for pressing the cap. Using light blows of the striker on the mandrel, press the cap until it stops.

Remove the safety mandrel, install the springs and valve retainers in the reverse order of removal.
After installing the crackers and removing When using the device for compressing valve springs, apply several gentle blows with a hammer to the end of the valve stem so that the crackers are guaranteed to be fixed in the groove of the stem.
If the nuts installed skewed remain unfixed, when the engine is started, the “loose” valve will fall into the cylinder, which will lead to a serious engine failure.
Install the hydraulic pusher.
Before installing the hydraulic tappet, lower it into a container with engine oil and press the hydraulic tappet sleeve several times until air bubbles stop escaping. The hydraulic pusher should become rigid.
Replace the oil seals of the remaining valves in the same way.
Install the cylinder head and all removed components and parts onto the engine.
")

")
")
")
")
")
")
")