Since hydraulic tensioners constantly keep the chains in tension, regardless of chain stretch and shoe wear, there is no need to adjust the chain tension during operation
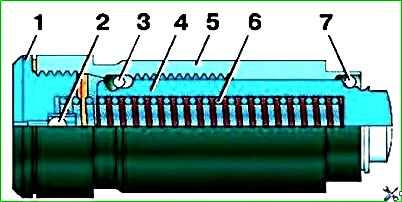
Plunger 4 is installed in housing 5. A spring 6 is inserted into the plunger, which is compressed by screw plug 1.
A check ball valve 2 is installed in plug 1.
The plunger 4 is fitted with a locking ring 3 and a locking ring 7.
In the figure, the tensioner is shown in a non-working “charged” state, when the locking ring 7 keeps the plunger 4 from moving.
To bring the tensioner into working condition, to “discharge” it, you need to press the end of the plunger so that the locking ring 7 moves into the groove of a smaller diameter on the plunger, and under the action of the spring 6 the plunger moves out of the body 5.
The hydraulic tensioner is installed on the engine in a charged state.
Plunger 4, under the action of spring 6 and oil entering through valve 2 from the engine lubrication system, presses on the tensioner shoe and maintains the chain in tension.
As the chain stretches and the tensioner shoe wears out, the plunger 4 further moves out of the body 5, while the locking ring 3 moves into the next annular groove on the body, preventing the plunger from moving in the opposite direction.
When the chain hits the tensioner shoe, for example, when the engine operating mode changes, the plunger 4 moves back into the housing 5 to the width of the groove for the locking ring 3.
At the same time, it compresses spring 6. In addition, valve 2 closes and additional damping occurs due to the fact that oil is squeezed out through the gap between the plunger and the body.
The hydraulic tensioners of the upper and lower chains are absolutely identical.
Removing and disassembling the hydraulic chain tensioner

Unscrew bolts 1, holding cover 2, as it is affected by the spring force.
Then carefully remove cover 2 with the cover gasket and the hydraulic tensioner soundproofing gasket

Remove the hydraulic tensioner from the channel in the cylinder head.
Unscrew screw plug 1.
The hydraulic tensioner must not be clamped in a vice, so you need to hold the key in a vice and insert the hydraulic tensioner into it.

Remove plug 1 and take out spring 2.

Remove plunger 1 from hydraulic tensioner housing 2
Inspection
It is prohibited to disassemble the plunger and hydraulic tensioner housing.
After disassembly, wash all parts in gasoline and dry.
Inspect the plunger, if there are burrs or nicks on its surface, the locking or retaining ring is broken, the hydraulic tensioner needs to be replaced.
Inspect the body. If there are burrs, deep scratches on the inner surface of the housing, or the annular grooves for the locking ring are damaged, replace the hydraulic tensioner.
The plunger in the body must move freely.
If the plunger “sticks” in the body in any position, replace the hydraulic tensioner.
The plunger should move in the body when the locking ring is engaged in the annular grooves on the body, only in the direction in which it moves under the action of the spring.
If the plunger moves in the opposite direction, replace the hydraulic tensioner.
Assembling and installing the chain tensioner
Before assembly, lubricate the plunger and the inner surface of the housing motor oil.
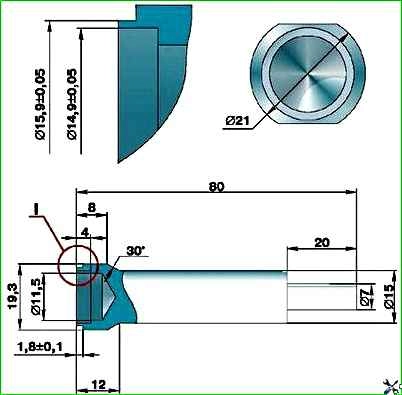
To assemble the hydraulic tensioner, it is recommended to make a mandrel, the dimensions of which are shown in the figure: “Charging” the hydraulic tensioner using a ring.
- 1. Clamp the mandrel vertically in a vice.
- 2. Install the hydraulic tensioner housing onto the mandrel.
- 3. Insert the plunger into the body until the plunger retaining ring stops in the mandrel.
- 4. Insert the spring into the plunger and fill the tensioner with engine oil. Compressing the spring, tighten the screw plug.
In this case, the plunger retaining ring should fit into the groove on the body and keep the plunger from moving, i.e. the tensioner will be charged.
- 5. Remove the hydraulic tensioner from the mandrel. Do not press the plunger, as this will cause the plunger retaining ring to come out of the groove on the body and the plunger will come out of the body, i.e. the hydraulic tensioner will be discharged.
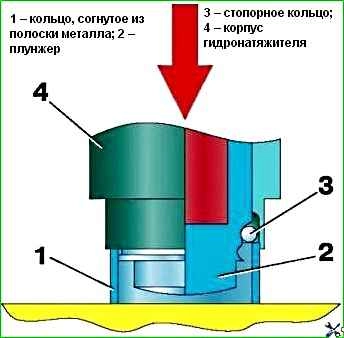
- 6. If there is no mandrel for assembling the hydraulic tensioner or it is not possible to make one, you can assemble the tensioner as follows:
- - bend a ring from a strip of metal 1.0 mm thick and about 15 mm high.
To do this, you can use a piece of tape from an old tape clamp;
- - insert the plunger into the hydraulic tensioner housing so that the locking ring on the plunger is opposite the groove in the housing;
- - place the bent ring on the table.
- - Install the body with the plunger on it so that the ring fits between the body and the plunger until it stops against the locking ring;
- - insert a screwdriver into the plunger and lightly hit the screwdriver with a hammer to move the plunger down. In this case, the retaining ring will move to a larger diameter of the groove on the plunger and enter the groove on the body, keeping the plunger in a charged state;
- - insert a spring into the plunger. Fill the tensioner with engine oil and tighten the plug, overcoming the spring force;
- - remove the manufactured ring. Do not press the plunger so as not to discharge the hydraulic tensioner.
- 7. Lubricate the channel for the hydraulic tensioner in the cylinder head with engine oil and install the hydraulic tensioner there until it stops against the tensioner shoe. Do not press the hydraulic tensioner so as not to discharge it.

Install a rubber soundproofing gasket into the cover 2. Install cover 2 with gasket on the cylinder head, tighten bolts 1.
Unscrew plug 3 and through the hole under the plug, press the hydraulic tensioner with a suitable rod, moving it until it stops, and then release it.
The hydraulic tensioner will discharge, its body, under the action of a spring, will rest against cover 2, and the chain will be tensioned.
Screw the plug 3 into the lid 2.
In the same way, remove and install the lower chain hydraulic tensioner.
If there is no mandrel for assembling the hydraulic tensioner or it is not possible to make one, you can assemble the tensioner as follows

We bring the jaws of the vice together, leaving a gap of 19 mm between them.
Do not clamp the tensioner body in a vice.
When disassembling two hydraulic tensioners at once, do not confuse their plunger pairs, since they are selected with a certain clearance.


Having installed the tensioner body in a vice, like in the mouth of a key, use a screwdriver with a wide blade, and turn out the valve

Remove the spring from the housing

Remove the plunger.
We wash everything whether in gasoline or kerosene, blow with compressed air and lubricate with engine oil.

Cut a strip (10-15 mm wide and 25 mm long) from a steel sheet 0.8-1.0 mm thick.
Using pliers or a mandrel, bend it into a ring with a diameter similar to that of a plunger.

Using a manufactured mandrel, we press the spring in the hydraulic tensioner housing.

Installing the plunger into the body.

If necessary, use a thin screwdriver to guide the locking ring.

Use a screwdriver to press the bottom of the plunger until it stops.

We install a spring in the plunger, and the body itself in a vice.

Overcoming the resistance of the spring, we wrap the valve into the hydraulic tensioner housing.

For a correctly charged tensioner, the plunger should be completely inserted into the body

Use a screwdriver to tighten the valve, holding the body in a vice (as during disassembly).
Do not press on the protruding end of the plunger, and after installing the cylinder head into the channel, do not press on the tensioner itself.
Discharging the hydraulic tensioner
After installing the hydraulic tensioner on the engine, it must be brought into working condition - discharged. To do this:

Using a 12mm wrench, unscrew the plug from the hydraulic tensioner cover

Use a screwdriver through the hole to press the tensioner, which, when “discharged,” will push it out

Installing the plug in place

This is what an “undischarged” hydraulic tensioner looks like

This is what a “discharged” hydraulic tensioner looks like.
")

")
")
")
")
")
")
")