We remove the generator for repair or replacement, as well as when repairing the power plant
Removing the generator
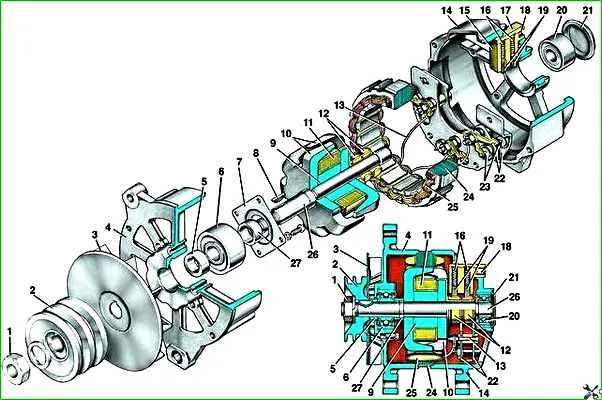
Generator 1631.3701: 1 - nut; 2 - pulley; 3 - fan impeller; 4 - drive side cover; 5 - fan spacer; 6 - front bearing; 7 - front bearing cover; 8 - key; 9 - rotor bushing; 10 - rotor magnetic circuit; 11 - rotor winding; 12 - contact ring; 13 - output of the stator winding; 14 - drive side cover; 15 - brush holder; 16 - brush spring; 17 - brush holder cover; 18 - terminal “III”; 19 - brush; 20 - rear bearing; 21 - rear bearing cover; 22 - rectifier block; 23 - diode; 24 - stator; 25 - stator winding; 26 - rotor shaft; 27 - rotor thrust bushing
Generator for engines ZMZ-402 and ZMZ-4021:
Disconnect the wire from the negative terminal of the battery.

Disconnect block 1 from the brush holder and, unscrewing bolt 2, disconnect the wires from the generator.
Remove the belt.

Finally unscrew the adjusting bolt

Finally unscrew the two bolts of the lower mounting of the generator, while holding the generator
Remove the generator
Disassembling the generator

Unscrew two bolts 1 and remove brush holder 2.
Unscrew nut 3 on the “positive” terminal of the generator and disconnect the capacitor wire.
Remove the plastic insulating sleeve 4.
Unscrew screw 5 and remove capacitor 6.

Unscrew the four coupling bolts 1 and remove the cover 2 from the slip ring side together with the stator.

Unscrew three nuts 1, disconnect stator leads 2 from the rectifier unit and remove stator 3.

Unscrew the three screws 1 securing the rectifier unit to the cover and remove the “positive” terminal 2 of the generator, while removing the plastic insulating sleeve from the terminal on the back of the rectifier unit.
Remove rectifier block 3.

Unscrew nut 1, remove pulley 2 and fan 3

Remove key 1 from the armature shaft.
Press armature shaft 2 out of cover bearing 3 on the drive side.

Unscrew the four screws 1 and remove the bearing cover 2.
Remove the bearing; if there is difficulty, you can knock out the bearing with light blows of a hammer through a drift.
Checking and inspecting the generator
Check brushes.

Inspect the slip rings. If they have burrs, marks, scratches, signs of wear from brushes, etc., the rings must be sanded.
The rest of the checks are carried out in the same way as checking the generator 9422.3701.
Assembling the generator
The generator is assembled in the reverse order of disassembly.
When installing the rectifier block, pay attention to the fact that a plastic insulating sleeve must be placed under the block on the “positive” terminal.
Installing a generator
Install the generator in the reverse order of removal. After installation, adjust the belt tension
Checking and replacing generator brushes
Disconnect the wire from the negative terminal of the battery.

Disconnect block 1 with wire from the brush holder terminal.
Unscrew the two screws 2 and remove the brush holder 3 from the generator.

Check that the brushes move easily in the brush holder.
If the brushes are jammed, you need to remove the two mounting screws and remove the brush holder cover.
Clean the brushes and clean the holes in the brush holder.
If the required result cannot be achieved, replace the brush holder assembly or brushes.
Brushes with chips, cracks or other defects must also be replaced.
Check the amount of protrusion of the brushes from the brush holder.
If the value “a” of the protrusion of the brushes in the free state is less than 8 mm, replace the brush holder assembly or brushes.
")

")
")
")
")
")
")
")