Draining sediment from the fuel coarse filter, washing the filter
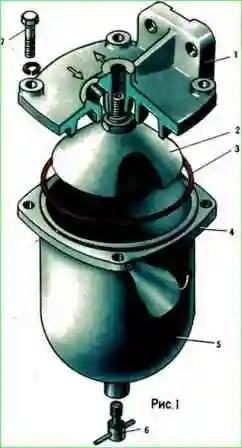
Unscrew the drain plug 6 (Fig. 1), drain the sediment from the filter.
Remove the bolts 7 securing the cap to the filter housing and remove the cap 5 together with the flange 4.
Unscrew the filter element 2 from the housing 1, remove the sealing washer.
Using a bath and a brush, wash the filter element 2 and the cavity of the cap 5 with diesel fuel, blow with compressed air.

Put the sealing washer, distributor onto the filter element and screw the filter element into the housing.
Install the filter cap and secure with screws.
Tighten the drain plug 6 and make sure the filter is tight with the engine running.
Remove fuel leakage or air leakage by tightening the bolts of fastening 7 of cap 5 to body 1.
Changing the filter elements in the fine fuel filter
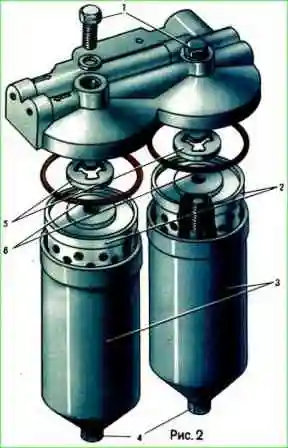
Remove drain plugs 4 (Fig. 2), drain the fuel from the filters into the dishes, screw in the plugs.

Remove the bolts 1 securing the filter caps, remove the caps 3 and remove the dirty filter elements 2.
Wash the caps with gasoline or diesel using a bath and a brush.
Install a new filter element in each cap.
Install bolts 1 with washers and gaskets 5, if necessary, install new cap gaskets 6, put caps 3 together with elements 2 and tighten bolts 1.
Start the engine and make sure the filter is tight.
Remove fuel leakage by tightening bolts 1 fastening the caps to the body.
Cleaning the element of the second stage and flushing the first stage of the air cleaner
Disconnect the ejection system hose and air ducts from the air cleaner, remove the cover, unscrew the fastening rod, remove the cardboard filter element, remove the air cleaner.
Wash the case with the inertial grating in gasoline.
Clean the second stage of the air cleaner (paper element) according to the clogging indicator.
The estimated service life of the filter element is 30,000 km.
If there is dust on the cardboard without soot or soot (gray element), blow it with dry compressed air (air pressure should be no more than 2-3 kgf / cm 2).
If there is dust, soot, oil, fuel on the cardboard, wash the filter element in warm (40-50 ° C) water with the addition of detergent, immersing the element in the solution for half an hour, followed by intensive rotation (rinsing) for 10-15 min.
Then rinse the element in clean water and dry well.
In the presence of mechanical damage, cardboard ruptures, peeling of covers and casings, replace the element.
Reassemble the air cleaner in reverse order.
When assembling gaskets that have tears, replace them, check the quality of the seal by the presence of a continuous imprint on the gasket.
Removing air from the power system

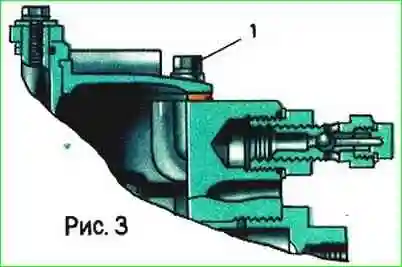
Loosen the filter cap bolt 1 (fig. 2) or bolt 1 (fig. 3) of the high pressure pump and pump fuel with a manual priming pump until fuel comes out from under the bolt without air bubbles.</p >
Then tighten the bolt.

Checking the oil level in the fuel injection advance clutch and topping it up
The fuel injection advance clutch is lubricated with engine oil.
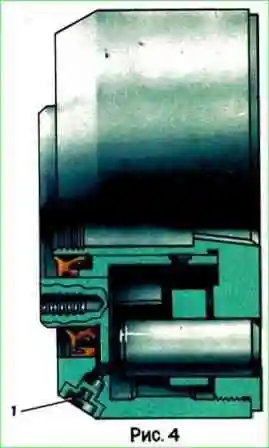
To check the oil level in the coupling, it is necessary to unscrew the plug 1 (Fig. 4) in the lower part of its body.

If oil flows out of an open hole, then the level is sufficient.
If it does not come out, unscrew a similar plug in the upper part of the clutch housing and add oil until it comes out of the bottom hole.
Then close both stoppers.
Characteristic malfunctions of the power system and their elimination
If the engine does not start, then first of all check if there is fuel in the tank.
Then make sure there is no air leak in the system.
Air ingress into the system can be detected by the release of foam or fuel leakage at the junctions of the fuel lines when fuel is pumped.
To eliminate fuel leaks and air leakage, tighten the threaded connections, and, if necessary, replace faulty pipelines or gaskets.
To remove air from the power system, it is necessary to bleed the system.
If no air leakage is detected in the fuel system, you need to make sure that the fuel priming pump is working.
To check its operation, disconnect the fuel supply line from the fine filter and turn the engine crankshaft with a starter.
If the pump is working properly, fuel should squirt out of the fuel line. If there is no jet, then the booster pump is faulty or the fuel lines are clogged.
The most likely malfunctions of the fuel priming pump are a broken spring or a stuck piston (due to dirt getting between the seat and the valve).
Then check whether the filter elements of the coarse and fine filters 2 are clogged.
Clogging of the filter elements can be judged by a decrease in fuel pressure at the inlet to the high pressure pump.
Normal fuel pressure should be between 0.5 - 1.0 kgf / cm 2 at 2300 rpm of the pump camshaft.
You can determine the fuel pressure using a control pressure gauge connected to the fuel supply fitting to the high pressure pump.
If the fuel pressure is lower than specified, check the condition of the fuel filters, clean or replace the filter elements if necessary.
If after all the checks the engine does not start, most likely the high pressure fuel pump (TNVD) is faulty or the fuel injection advance angle is set incorrectly.
The faulty injection pump must be removed and sent for repair, the advance angle must be adjusted.
In winter, water may freeze in the fuel lines, filters or on the intake screen, increase the viscosity of the oil, which makes it difficult to move the injection pump rack.
In this case, you need to carefully warm up the fuel lines, filters, fuel tank, injection pump with a rag soaked in hot water. It is forbidden to use an open flame for warming up!
At low temperatures, thickening of the fuel in the system is possible. To eliminate this phenomenon, it is necessary to fill in the fuel corresponding to the season and bleed the power system.


