Synchronization sensor - inductive type (2612.1.113 Bosch or 406.3847113) is installed on the front end of the engine at the bottom, on the right side and is designed to synchronize the operation of the control unit with the engine workflow
The sensor is a bar magnet with a winding wound over it and enclosed in a high-strength plastic housing.
When the teeth of the synchronization disk pass, past the end of the core, a signal appears on the sensor terminals that carries information about the crankshaft speed, and two teeth missing on the synchronization disk cause a signal pulse by which the control unit determines the top dead center (TDC) of the first cylinder .
If the synchronization sensor and its circuits fail, the engine will not work.
The control unit will memorize the fault code and turn on the KMSUD alarm lamp on the dashboard.
Timing Sensor Test
Turn off the ignition and disconnect the "negative" terminal of the battery.

Use a thin screwdriver or an awl to remove the spring clip of the shoe.

Disconnect the sync sensor connector.

Connect an ohmmeter to the central and one side output.

We measure the resistance of the sensor winding, which should be in the range of 700-900 Ohm.

To further check the health of the sensor, remove it from the engine.
You can verify that the sensor is working by connecting a voltmeter to its outputs

We quickly bring the metal rod to the core of the sensor - if it is working, voltage surges are observed on the device.
We replace the defective sensor.
Removing the timing sensor

Using the “10” key, we unscrew the bolt securing the sensor to the engine block

Remove the sensor from the hole.
Bending the sensor wire clamps located on the intake manifold and cylinder block, pull the wire down together with the connector
Install the sensor in reverse order.
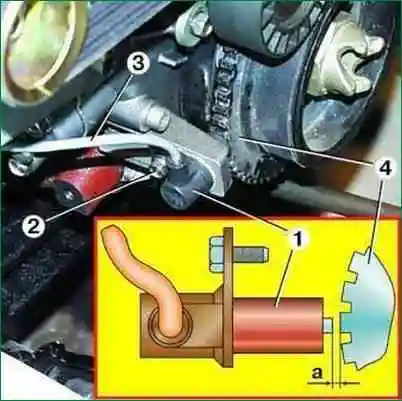
After installing the sensor, we check the gap between its rod and the teeth of the synchronization disk using a set of probes.
The gap should be within 1-1.5 mm.
")

")
")
")
")
")
")
")