Removing the door trim
Remove the door trim to gain access to the lock and window lifter mechanisms.

Use a screwdriver to pry the latch of the window lifter handle (insert the screwdriver between the latch and the washer).

Remove the latch.

Remove the handle and washer.

Using a slotted screwdriver, remove the door handle plug.


Use a Phillips screwdriver to unscrew two screws for the lower fastening of the handle to the door and one screw for the upper fastening.

Remove the handle

Use a slotted screwdriver to pry up the interior door handle trim and remove the trim


Use a screwdriver to pry up eight pistons (two on the front edge, two on the back and four on the bottom)

We remove the upper edge of the upholstery from under the flange and remove the door trim.
Under the upholstery there is a vapor barrier film.

To replace the piston, turn it 90° and remove it from the groove
Removing the door lock
Remove the door trim.

Use a Phillips screwdriver to unscrew the two screws securing the interior door handle.

By bringing the handle to the window of the inner door panel, disconnect the rod from the inner door handle.

Unscrew the lock button.

Using pliers, disconnect the lock button rod from the lock and remove the rod.

To facilitate access to the lock, you must move the glass guide.

To do this, go to Use a Phillips screwdriver to unscrew the upper and lower screws securing the glass guide.

We move the glass guide to the front of the door.

Using a screwdriver, remove the rod going from the lock release roller to the lock switch arm.

Use a Phillips screwdriver to unscrew the three screws securing the lock to the end of the door.

We remove the lock from the window of the inner door panel.

Using a felt-tip pen, trace the outline of the latch on the door pillar.

Using a 10mm socket, unscrew the three bolts securing the clamp to the body (loosen when adjusting)

Remove the door lock together with the adjusting shims.
When installing a new clamp, we save the set of gaskets.
Lubricate the new lock with any grease, connect a rod with a handle to it and install it on the car in the reverse order of removal
Install the lock and check the operation of the lock.
Adjusting door locks
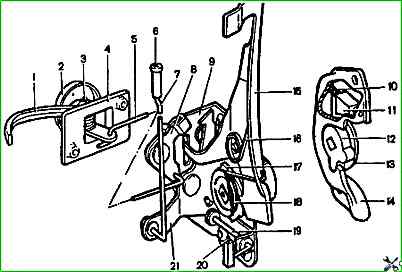
Left front door lock: 1 - internal lock drive handle; 2 - lining of the inner handle; 3 - axis; 4 - bracket for the internal handle; 5 - pull of the inner handle; 6 - lock button; 7 - lock button rod; 8 - lever of the internal lock drive; 9 - lock body; 10 - cracker spring; 11 - lock retainer block; 12 - rotor; 13 - support of the central roller; 14 - lock body; 15 - external drive lever; 16 - external drive lever spring; 17 - ratchet; 18 - ratchet spring; 19 - lock release roller; 20 - lock release rod; 21 - locking lever
For normal operation of the door lock, adjust the position of the housing 14 (see Fig. 14) of the lock retainer, having first loosened the fastening bolts.
Before adjusting the lock, it is recommended to outline the contours of the lock on the body pillar.
If the door closes too tightly, move the lock outward and tighten the bolts.
If the door closes poorly, move the lock inward.
If the door goes down when closing, move the lock up, and if it rises (sagging in the open position), move the lock down.
If the door is not properly unlocked using inside handle 1, adjust the position of the handle.
To do this, loosen the fastening screws and move the handle together with the bracket to the desired position.
After completing the adjustment, tighten the fastening screws.
")

")
")
")
")
")
")
")