The starter type 5722.3708 is a DC motor with excitation from permanent magnets, combined with a planetary gearbox and an electromagnetic two-winding traction relay
The covers and the stator housing are pulled together by two studs.
The armature shaft rotates in two metal-ceramic liners installed in the cover and support.
Four permanent magnets are fixed in the stator housing.
Rotation from the armature shaft is transmitted to the drive shaft through a planetary gearbox, which consists of a central gear, three planetary gears, a carrier and a gear with internal engagement.
The planetary gears rotate on needle bearings.
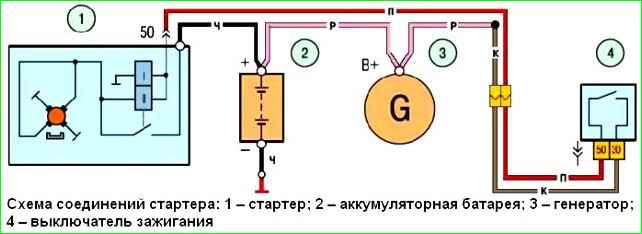
The starter connection diagram is shown in the figure.
When the starter is turned on, the voltage from the battery 2 is supplied to both windings of the starter traction relay (pull-in II and holding I) via the ignition switch 4.
After the traction relay contacts are closed, the pull-in winding is disconnected.
Connecting the starter with the ME17.9.71 EURO-5 controller
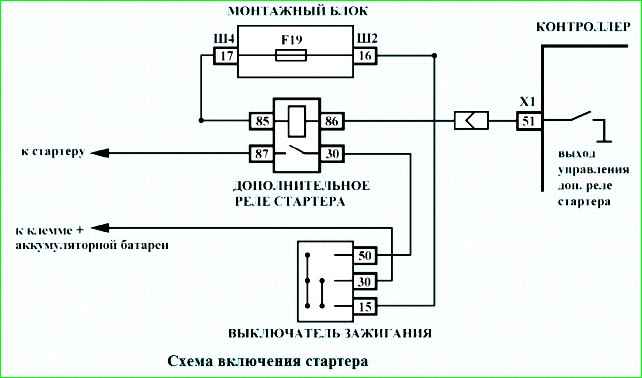
In this engine management system, power is supplied to the starter solenoid coil via the contacts of the additional relay (Fig. 1.10-01).
The controller turns on the starter relay when the ignition is turned on, if the "correct" password is received from the APS control unit, and turns it off after the engine starts (the engine crankshaft speed has reached 500-1000 rpm, depending on the coolant temperature) or 7-20 seconds (depending on the coolant temperature) after the starter starts cranking.
The controller prohibits turning on the additional starter relay when the engine is running.
Removing the starter
To remove the starter, place the car on an inspection pit or lift.
Remove the engine screen.
Disconnect the negative terminal from battery.
Remove the rear mudguard of the engine compartment.

Using a 13 mm socket, unscrew the bolt securing the front support bracket to the intake pipe

Using a 13 mm wrench, unscrew the nut securing the front support bracket to the bracket of the right support of the power unit and remove the bracket
On a car with air conditioning, it is necessary to remove the guide screen, for this:

Using a 10 mm wrench, unscrew the two nuts securing it

Removing the screen

Using a 13 mm socket, unscrew the upper bolt securing the starter

From underneath the car, using a 13 mm head with an extension, unscrew the bolts of the middle and lower starter mounts.
The middle bolt also secures the bracket for the wire harness holder of the control oxygen concentration sensor.

We remove the starter from under the starter shield and move the protective cap from the contact bolt of the traction relay.
With a 13 mm head, unscrew nut 1 and remove the wire tip from the contact btraction relay bolt.
Disconnect the tip of control wire 2 from the traction relay terminal.

Removing the starter

For assessing the serviceability of the starter drive, use a screwdriver to turn the drive gear.
The gear should turn in one direction with the drive shaft, and in the other - on the drive shaft.
Otherwise, replace the drive with a new one.

Using a screwdriver, move the drive gear along the shaft. The gear should move easily along the shaft without jamming
To check the starter, connect the positive terminal of the battery with the upper contact bolt of the traction relay, and connect the negative terminal to the starter housing.

Using a screwdriver, bridge the upper contact bolt and the control terminal of the traction relay.
This should extend the drive gear and turn on the starter electric motor.
Otherwise, check the electric motor and the starter traction relay.

To check the electric motor, connect the positive wire of the battery to the lower contact bolt of the traction relay, and the negative wire to the starter housing.
The shaft of the electric motor should rotate.
Otherwise, the electric motor is faulty.

To check the traction relay, connect the positive terminal of the battery with the control terminal of the traction relay, and the negative terminal with the starter housing.
The drive gear should extend.
If this does not happen, the traction relay is faulty.
Install the starter in the reverse order
")

")
")
")
")
")
")
")