Preparing the car for work
Removing the windshield trim
The windshield pillar trim is secured with three plastic holders
To remove the trim, carefully grasp the upper edge of the trim and pull with a force that overcomes the force of the holders.
Removing the front threshold trim
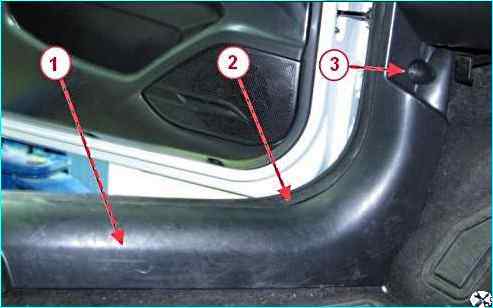
Using a T20 Torx head, unscrew the self-tapping screw 3, Figure 1, fastening the front part of the trim 1 of the front threshold.
Remove the seal 2 of the door opening in the mating area with the threshold trim.
Remove the threshold trim by pulling it with a force that overcomes the force of the plastic holders.
Removing the rear threshold trim
Removing the rear threshold trim is done with the side arch trim and rear seat cushion removed.
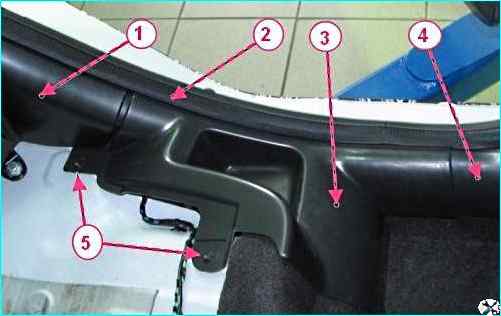
Using a T20 Torx head, unscrew the self-tapping screws 5, Figure 2, fastening the rear trim 3 of the threshold.
Remove the seal 2 of the door opening in the area of connection with the threshold trim.
Remove the threshold trim by pulling it with a force that overcomes the force of the plastic holders.
Removing the side arch trim
Lift the locking handle up and tilt the back of the rear seat forward.
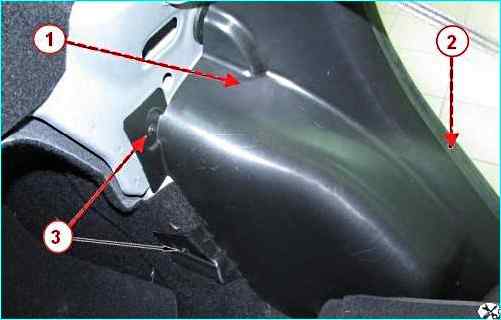
Using a T20 Torx head, unscrew the self-tapping screws 3, Figure 3, fastening the side panel arch trim 1.
Remove the doorway seal 2 in the area where it meets the threshold trim.
Remove the side panel arch trim.
Removing the upper and lower pillar trim
Removing the lower middle pillar trim must be done after first removing the upper middle pillar trim, front and rear threshold trim.
Remove the doorway seal of the front and rear doors in the area where it meets the threshold trim.
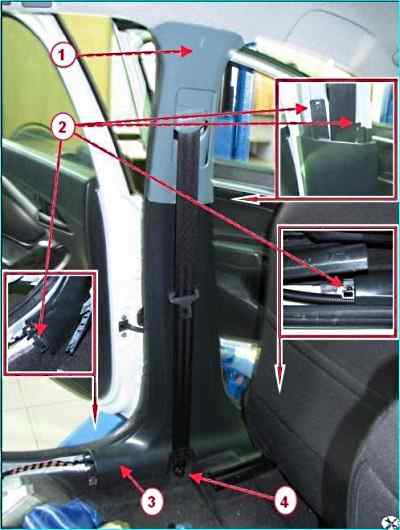
Using a flat-head screwdriver, remove the cap from the head of bolt 4, Figure 4, fastening the lower point of the seat belt, use a 14 head to unscrew the bolt.
Take the lower part of the trim 1 of the upper pillar and pull with a force that overcomes the force of the plastic holders.
Remove the trim by threading the belt tape through the hole in the trim.
Using a T20 Torx head, unscrew the four self-tapping screws 2 fastening the lower trim 3, remove the trim.
Removing the side window trim
The side window trim is attached to the rear shelf trim.
Installation and dismantling of the side window trim is carried out together with the rear shelf trim – see the article “Removing the car seats and seat belts”.
Removing the floor tunnel lining
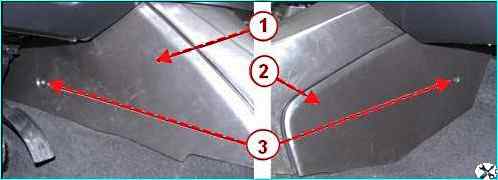
Using a T20 Torx head, unscrew screw 3 on the right and left sides, Figure 5, left 1 and right 2 side screen mounts, remove the screen.
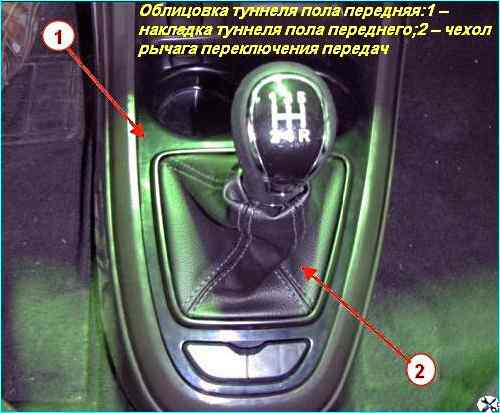
Using a flat-head screwdriver and we extract the cover 2 of the gearshift lever from the fixing holes in the trim 1, Fig. 6, of the front floor tunnel.
We remove the trim of the front floor tunnel, having disconnected the wiring harness pads from the switches.
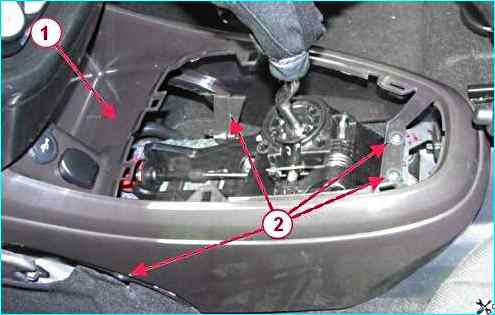
Using a T20 Torx head, unscrew screws 2, Figure 7, securing trim 1 of the front floor tunnel, disconnect the wiring harness connectors, and remove the trim.
Move the front seats to the forwardmost position.
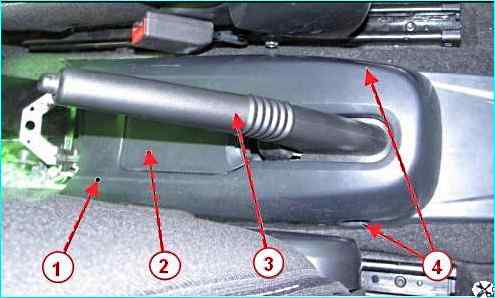
Using a T20 Torx head, unscrew screws 4, Figure 8, fastening trim 1 of the rear floor tunnel.
Using a flat-head screwdriver, remove plug 2 of lever 3 of the parking brake from the hole in the trim, remove the trim.
Removing the roof trim
Remove the headlining after first removing the windshield pillar trims, the upper middle pillar trims, and the side window trims.
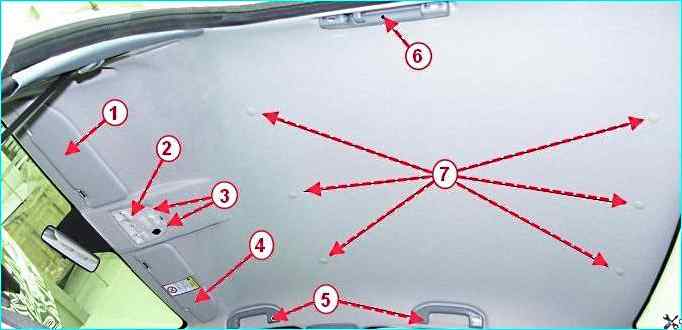
On the right and left sides, use a T20 Torx head to unscrew the two self-tapping screws for fastening the left 1 and right 4, Figure 9, sun visors, remove the visors.
Use a flat-head screwdriver to remove the trim of the interior light 2.
Use a T20 Torx head to unscrew the two self-tapping screws 3 for fastening the light, remove the light, disconnecting the wiring harness blocks.
Remove the decorative plugs for the screws for fastening the right 5 and left 6 handrails, use a T30 Torx head to unscrew the screws, remove the handrails.
Remove the holders 7, roof trim, remove the trim and remove it through the opening of the rear doors.
We install the trim and upholstery in the reverse order of removal.


