Prepare the car for work.
Place the car on an inspection pit or lift. Disconnect the negative battery terminal.
Remove the engine guard.
Remove the front bumper of the car.
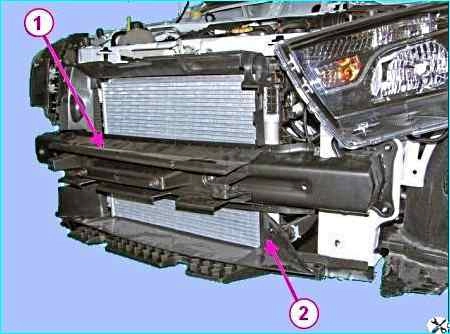
Front bumper beam and air deflector: 1 - front bumper beam; 2 - air deflector
Remove beam 1, figure 1, of the front bumper.
Press the clamps and disconnect the air intake pipe from the air deflector 2.
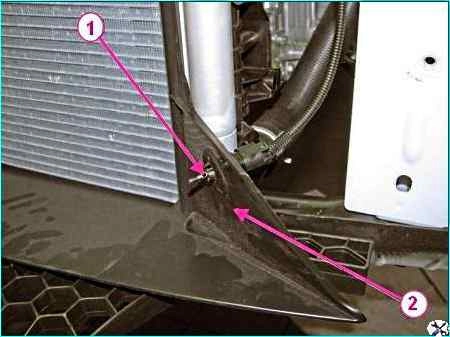
Front bumper beam and air deflector: 1 - ambient air temperature sensor; 2 - air deflector
Press the clamps and disconnect sensor 1, figure 2, of ambient air temperature from air deflector 2.
Press the clamps and remove air deflector 2.
Drain the fluid from the engine cooling system (see the article on replacing the coolant).
Loosen the fastening clamps and disconnect:
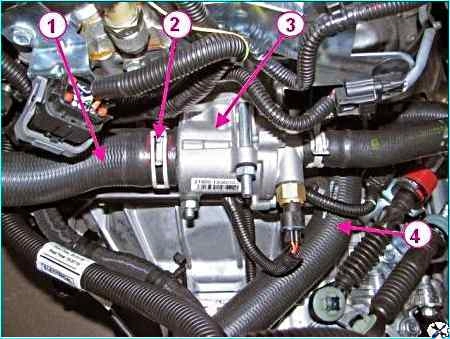
Thermostat and hoses of the engine cooling system: 1 - radiator supply hose; 2 - clamp; 3 - thermostat; 4 - radiator outlet hose
- - inlet hose 1, figure 3, radiator from thermostat pipe 3;
- - outlet hose 4 radiator from water pump inlet pipe pipe;
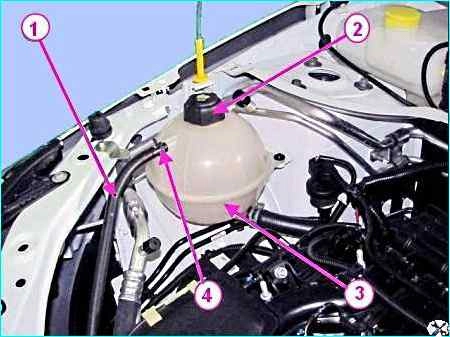
Expansion tank and engine cooling system hoses: 1 - steam outlet hose; 2 - expansion tank plug; 3 - engine cooling system expansion tank; 4 - clamp
- steam outlet hose 1, figure 4, from expansion tank pipe 3 (use pliers).
Cut the clamps securing the hoses to the upper crossmember of the radiator frame and the bracket on the gearbox.
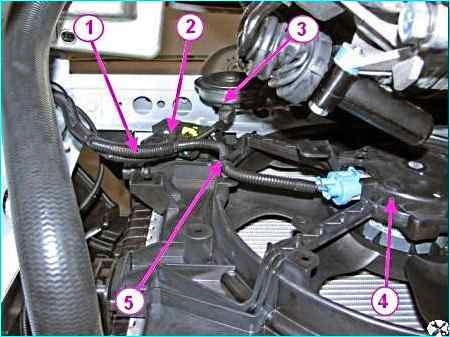
Electric fan of the radiator of the engine cooling system: 1 - front wiring harness; 2 relay unit - electric fan; 3 - horn; 4 electric fan of the radiator of the engine cooling system; 5 – clamp
Disconnect the connectors of harness 1, Figure 5, of the front wires from the connectors of block 2 of the electric fan relay, horn 3 and electric fan 4 of the radiator.
Cut clamp 5 fastening harness 1 of the front wires to the electric fan casing.
For vehicles with air conditioning:
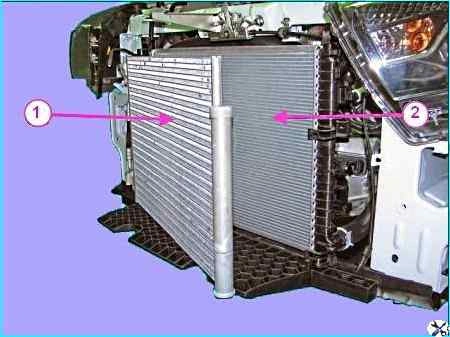
Air conditioning condenser: 1 – air conditioning condenser; 2 - engine cooling system radiator
Press the clamps, disconnect and move aside the condenser 1, figure 6, of the air conditioning system from the radiator 2 of the engine cooling system.
Operations for all vehicle configurations:
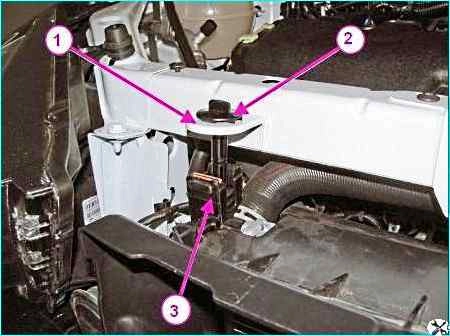
Upper mount of the engine cooling system radiator: 1 - bracket; 2 - engine radiator mount clamp; 3 - radiator of the cooling system
Turn and remove from brackets 1, Fig. 7, on the upper cross-member of the radiator frame the clamps 2 of the radiator 3 fastening.
Remove radiator 2, Fig. 6, from the fastening on the lower cross-member of the radiator frame and remove the radiator assembly with the electric fan and hoses.
Press the clamps and disconnect the electric fan of the engine cooling system from the radiator.
Installation
Install the electric fan of the engine cooling system on the radiator.
Install radiator 2, Fig. 6, of the engine cooling system with the electric fan and hoses as an assembly into the fastening elements of the lower cross-member of the radiator frame.
Secure radiator 3, Fig. 7, of the engine cooling system with two clamps 2 to brackets 1.
Attach supply, discharge and radiator outlet hoses of the engine cooling system to the corresponding pipes and secure with clamps, Figures 3 and 4.
Install new clamps for fastening the hoses to the upper cross member of the radiator frame and the bracket on the gearbox.
For vehicles with air conditioning
Install and secure the condenser 1, Figure 6, of the air conditioning system on the radiator 2.
Operations for all vehicle configurations;
Install and secure the air deflector 2, Figure 1, on the radiator.
Install the sensor 1, Figure 2, of the ambient air temperature on the air deflector 2.
Connect the air intake pipe to the air deflector.
Connect the connectors of harness 1, Figure 5, of the front wires to the connectors of the relay unit 2 electric fan, horn 3 and radiator electric fan 4.
Install a new clamp 5 securing harness 1 of the front wires to the radiator electric fan casing.
Install beam 1, Figure 1, of the front bumper.
Install the front bumper.
Fill the engine cooling system in accordance with the article (Replacing the coolant).
Connect the ground wire terminal to the battery.
Start the engine and let it run for 2 - 3 minutes at idle speed to remove air locks in the cooling system.
Check the heater for operability.
After stopping the engine, check the coolant level and the absence of signs of leakage, if necessary, bring the fluid level to normal.
The coolant level should be between "min" and "max" marks on the expansion tank.
Install the engine splash guard


