A starter type 5702.3708 is installed on the Lada Kalina.
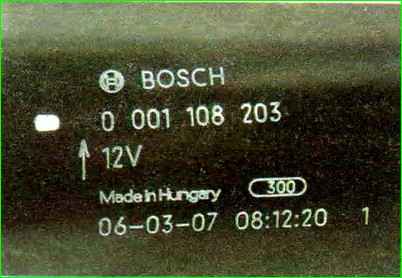
Some cars may have a BOSH 0001108203 starter installed.
The armature shaft transmits rotation to the drive shaft through a planetary gearbox.
The planetary gears of the gearbox rotate on needle bearings.
The starter drive consists of a drive gear and an overrunning clutch.
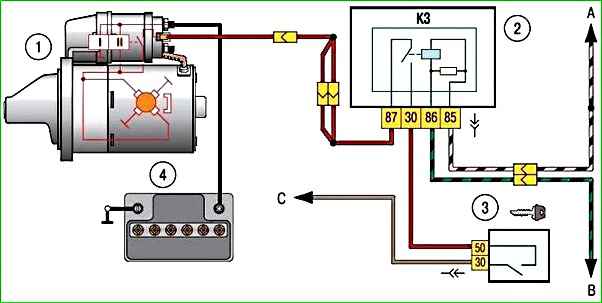
Starter connection diagram in Fig. 1.
The traction relay is installed on the motor housing.
The large current consumed by the starter when starting the engine is transmitted through the copper contacts of the relay.
The relay has two coils, one retracting and one holding.
When the ignition key is turned to position "II", voltage is supplied from the battery to the control terminal of the traction relay "50" type 902-3747-11, and from it voltage is supplied to the two windings of the traction relay from the battery.
Under the influence of a magnetic field, the metal core of the traction relay, overcoming the force of the spring, is drawn into the coil.
At the same time, it moves the starter drive lever.
The lever, in turn, extends the starter drive, engaging the drive gear with the engine flywheel ring gear.
At the same time, the copper contact plate closes the contact bolts.
Current begins to flow through the starter armature windings, and the armature rotates, starting the engine.
The negative terminal of the relay coil is connected to ground through the starter armature windings.
After closing the contact bolts, current stops flowing through the winding, and the core of the traction relay is held by only one winding, this allows you to reduce the heating of the relay windings and reduce energy at the time of start-up.
Checking the functionality of the starter
We connect the negative terminal of the battery with one wire to the starter housing.

The second wire, connected to the positive terminal of the battery, is connected to contact bolt 2 of the traction relay, to which the starter wire is connected.
If the starter armature starts to rotate, the starter motor is good.
Connect the second wire to contact bolt 1 of the traction relay. Using a screwdriver or other suitable metal object, we connect terminal 3 and the contact bolt of the traction relay.
If there is a loud click and the starter armature begins to rotate, then the traction relay is working properly.
To further check the starter, as well as to determine the cause of the malfunction, it is necessary to disassemble the starter.
If the starter fails, see the article “How to check the starter of a Lada Kalina car”
Removing and disassembling the starter
Disconnect the “-” terminal from the battery.
Remove the air filter

Disconnect the traction relay control wire.

Using a 13mm socket, unscrew the nut securing the tip of the wire connected to the positive terminal of the battery

Remove the wire end

Use a socket to unscrew the two nuts securing the starter.

Remove the starter
Using a 13mm socket, unscrew the nut securing the wire tip to the traction relay terminal.

Remove the spring washer from the terminal

Remove the wire end

Remove the three screws securing the traction relay

Remove the traction relay from the starter

Remove the spring from the relay

Remove the traction relay anchor from the drive lever

Use a Phillips screwdriver to unscrew the two screws securing the bearing cover

Remove the cover

Remove the gasket

Remove the locking ring

Remove the spacer

Use a 7 wrench to unscrew the two coupling bolts

Remove the coupling bolts and remove the back cover

Using a screwdriver, remove the brush holder, holding the brush springs

This is what the brush assembly looks like

Remove the front cover

Remove the anchor from the body

Remove the seal from the lid

Remove the drive shaft with the lever

Remove the drive lever.

To check the condition of the gearbox gears, use a screwdriver to pry off the gearbox cover

Remove the cover

Inspect the gear teeth.
The teeth should not have chips or signs of wear. Add Litol-24 lubricant and replace the cover

We support the drive shaft on a metal rod, through a piece of pipe or an 11 socket wrench

- knock down the thrust bushing.

Unclipping the spring ring with pliers

Remove the ring from the shaft
Remove the thrust bushing from the drive shaft

Remove the drive assembly

Inspect the commutator and armature windings.
Traces of charring of the windings are not allowed - such an armature must be replaced.
We clean the contaminated commutator with fine-grained sandpaper, clamping the armature shaft through a strip of thick paper into the chuck of an electric drill.
We wash the anchor with water and detergent to remove dirt, coal dust and abrasive residues and blow with compressed air.
We replace worn brushes if their height is less than 3.5 mm. We wash the gearbox and drive parts with white spirit or kerosene.
Assembly
You can install the brush assembly on the starter armature commutator using a special mandrel or using a tool head of a suitable size and shape.
If they are missing, you can install them without these devices. To do this:
- - use two screws to secure the brush assembly to the rear cover of the starter;
- - lubricate the end of the armature shaft with two drops of engine oil;
- - insert four brushes into the corresponding brush holders.
Without inserting the brush springs into the brush holders, we put the brush assembly on the armature commutator;

- use pliers with thin jaws to bend the outer stops of the springs of all four brushes;

- insert a spring into the brush holder;

- holding the spring with a screwdriver, bend the four spring stops with pliers.
We install the remaining three springs in the same way;
- insert the starter armature into the stator with the brush assembly and rear cover put on it (in this case, it is necessary to hold the armature so that its commutator does not come out of the groove captivity with brush assembly).
We install the thrust bushing in place using sliding pliers.
We perform further assembly in reverse order. We apply CV joint-4 lubricant to the gearbox parts.
Before installing the drive, dip it in engine oil and let the oil drain.
Lubricate the bushings in which the armature and drive shafts rotate, as well as the screw splines of the drive with engine oil;
- to make sure that the starter is assembled correctly, before installation we check its functionality (Described at the beginning of the article).
")

")
")
")
")
")
")
")