We replace the springs if there is damage or loss of elasticity of the sheets
Removing the front spring
Prepare the car and disconnect the plug connector of the front lights
Using 19 keys, unscrew the nuts of the bolts securing the front buffer and remove it
Using the parking brake system, brake the rear bogie of the car
Lift the front of the car and place a stand under the front part of the frame
Lift the front drive axle on the side of the spring being removed until it is completely unloaded
Unscrew the nuts of the U-bolts, remove the spring washers and U-bolts, spring pads and buffer support
Using 22 keys, unscrew nut of the tie bolt of the rear spring bracket, remove the spring washer and bushing
Unscrew the nuts of the tie bolts of the front bracket, remove the spring washers and knock out the bolts using a bronze extension
Unscrew the oiler from the pin and knock out the pin
Lower the bridge
Remove the upper sheets in assembly, the lower sheets (we do this with an assistant)
Installing the front spring
Install the lower springs, aligning the centering recesses, install the upper spring sheets in assembly
Insert the spring eye into the front bracket and, aligning the holes in the eye and the bracket, insert the eye pin (we do this with an assistant)
Insert the tie bolts, put on spring washers and tighten M14 nuts with a torque of 78-88 Nm (8-9 kgfm)
Lift the bridge until the main leaf pad stops in the rear spring bracket, install the bushing between the rear bracket eyes and, aligning the holes in the bushing and bracket
Insert the bolt, put on the spring washer and tighten the nut with a torque of 19.6-39 Nm (2-4 kgfm) (do this with an assistant)
Install the spring pad and the buffer support and the U-bolt lining for the right spring, tighten M20 nuts with a torque of 245-312 Nm (25-32 kgfm)
Screw the oiler into the spring eye pin and lubricate the pin with grease Litol-24
Raise the front of the car, remove the support from under the frame. Lower the car onto the wheels
Install the front bumper and connect the plug connector of the front lights
Remove the rear spring
Unscrew the locknuts and M24 nuts of the spring U-bolts using a 36 mm head
Install wheel chocks under the front wheels
Jack up the car's balancer bracket until the spring is completely unloaded, place a support under the frame and lower the frame onto the support
Remove the upper spring cover and U-bolts
Unpin the spring support pins and knock them out
Note. If this is not possible, knock out the pins, unscrew the nuts of the spring clamp tie bolts and remove the spring
Remove the upper individual spring leaves and the lower leaves as an assembly (do this with an assistant)
Installing the rear spring
Install the lower spring leaves as an assembly (or separately) and fasten them with clamps, install the upper leaves and the spring cover (do this with an assistant)
Install the spring U-bolts and tighten the M24 nuts and locknuts to a torque of 538.8-607.6 Nm (56-62 kgf.m)
Install and cotter pin the spring support pins
Raise the rear of the car, remove the support from under frames, lower the car
Remove the wheel chocks from under the front wheels
Repairing the front spring
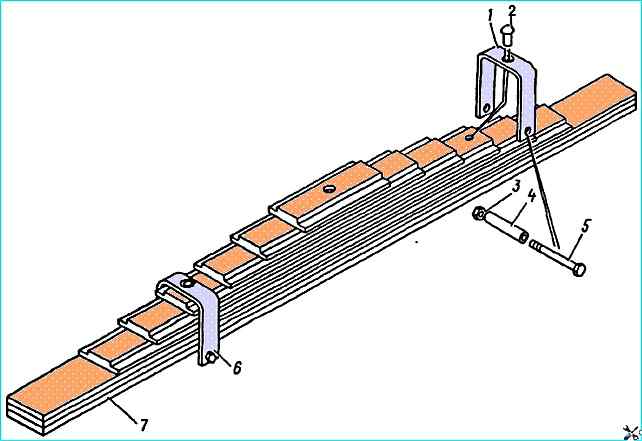
Disassembling the front spring. Secure the spring in a vice

After unscrewing nuts 5 of bolt 3 securing the front spring eye, using two 19 mm wrenches, remove lining 4 of the eye
Using a 24 mm wrench, unscrew nut 6 of bolt 9, remove eye 8 of the spring
Using 14 mm wrenches, unscrew nuts 10, remove bolt 1 and spacer bushings 11 from clamps 2 and 12 of the spring
Smoothly unload the spring leaves in a vice and separate them from each other
Clean the spring from dirt and check its condition
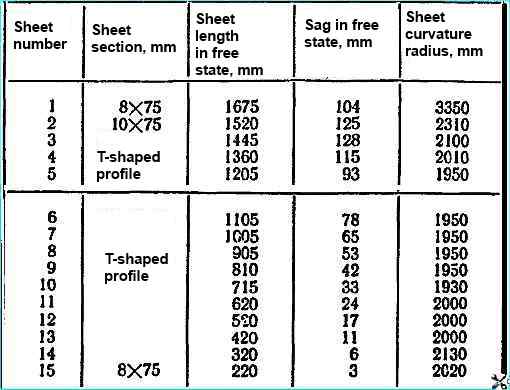
Conditions for defect detection and repair of front spring parts
No allowed:
- - cracks and breaks on spring sheets and clamps;
- - cracks, breaks and chipping of bushing ends;
- - inner diameter of spring eye bushing over 40.75 mm;
- - thickness of main leaf lining less than 4.5 mm:
- - loose fit of spring clamp rivets, corrected by replacing rivets. Front spring clamp rivets must be riveted flush with spring sheet surface, rivet cleaning is allowed;
- - deformation of spring sheets and non-compliance with dimensions specified in table
Assembling the front spring
Assemble the sheets, ensuring that the ridges on the convex side of the sheets match the notch on the concave side of the sheet
Before assembly, lubricate the spring sheets with USSA graphite grease. The displacement of the spring leaves in the transverse direction relative to the first leaf is allowed no more than 2 mm on the sealing section of 190 mm
We install spacer bushings 11, (see figure) tie bolts 1 in clamps 2 and 12, tighten nuts 10 with a torque of 23.5-35.3 Nm (2.4-3.6 kgfm)
After assembling the spring, unrivet the threaded ends of the tie bolts
We install eye 8 on the extrusion of the main leaf of the spring, screw in bolt 9 and tighten with nut 6 with a torque of 216-275 Nm (22-28 kgfm)
We install cover 4 of the eye in the slots in the second, third and fourth leaves, secure with tie bolts 3 and tighten with nuts 5 with a torque of 98.1-137 Nm (10-14 kgfm)
In the middle part, install the transport clamp (remove the clamp before installing it on the car)
Technical specification. The gaps in the middle part between the spring leaves, pulled together until the leaves touch, should be no more than 1.2 mm, while the gaps on a section length of less than 75 mm should not be more than 0.3 mm.
Rear spring repair
Securing the spring in a vice
Unscrew nuts 3 (fig) of tie bolts 5 of clamps 1 and 6 of the rear leaf spring, remove bolts 5 and spacer bushings 4
Smoothly unload the leaf springs in a vice and separate them from each other
Clean the spring from dirt and check the technical condition
The following are not allowed:
- - cracks and breaks in the leaf springs;
- - wear of the leaf spring extrusions;
- - loose fit of the rivets securing the leaf spring clamps, which can be eliminated by replacing the rivets;
- - the thickness of the ends of the first leaf spring is less than 9 mm
If the ends of the first leaf of the spring are worn more than 9 mm, it is allowed to replace the first and third leaves of the spring;
- - deformation of the leaves of the spring and non-compliance with the dimensions specified in the table

Assembling the rear spring
We assemble the leaves of the spring, ensuring that the extrusions on the convex side of the leaves coincide with the notch on the concave side sheet
Before assembly, lubricate the spring sheets with USSA graphite grease.
The displacement of the spring sheets in the transverse direction relative to the first sheet is allowed no more than 2 mm in the sealing section of 150 mm
Install the tie bolts 5, spacer sleeves 4 in clamps 1 and 6 (see fig.) and tighten the nuts 3 with a torque of 23.5-35.3 Nm (2.4-3.6 kgfm)
After assembling the spring, the threaded ends of the tie bolts must be riveted
")

")
")
")
")
")
")
")