We thoroughly wash and prepare the engine for disassembly
We install the engine on a stand or stand. We prepare the necessary tools for disassembly.
When disassembling, you need to mark the parts that will be used in the future.
The crankshaft, flywheel and clutch are balanced as an assembly, so they cannot be disassembled.
Using a 10mm socket, unscrew the six bolts securing the cylinder block cover and remove the cover together with the gasket.
Remove the oil dipstick

Using a 12mm wrench, loosen the bolt on the top mounting of the generator

Using a 13mm wrench, unscrew the nut securing the adjusting plate to the block head

Remove the plate from the block head stud

Use a 13mm wrench to unscrew the two nuts securing the outer struts securing the rocker axle

Using a 17mm wrench, evenly loosen and unscrew the four nuts securing the main struts of the rocker axle

Remove the rocker arm axle from the studs

We take out the eight push rods and arrange them in order so that we can put them in their places later
Remove the ends of the high-voltage wires and unscrew the spark plugs.
Disconnect the hose from the fine fuel filter.
Disconnect the vacuum corrector hose of the ignition distributor sensor from the carburetor.

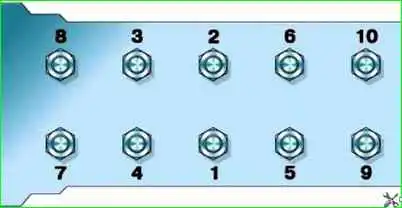
Using a 19mm socket, unscrew the ten nuts securing the block head in the reverse tightening sequence

Remove the head from the cylinder block studs.

Remove the cylinder head gasket

Turn the engine over with the sump facing up and use a 13mm wrench to unscrew the eighteen nuts securing the sump.
There are shaped washers installed under the corner nuts for securing the pallet

Remove the front and back parts of the gasket from the pallet

Remove the side parts of the gasket from the block
Sealing gaskets secondary o cannot be used. All gaskets are sold in repair kits.

Using a 12mm socket with an extension, unscrew the two bolts securing the fuel pump

Removing the fuel pump

A gasket is installed between the pump and the block

Use a 24mm wrench to unscrew the bolt and disconnect the tube from the oil filter housing

Using a 13mm wrench, unscrew the four nuts securing the oil filter

Remove the oil filter

Using a 14mm wrench, unscrew the six nuts and two bolts securing the clutch housing

Removing the clutch housing

Use a 24mm wrench to unscrew and remove the oil radiator valve and oil pipe

Using a 12mm wrench, unscrew the fitting and remove the oil level indicator tube
Remove the timing gear cover to do this:

Use a 46 socket wrench to unscrew the ratchet

Use a 12mm socket to unscrew the six pulley mounting bolts

Remove the crankshaft pulley

Use a three-fingered puller to tighten the pulley hub

Using a 13mm wrench, unscrew the eight nuts securing the front cover

Remove the timing gear cover

Using a 13mm wrench, unscrew the two nuts securing the pusher box cover.

Remove the pusher cover

We take out the eight valve tappets and mark them or arrange them in order

Using a bit, knock out the key

Remove the oil deflector from the crankshaft

Using a 12mm socket through the hole in the gear, unscrew the bolts securing the thrust flange

Remove the camshaft together with the gear

Secure the sleeves from falling out using suitable bushings, washers and nuts
If you do not secure the cylinder liners, then when the crankshaft rotates, they may rise due to friction against their piston mirrors.
Scale particles from the water jacket will get under the seating collars of the liners, and when assembling the engine, the liners will not fit tightly into place, which will lead to coolant leaking into the oil sump.
Turn over the cylinder block.

Using a 13mm socket, unscrew the two nuts securing the oil pump

Removing the oil pump

Use an 8mm hex to unscrew the two nuts securing the oil seal holder

Remove the rear bearing oil seal holder

Using a 15mm socket, unscrew the two nuts of the connecting rod cover

Remove the connecting rod cover

Use the wooden handle of a hammer to press the piston out of the cylinder.
We also remove the remaining pistons.

Using a 19. socket, unscrew the two nuts securing the main bearing cap

Remove the main bearing cap.
We also remove the remaining main bearing caps.

Remove the crankshaft from the block

Unscrew the device holding the cartridges and take them out.
Marking the cartridges
After this, we wash all the parts and prepare them for fault detection
")

")
")
")
")
")
")
")