Before performing repair operations, brake mechanisms must be thoroughly washed with warm water and detergents and dried with compressed air
To disassemble the rear wheel brake mechanism you must:
- perform operations to remove the brake pads (see “How to replace the rear pads of a GAZ-2705”);
- disconnect the pipeline from the wheel cylinder, remove the wheel cylinder and disassemble it.
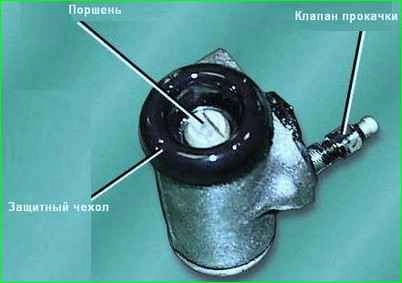
To do this, you must first remove the rubber protective caps and polyurethane foam rings.
Then turn the pistons 90° with a screwdriver and remove them from the cylinder.
Snap rings should not be removed unless necessary.
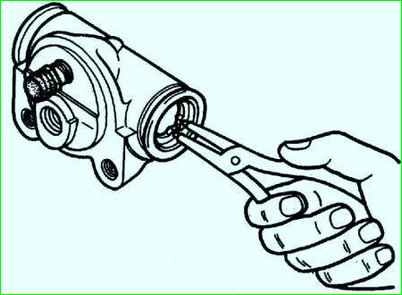
If for some reason the ring needs to be removed, then special round-nose pliers are used for this (Fig. 1).
Inserting the round jaws (jaw diameter 4 mm and height 5 mm) of the tool into two special holes on the ring, squeeze the pliers and remove first one and then the second ring from the cylinder.
Unscrew the wheel cylinder bleeder valve.
Wash all parts with warm water and detergent and dry with a stream of compressed air, and then inspect the brake parts.
The brake drum on the working surface should not have deep marks or burrs.
If necessary, the drum and hub assembly should be bored relative to the outer rings of the bearings.
The runout of the working surface of the drum should be no more than 0.2 mm. In order not to reduce the strength of the drum, boring its internal diameter more than 283.0+0.2 mm is not allowed.
If there is damage or particularly deep risks, as well as if it is necessary to bore the working surface of the drum to a diameter of more than 283 mm, it must be replaced with a new one.
Brake linings are glued with glue.
Before gluing the surfaces of the rim, the pads and the internal surfaces of the lining should be thoroughly cleaned and blown with compressed air.
Apply an even layer of glue and let it dry for 1 hour at production room temperature.
Then, in a special device, press the linings to the pads with a force of 500-800 kPa (5-8 kgf/cm 2).
Place the device in an oven, where it is kept at a temperature of 175-185°C for at least 30 minutes, excluding the time it takes to warm up the oven and pads to the specified temperature, then cool the device together with the oven to ambient temperature for at least 3 hours.
After gluing, the outer surface of the linings is ground so that the radius is 0.1-0.3 mm less than the radius of the drum, which speeds up the running-in of the pads.
Pads with linings that are worn out or become oily during operation must be replaced with new ones.
It is allowed to use pads with partially oiled linings for further operation.
In this case, the linings must be washed with unleaded gasoline, dried and cleaned with a steel brush or sandpaper.
Do not replace just one of the brake pads or the pads of one brake mechanism.
The pads on both brake mechanisms should be replaced to prevent the vehicle from pulling when braking.
You should check whether the mounting holes of the shield and wheel cylinders are broken. The shield should not be bent.
Cracks on the shield are not allowed.
Wash the wheel cylinder and its parts in isopropyl alcohol or clean brake fluid.
Clean the cylinder mirror with a clean cloth.
The working surface must be completely smooth, without marks or roughness. Defects should be eliminated by lapping.
If the wheel cylinder piston is scored, is covered with corrosion that cannot be removed without damaging the base metal, or has one-sided wear, it should be replaced with a new one.
If the rubber sealing rings of the wheel cylinders have lost their original shape or have defects on the working surface, they should also be replaced with new ones.
The protective covers of the wheel cylinders should be changed if there is the slightest damage, as a result of which the tightness is compromised.
Moisture getting under the protective covers leads to the formation of corrosion on the surface of the cylinder and on the piston, which can cause piston seizure or premature wear of the o-rings.
The brake mechanisms are assembled in the reverse order of disassembly.
In this case, it is necessary: - before assembling, wash the wheel cylinder parts in a soda solution, blow with compressed air and immerse into fresh brake fluid;
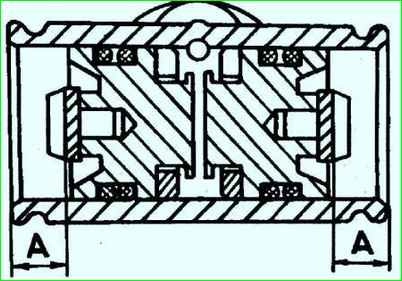
- check the location of the slot of the automatic adjustment thrust ring, which should be in the vertical plane.
The depth “A” (Fig. 3) of installation of the thrust ring in the wheel cylinder must correspond to 11+0.5 mm;
- make sure that during assembly, mineral oil, kerosene and grease do not come into contact with the sealing rings.
The rings must not be twisted. After assembling the brake mechanisms of the rear wheels, add brake fluid and bleed the system.
")

")
")
")
")
")
")
")