We discussed dismantling the axle gearbox in the article - How to disassemble the rear axle of a Gazelle car
In this article we will look at how to properly assemble and adjust the rear axle gearbox of a Gazelle car.
Assemble the main gear in the reverse order of disassembly, lubricating the bearings and gears with transmission oil.

Having installed the drive gear in the gearbox housing, use a torque wrench to tighten the flange nut with a torque of 16–20 kgf.m, while the gear must be rotated for proper installation of the rollers in the bearings.

We install an indicator with a division value of no more than 0.01 mm on a tripod, resting its leg against the end of the flange and moving the shaft behind the flange, measuring the axial play of the drive gear
To eliminate the backlash, take out the spacer ring mounted on the gear shaft (see - How to disassemble the rear axle of a Gazelle car) and measure its thickness with a micrometer.
Select and install a new spacer ring.
It should be thinner than the one removed by the amount of play and additionally thinner by 0.05 mm - if the drive gear bearings are new or by 0.01 mm - if the bearings are left the same.

If there is no axial play of the drive gear, use a special torque wrench with a scale of up to 0.5 kgf.m to check the moment of resistance to shaft rotation.
With proper adjustment, the resistance moment should be 15–20 kgfcm for new bearings or 7–10 kgfcm if the bearings are left the same.
With sufficient accuracy, the moment of resistance can be measured using a household steelyard by hooking its hook onto the hole in the flange.
In this case, the required values will be less - 3.8–5 kgf and 1.8–2.5 kgf, respectively.
If the moment of resistance is greater, change the spacer ring to another one, 0.01–0.02 mm thicker; if less, select a ring of thinner thickness accordingly.
The bolts for fastening the parts of the differential box and the bolts for fastening the driven gear, as well as their threaded holes, are degreased and coated with anaerobic sealant before assembly.
We pay special attention to the cleanliness of the end mounting surfaces of the gears and the gearbox; the slightest contamination or nicks are unacceptable.

When installing the driven gear on the gearbox, we center it using long M10x1 bolts (you can use bolts from old connecting rods).
Using adjusting nuts, we tighten the differential bearings with a slight tension, while turning the gear first in one direction or the other so that the bearing rollers take the correct position.

To measure the lateral clearance in the mesh of the final drive gears, we fix the indicator on the rear axle housing by moving its probe to the top of the tooth on the outside of the driven gear.
The gap should be 0.15–0.20 mm. Measurements should be repeated on at least six teeth in opposite zones of the crown.
To reduce the gap (using a screwdriver or a thin steel rod), loosen the adjusting nut on the side opposite the driven gear and tighten the other.
Unscrew one nut and tighten the other by the same amount, guided by the grooves of the adjusting nuts.
In this case, each unscrewing of the adjusting nut must be completed by tightening it slightly.
For example, to loosen a nut by five grooves, unscrew it by six, and then tighten it by one groove.
This will ensure constant contact of the outer ring of the bearing with the nut and thereby guarantee its fixation during operation.
To increase the gap, repeat the entire procedure in reverse order.
After To adjust the lateral clearance in the mesh, we check the axial play in the differential bearings, for which we fix the indicator on a tripod, resting its probe against the end of the driven gear.
By rocking the gear in the axial direction, we measure the play in the differential bearings.
Use an adjusting nut located on the opposite side of the driven gear to set the axial play to 0.035–0.055.
Next, by tightening the nut, we set the bearing preload: 0.1 – for bearings with a mileage of less than 10 thousand km; 0.05 – with a mileage of more than 10 thousand km.
Turning the nut by one groove corresponds to “compressing” the bearing by 0.03 mm.
Once adjusted, tighten the bearing cap bolts and install the locking plates and check the side clearance again.
Adjusting the main gear according to the contact patch of the teeth
Before final tightening of the cover bolts, turn them out one by one and apply anaerobic sealant to the threaded part.

Adjusting the main gear according to the contact patch of the teeth is an effective way to adjust the gear mesh.
It also allows you to check the quality of adjustments made by other methods.
Apply paint, preferably bright paint, to the teeth of the driven gear.
Rotate the drive gear flange several times in both directions, while simultaneously slowing down the driven gear until the paint wears off at the points where the teeth contact.
Inspect the contact spots on the teeth of the driven gear from the convex and concave sides.
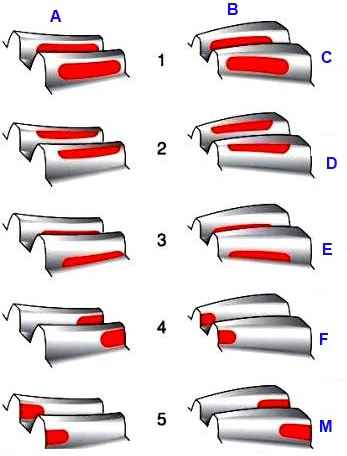
If the contact patch is located at the top of the teeth, it is necessary to increase the thickness of the adjusting ring at the drive gear, and if at the base, reduce it.
If the contact patch is shifted to the center of the gear, it is necessary to increase the gap between the driven and driving gears, and if outward, reduce it.
After adjustment, install the gearbox in the rear axle, while applying a thin layer of oil-resistant sealant to the mounting bolts and flange.
Having assembled the rear axle and poured oil into it (see How to change the oil in the rear axle gearbox of a gazelle), we test the gearbox on the move.
To do this, we travel at a speed of 60–70 km/h for 20–30 minutes.
The temperature of the crankcase neck should not be higher than 95° (water drops should not boil).
Otherwise, it is necessary to reduce the preload of the drive gear bearings.