To check the condition of the steering rod joints, place the vehicle on a level horizontal surface so that the front wheels are straight ahead
The indicator is secured to the steering rod using a clamp so that the measuring rod rests against the head of the steering knuckle lever, and the rod axis is parallel to the rod axis (Fig. 1).
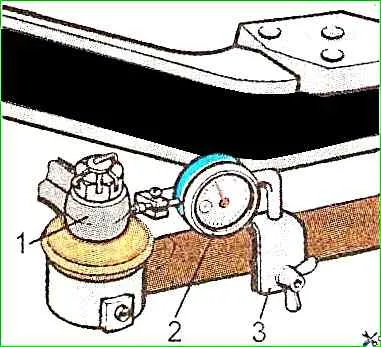
Smoothly turning the steering wheel left and right, until the steering wheel has completely freed up, determine the gap on the indicator scale.
If the gap in the joint exceeds 1 mm, it should be adjusted.
To do this, remove the cotter pin and screw the plug into the tip until it stops, and then unscrew it to the first position for cotter pinning, but not less than 1/8 of a turn, check the gap and if it is within the norm, cotter pin.
After adjusting the gaps, it is necessary to hang up the front wheels of the car and bus and, with the engine off, make sure that there is no noticeable increase in force on the steering wheel when it is turned from one extreme position to another.
If the adjustment fails to establish an acceptable gap, then the pin should be replaced and liners.
After assembling and adjusting the joint, it is necessary to check the moments required for rotation and swing of the ball pin.
These moments should be no more than 50 Nm.
Using joints in which the moment of rotation and swing (from one extreme position to another) of the ball pins is greater than the specified one can lead to breakage of the pins.
To measure the moment, a special attachment is screwed onto the threaded end of the ball pin, which has places for gripping a torque wrench in the horizontal and vertical planes.
")

")
")
")
")
")
")
")