Removing the side link
We carry out the work on an inspection ditch or a lift.
Hang and remove the wheel.
To remove the right side rod, turn the steering wheel all the way to the left.

Use pliers to remove the cotter pin

Using a 22mm wrench, unscrew the nut securing the side link to the steering knuckle lever.

Use a puller to press the ball pin out of the lever.

A fork puller can be used.

If there is no puller, unscrew the nut not completely, insert a mounting blade into the spacer between the side rod and the steering knuckle lever and hit the end of the lever with a hammer.

The ball pin can also be pressed out of the lever by striking a sharp blow from below with the back of a hammer on the steering knuckle lever near the hinge

Remove the ball pin from the eye of the steering knuckle lever.
Use a puller to press the ball pin out of the pendulum arm.

The finger can also be pressed out by striking a sharp blow from below with a hammer through a chisel with a blunt end on the pendulum lever
Remove the right side rod. Similarly, remove the left side rod.

Install the side link so that a long tip is attached to the steering knuckle lever.
Having replaced the rod, we check the wheel alignment, article - “How to check wheel alignment”
Removing the middle link
We carry out the work on an inspection ditch or a lift.

Use pliers to remove the cotter pin

Using a 22mm wrench, unscrew the nut securing the middle link to the pendulum arm.

Using a fork puller, press the middle link ball pin out of the hole in the pendulum arm.

The pin can also be pressed out by applying a sharp blow to the pendulum lever from below (near the hinge) with a chisel with a blunt end.

Remove the ball pin from the eye of the pendulum arm.
In the same way, press the ball pin out of the bipod.

Remove the middle rod. Install middle thrust in reverse order.

The left hinge pin (inserted into the bipod hole), in addition to rotation, can swing (unlike the right one).

In this case, when installing the rod on the car, we orient it so that its longitudinal axis is in front of the hinge axes
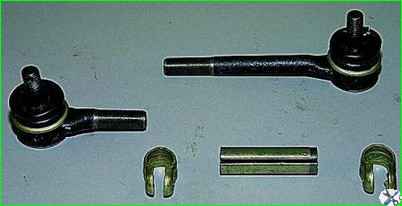
Replacing mud caps and tie rod ends
The mud caps and tie rod ends can be replaced on the vehicle.
For clarity, these operations are performed with the rod removed.

To replace the dirt cap, knock it out with a soft metal drift.
Clean the ball joint from old grease and dirt.
If traces of corrosion are found on the ball pin and the pin moves freely in the body, replace the ball joint with the rod end.

Press the new dirt cap onto the hinge body using a suitable piece of pipe, resting on the metal ring of the cap.

Before replacing the rod end, measure the distance between the hinge axes.

Using a 13mm wrench, unscrew the nut of the adjusting clutch clamp bolt, holding the bolt with a wrench of the same size.

Use a slotted screwdriver to release the clamp.

Hold the adjusting coupling with a pipe wrench and unscrew the tip (we use the pipe placed on the ball pin as a lever).
Assemble the rod in the reverse order. We adjust the tips so that the rod is the same length (see photo 3).
After adjustment, tighten the clamps on the coupling.
Having replaced the tips, we check the wheel alignment, article - “How to check the wheel alignment”
")

")
")
")
")
")
")
")