To complete the work you will need an assistant, as well as:
- - multimeter (in voltmeter mode with a measurement limit of 15-20 V);
- - technical stethoscope.
Start the engine. If the battery charge indicator light on the instrument panel lights up, check:
- - voltage supply of -12 V to the excitation winding of the generator when the ignition is turned on (pin 1 of the generator connector);
- - generator drive belt tension.
- 1. Warm up the engine to operating temperature (at least 80˚C)
- 2. We turn on all powerful consumers of the car's electricity (heated rear window, electric heater fan, high beam headlights, heated seats).
- 3. By pressing the gas pedal and monitoring engine operation using the tachometer, we keep the engine crankshaft speed within 3000-3500 rpm.
- 4. We use a voltmeter to measure the voltage at the terminals of the battery. If the generator is working properly, the voltmeter should show a voltage of at least 14 V.
If the voltage is less, the generator drive belt may be loose, the generator circuit is faulty, the generator voltage regulator is faulty, the brushes in the generator are oily or worn, or the generator itself is faulty.
5. We turn off all electricity consumers, and the voltmeter should show a voltage no higher than 15.1 V.
If the voltage is higher, the voltage regulator is most likely faulty.
6. Using a stethoscope, we evaluate the condition of the generator bearings based on noise. A strong hum indicates wear of the bearing or bearings (the front bearing most often fails).
Checking and tensioning the generator drive belt
A loose belt and poor condition can be identified by a characteristic “whistle”, especially when starting the engine.
To perform the work, you can remove the right front wheel or install the car on an inspection ditch or overpass.
- 1. Remove the right side of the engine mudguard.
- 2. Visually check the condition of the generator drive belt. We apply a force of 98 N (10 kgf) to the belt exactly in the middle between the generator pulley and the engine crankshaft pulley. (You can use the steelyard).
- 3. To adjust, remove the windshield washer reservoir.
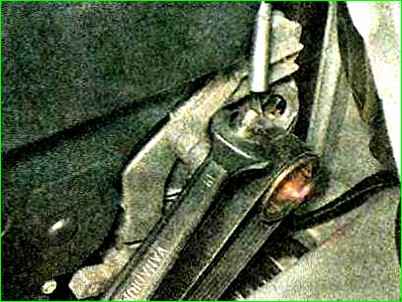
- 4. Using a 19mm open-end wrench, unscrew the locknut of the tensioning mechanism. By rotating the adjusting pin with a socket wrench by 8, we change the tension of the generator drive belt (clockwise we increase the belt tension, and counterclockwise we decrease it).
Excessive belt tension can lead to failure of the front bearing of the generator.
- 5. We check the tension of the generator belt (see above) and, if necessary, repeat the adjustment.
- 6. After making sure that the belt is tensioned correctly, hold the adjusting pin and tighten the lock nut.
- 7. Installing the engine splash guard
Replacing the alternator drive belt and tension roller
1. We loosen the tension of the generator drive belt.
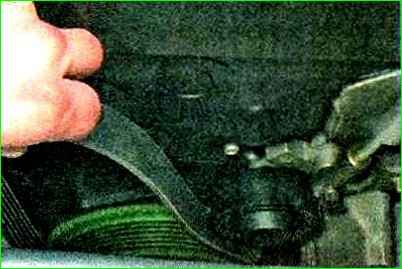
- 2. Remove the belt from the generator pulley and the crankshaft pulley
- 3. Rotating the tension roller, we check its condition.
When replacing the generator drive belt, check the condition of the tension roller.
It should rotate easily, without jamming or noise. The faulty roller should be replaced.
If necessary, you can replace the roller without removing the tension mechanism from the engine.
Pump the generator pulley and rotate it to determine the condition of the bearings.
Installation
- 1. Install the roller and assemble in reverse order
- 2. First we put the belt on the crankshaft pulley and then on the generator pulley.
- 3. Adjust the belt tension.
Checking the generator
To check the generator set, you need to start the engine and increase the speed to approximately 3000 rpm -1.
We turn on all consumers: - external lighting, high beam headlights, heater fan, rear window heating, windshield wiper, etc.
We take a voltmeter and measure the voltage on the battery, this needs to be done together. One maintains engine speed, and the second assistant measures the voltage.
The voltage must be at least 13 V.
If the voltage at the battery terminals is less than 13 volts, then the generator windings are faulty (open or shorted).
The relay may be faulty voltage regulator or rotor slip rings are oxidized.
To make sure that the voltage regulator is working properly, turn off all consumers except the high beam headlights and measure the voltage on the battery again.
The voltage must be at least 14 volts.
If the voltage is less, the regulator should be replaced.
The regulator can be changed without removing the generator. We look at removing the voltage regulator in the article “Repair of generator”.
To check the valves of the rectifier unit, it is necessary to disconnect the wires from the battery, generator and the “+” terminal of the voltage regulator.
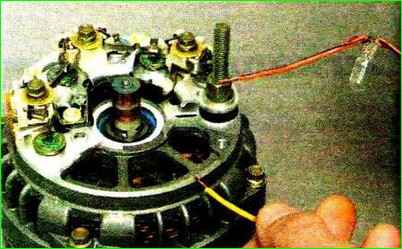
We take a conductor, connect it to the “+” of the battery, and through a light bulb (1-5 W, 12 V) connect it to the “B+” terminal of the generator, and connect the “minus” to the generator housing.
If the light is on, then there is a short circuit in both the block of positive and negative terminals of the valves.
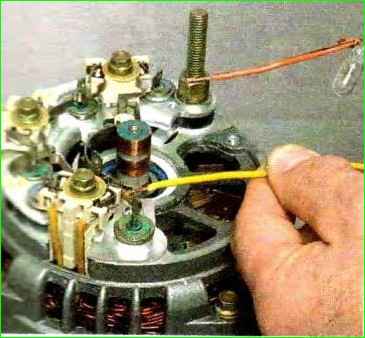
To check the short circuit in the positive valves “+” of the battery, we connect it through a light bulb to the “B+” terminal of the generator, and connect the “minus” valve to the terminal of one of the phase windings of the stator.
If the lamp is on, one or more positive diodes are broken.
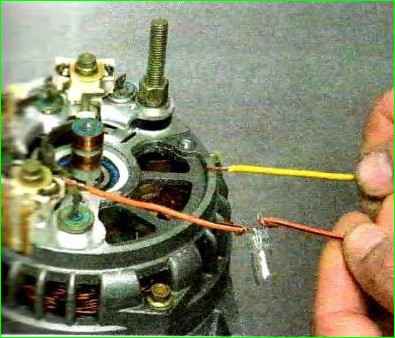
To check the short circuit in the negative valves, “+” of the battery is connected through a light bulb to the output of one of the stator phase windings, and the “minus” valve is connected to the generator housing.
If the light is on, one or more negative valves are broken or the stator windings are shorted to the generator housing.
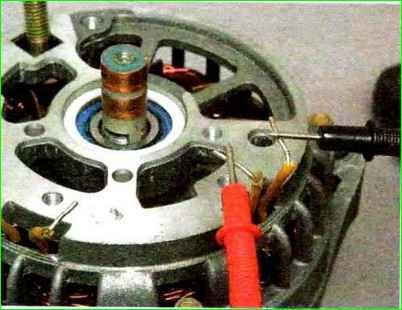
In order to prevent short-circuiting of the windings, remove the generator from the car and, having disconnected the windings from the voltage regulator and rectifier unit, check them for short-circuits using a lamp or ohmmeter.
To check for breaks in the stator windings, connect the tester probes (in ohmmeter mode) to the stator winding terminals.
If the ohmmeter shows infinity, it means there is a break in the winding. We also check the other two windings.
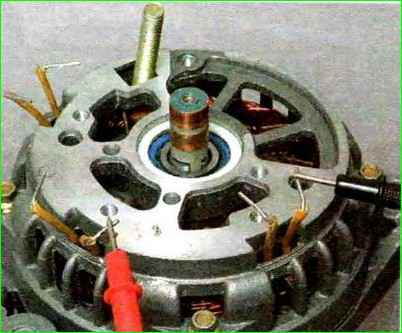
To check for a short circuit between the stator windings, connect the tester probes between the terminals of the two windings.
The ohmmeter should show infinity, otherwise the windings are short-circuited.
Check the other two windings in the same way.
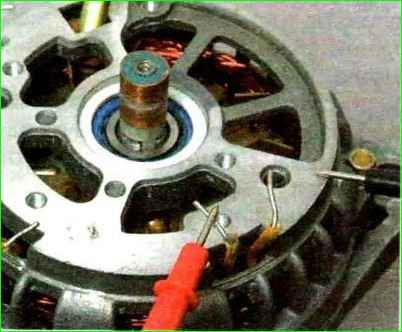
To check if the stator winding is shorted to ground, connect the tester probes to the winding terminal and the generator housing.
The ohmmeter must show infinity, otherwise the winding is shorted to ground
Check the other two windings in the same way.
Inspect the stator windings.
There should be no signs of overheating on the winding insulation, which is a consequence of a short circuit in the valves of the rectifier unit.
If there are signs of overheating on the windings, the stator must be replaced
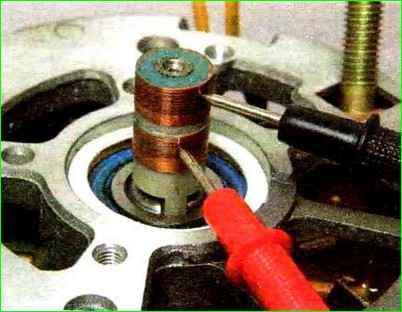
To check for a break in the rotor winding, connect the tester probes to the slip rings.
If the ohmmeter shows infinity, then there is a break in the winding.
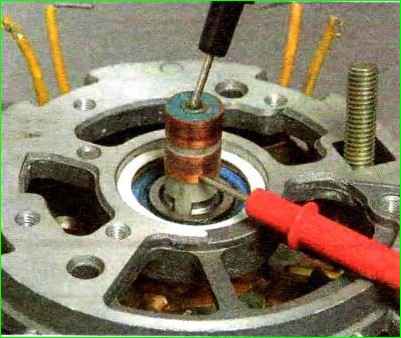
To check the short circuit of the rotor winding to ground, connect the tester probes to the slip ring and to the rotor shaft (or pulley).
The ohmmeter should show infinity, otherwise the winding is shorted to ground


