Removing the panel trim
We remove the panel lining in cases of replacing the wiring harness, as well as replacing ventilation and heating control rods
Remove the instrument cluster (see "Removing the instrument cluster").

Use a screwdriver to pry up the upholstery of the left front pillar and, overcoming the resistance of three pistons, remove the upholstery.
We remove the upholstery of the right front pillar in the same way.
Remove the steering wheel (see "Removing the steering wheel").
Removing the steering column switches

Use a screwdriver to pry up the casing intended for installing the head unit of sound reproduction (radio tape recorder) and remove the casing from the socket.

Pressing the clamps of the wiring harness blocks, disconnect them from the radio casing.

Use your finger to squeeze out the left plug from the central trim of the instrument panel trim.
Remove the right plug in the same way.

Remove the handle from the lever for turning on the air recirculation mode.

Remove the air flow distribution control knob.

Remove the air temperature control knob

Use a screwdriver to pry up the fan mode switch knob and remove it.

Use a Phillips screwdriver to unscrew the two self-tapping screws securing the central trim of the instrument panel trim.

We remove the instrument panel trim, removing the spring clips from under the instrument panel trim, and hold it in our hands

Pressing the clamps of the wiring harness block, disconnect it from the hazard warning switch.

Disconnect the wiring harness connectors from the two backlight lamp sockets.

Disconnect the wiring harness block from the fan mode switch.

Disconnect the wiring harness block from the rear heating switch glass.

Having opened the glove box lid, press the top fastening bar of the decorative material by hand and remove it.

Inside the glove box, use a Phillips screwdriver to unscrew the screw securing the instrument panel trim

Use a screwdriver to pry up the glove compartment lighting lamp and remove it from the hole in the lining.
Disconnect the wire tips from the lamp terminals.

Use a Phillips screwdriver to unscrew the self-tapping screw securing the glove box lamp switch.

Having removed the switch from the socket, disconnect the wire block from the switch.
Use a Phillips screwdriver to unscrew the four self-tapping screws securing the ventilation and heating control unit to the cladding.

Use a Phillips screwdriver to unscrew the two screws securing the left deflector of the interior ventilation and heating system

Remove the deflector. We also remove the right deflector

Under the windshield, use a screwdriver to remove the lock washers (14 pcs.) securing the instrument panel trim.
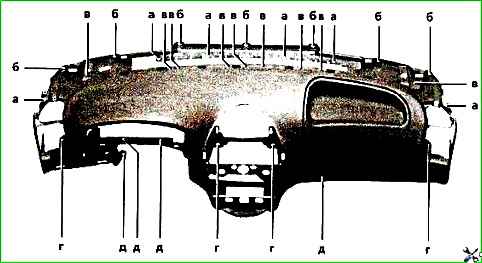
Use a Phillips screwdriver to unscrew the self-tapping screws (a) - (there are six in total), and with a “10” wrench, the nuts (b) - (there are seven in total) fastening the cladding.
Using a Phillips screwdriver, unscrew the screws (c) - (there are nine in total) of the upper fastening of the cladding (see photo.◄◄ ●●●).
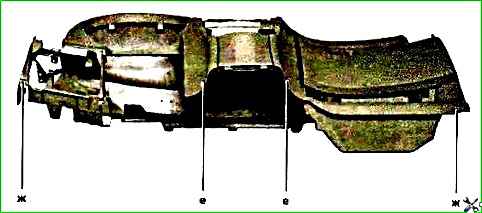
Unscrew four screws (d) and four self-tapping screws (e) from the front. From below, under the instrument panel, unscrew two screws (e) and two self-tapping screws (g).
Unscrew the self-tapping screw of the lower fastening of the mounting block to the instrument panel (see "Mounting block of relays and fuses").

Remove the lining from the instrument panel frame

Install the instrument panel trim in reverse order.
We first pass the block and wire ends of the switch and the glove box lighting through the corresponding holes in the lining.
When removing the 14 lock washers, the plastic pins may break off; in this case, you can install self-tapping screws instead of the lock washers.
")

")
")
")
")
")
")
")