Maintenance of the wheels consists in periodically checking the fastening and observing the rules for operating the tires
During operation, it is necessary to check the fastening of the wheels to the hubs. The nuts should be tightened evenly, through one, in 2...3 steps.
When tightening the nuts, check the lateral deviation of the wheels using a plumb or square.
The runout during rotation of the wheel should not exceed 5 mm, at higher values, loosen the nuts and, when tightening them, reduce the runout.
Check the air pressure in your tires periodically.
It should be remembered that driving with a 25% reduced air pressure reduces tire life by 35...40%, while exceeding the pressure by 10% reduces it by 10...15%.
If during the movement the car spontaneously deviates in any direction, you should check the tire pressure, identify and eliminate the cause of the air leak.
Vehicle deflection can also be caused by a misalignment of the toe-in.
Accelerated wear of tires of a local nature and the appearance of vibrations indicate a violation of the balance of the wheels.
To check the balance, the wheel assembly with the hub is mounted on the axle.
If there is an imbalance, the weighted area is located at the bottom. In the upper part, you should make a mark and put a balancing weight.
Then, tilting the wheel to both sides by 90 °, check the balance. If the wheel returns to its original position, a second weight should be added, etc.
Weights are installed on the rim by pressing the bead of the tire away from the ring with a mounting spatula and hitting them through a wooden spacer.
To save the tires, it is necessary to prevent fuel and lubricants from getting into them, to avoid sudden braking and skidding, and not to touch the sidewalls of the tires with obstacles.
Do not overload the car, strictly observe the rules for driving at reduced air pressure in tires if it is possible to regulate it.
Timely check the angles of the wheels and pivots; do not allow cars to park on flat tires.
After changing the tube or dismantling the wheel for other reasons, inflate the tire in a safety cage, observing the precautions, and on the line - putting the wheel with the rings down.
The raising and lowering of the spare wheel on 6X4 vehicles requires adjustment if the wheel is forced to lower or lowers spontaneously.
Regulation is made with a nut that clamps the Belleville springs.
If properly adjusted, the wheel should drop when an additional force of 150...200 N is applied to it.
The wheel bearings are periodically adjusted and the grease in the bearings is changed.
When the bearings are correctly tightened, the wheel rotates freely, without jamming, and has no axial movement and oscillation.
If the bearings are tightened too loosely, shocks occur during movement, destroying them.
If tightened too tightly, the bearings become very hot, and as a result, they are also destroyed.
On service 1:
- - tighten wheel nuts;
- - adjust the tire pressure to normal;
- - lubricate the pivots of the steering knuckles.
Tighten the wheel nuts with a torque of 245-294 Nm (25-30 kgf.m) evenly, through one nut, in two or three steps, starting from the top, while checking the lateral runout of the tire along the middle part of the sidewall of the tire.
To do this, attach a square or a plumb bob to the side of the tire and, by rotating the wheel, determine the maximum lateral runout of the tire, which should not be more than 5 mm.
If the deflection is large, loosen the wheel nuts and retighten them in the above order to reduce tire runout.
To inflate tires, unscrew the cap 15 of the pressure regulator and screw on the hose fitting.
Before inflating the tires, it is necessary to reduce the pressure in the receivers to a value of 608-637 kPa (6.2-6.5 kgf / m 2), in this case the regulator is turned on and the compressor starts to pump compressed air .
When inflating tires, do not stay in the area of the wheel being inflated: if it accidentally jumps out of the groove, the lock ring can injure.
Inflating a tire without dismantling is possible with a decrease in air pressure of no more than 40% compared to normal and with confidence that the decrease in pressure did not violate the correct installation.
On service 2:
- - check the cotter pin nuts of the ball pins, steering knuckle levers;
- - rearrange the wheels if necessary;
- - adjust the amount of convergence of the front wheels;
- - adjust the front wheel hub bearings (when the wheels are suspended).
Change the wheels if there is excessive or uneven tread wear on the front tires, swapping them with any other wheels on the vehicle that have good tire treads.tread condition.
Check the front wheel alignment in the following order:
- - check the pressure in the tires of the front wheels. If necessary, bring it to normal;
- - set the front wheels to the position corresponding to the car moving in a straight line;
- - measure the distance between the side flanges of the wheel rims at the rear at the height of the centers of the wheels with a linear 2182;
- - roll the car forward half a turn of the front wheels;
- - measure the distance between the side flanges of the wheel rims in front at the same points as before, at the height of the centers of the wheels.
The difference in the results of measuring the distances between the side flanges of the wheel rims before and after rolling the car determines the amount of toe-in, which should be 0.9-1.9 mm.
If the toe-in does not match this value, adjust it by changing the length of the tie rod.
To do this, loosen the bolts connecting both tips and, screwing the rod into the tips with a large toe-in and turning it out with a small one, ensure the above value of the toe-in of the front wheels.
After that, tighten the nuts of the handpiece mounting bolts, providing a tightening torque of 49-61 Nm (5-6.2 kgf-m).
Check the front wheel bearings (with the wheels suspended) by rocking the wheels suspended on the lift in a direction perpendicular to the plane of rotation of the wheel, and also by rotating by hand.
When the bearings are correctly tightened, the wheel rotates freely, without binding, and has no axial movement and oscillation.
If the wheel turns hard and this is not the result of the brake pads touching the surface of the drum, or if you feel play when the wheel is rocking, adjust the tightening of the hub bearings.
When service C:
- - check the condition of the hub bearings (with the hubs of all wheels removed);
- - change the grease in the rear and front wheel hub bearings.
To check the wheel bearings and relubricate them, remove the rear and front wheel hubs.
Remove the hubs with great care not to damage the seals. Damage to the oil seal can lead to the penetration of grease from the hubs into the brake mechanism.
To remove the front wheel hubs:

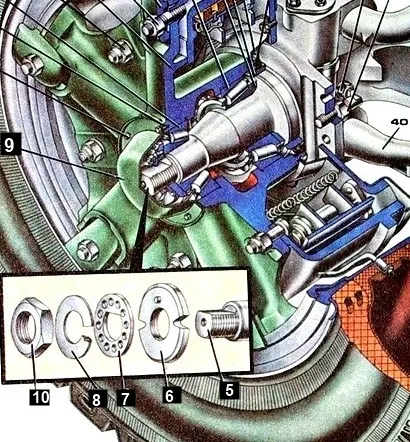
- - remove the cover 9 of the hub (see Fig.);
- - unscrew the locknut 10 for fastening the bearings and remove the washers 7 and 8;
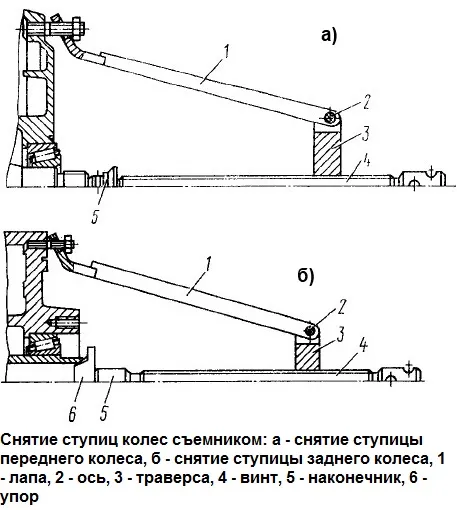
- - unscrew the nut 6 for fastening the bearings; remove the hub with a puller И801.38.000 (fig.), to do this, put the paws 1 on the hub studs and secure with wheel nuts.

Letting the tip 5 against the steering knuckle, screw the screw 4 into the crosshead 3 until the hub is completely removed.

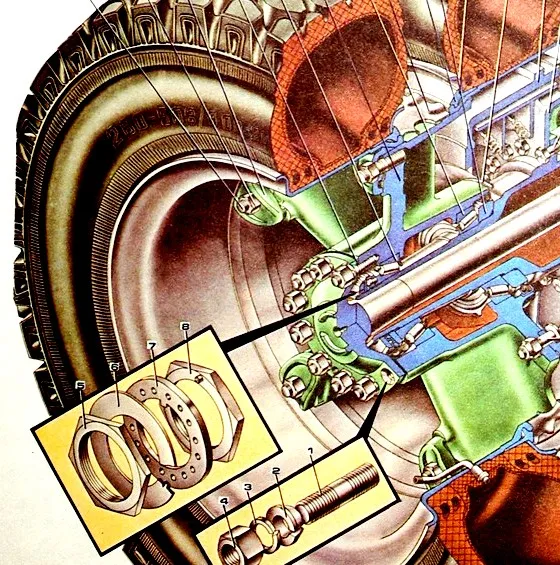
When removing the rear wheel hubs, first remove the axle shafts (see Fig.), for this:
- - unscrew the nuts 4 securing the axle shaft to the hub;
- - remove spring washers 3;
- - remove expansion sleeves 2;
- - screw two bolts M 12x1.25 into the holes of the axle shaft flange until it moves;
- - remove the axle shaft and the gaskets of the axle shaft flange.
Remove the rear wheel hub in the same way as the front wheel, while using the tip 5 (Fig. 2) and stop 6.
When assessing the condition of bearings, the working surfaces of the outer rings and rollers should not have visible traces of scratches, scoring, cracks, tint colors. The rollers must rotate freely in the cage.
To lubricate the wheel bearings, remove the old grease and fill the space between the rollers and the cage with the required amount of grease evenly around the entire circumference.
Adjust the bearings of the front wheel hubs in the following order:
- - remove the hub cap and loosen the bearing nut, then turn the hub (wheel) to check for ease of rotation.
In case of hard rotation, which is not due to friction of the brake pads on the drum, remove the hub and find out if this is not caused by damage to the bearings or the oil seal;
- - turning the hub (wheel) in both directions to properly install the rollers between the bearing rings, tighten the nut 6 (see Fig. 1) of the bearing until the hub (wheel) rotates tightly;
- - unscrew the nut approximately 1/6 of a turn until the nut pin matches the nearest hole in the lock washer, check the hub (wheel) for ease of rotation without noticeableth gap;
- - tighten the lock nut of the fastening, bearings with a torque of 137-157 Nm (14-16 kgcm) and bend the lock washer of the lock nut onto one of its faces to lock the lock nut;
- - check the rotation of the hub (wheel), turning in two directions. The rotation of the hub (wheel) must be free and uniform.
When checking the rotation of the wheel hub, no axial movement is allowed.
Check the quality of bearing adjustment with a control run of up to 10 km. If there is strong heating, repeat the adjustment.
Adjust the wheel bearings of the intermediate and rear axles in the same way as above. Tighten the nuts of the axle shaft fastening studs, providing a tightening torque of 118-137 Nm (12-14 kgf-m).


