The cabin heating is water-based, from the engine cooling system, which allows you to set the optimum temperature in the cabin at any time of year and protects the glass from freezing
The cabin heater consists of a radiator with valve 10, two fans with electric motors, hot air distributors with flaps, two air distributors and controls.
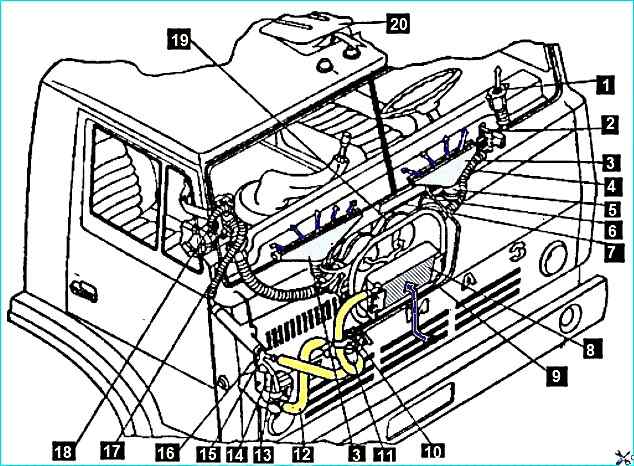
Cabin heating and ventilation system: 1 - hot air distributor; 2 - heating control drive; 3 - windshield blower nozzle; 4 - side window blower hose; 5 - windshield blower hose; 6 - left distributor flap control cable; 7 - right distributor flap control cable; 8 - heater radiator; 9 - heater valve cable; 10 - heater valve; 11 - front heater inlet hose; 12 - heater outlet hose; 13 - drain hose; 14 - engine radiator; 15 - drain valve; 16 - heater inlet pipe; 17 - middle heater inlet hose; 18 - water take-off pipe; 19 - electric motors; 20 - ventilation hatch
Radiator 8 is installed in a niche behind the trim panel and is included in the engine cooling system.
Hot liquid enters the radiator through the supply hose 11 through the heater tap 10.
After passing through the radiator, the liquid enters the lower tank of the radiator 14 of the engine cooling system through the supply hose 12 of the heater.
Outside air passes to the radiator through the grille of the trim panel.
After passing through the radiator, the heated air is supplied by two fans through air ducts to the windshield blower nozzles.
Air is supplied to the feet of the driver and passengers through the holes of the air distributors.
Air distributors 1, installed on the instrument panel on the left and right, serve to direct air to the door windows. sides.
The air distribution grilles rotate 360° in the horizontal plane.
Adjust the heat flow with the heater valve, as well as by changing the rotation speed of the fan impellers.
To obtain maximum heat flow, the heater valve must be fully open, the fan electric motors 19 must operate at maximum rotation speed, the flaps in the distribution channels must be fully open.
When supplying overheated air to the cabin, close the heater valve.
To further reduce the supply of warm air to the cabin, switch the fan electric motors to a lower rotation speed or turn them off.
In this case, air is supplied to the cabin due to the high-speed pressure that occurs when the car is moving.
The efficiency of the heater depends on the temperature of the liquid in the engine cooling system. At a fluid temperature below 75ºС, the efficiency of the heater drops sharply.
The heater valve should be fully open in winter.
The valve and air distributor flaps are controlled by the drive levers 2, located under the instrument panel, to the left of the steering column.
The upper lever controls the heater valve, and the two lower levers control the flaps of the right and left air distributors.
Intermediate positions of the levers allow smooth changes in the efficiency of heating the cabin and windshields;
The key switch for the fan motors is located on the fuse panel to the right of the steering column.
When the heater is running, do not close the heater valve completely, as this disrupts the circulation of fluid through the radiator.
Cabin ventilation is natural - the oncoming air flow is used when driving car.
Use the rotary vents to ventilate the cabin, lower the door windows, open the roof ventilation hatch, which can be set in four fixed positions.
Replacing the heater

The heater is usually replaced in case of leaks and mechanical damage to the radiator, damage to the casings, impellers and electric motors, which impair the operation of the heater
You will need tools: 10, 12 keys, a screwdriver, coolant container
Prepare the car and turn off the battery
Set the heater control lever to the "open" position
Drain the coolant (8-9 l) from the engine cooling system
Disconnect the plug connectors of the fan electric motors
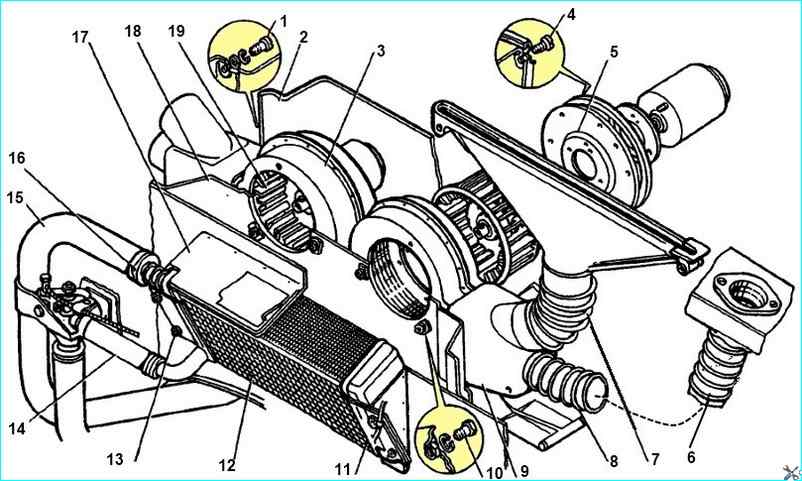
Unscrew the screws 1 and remove the fan casing 2
Unscrew the screws 4 securing the flanges 5 and remove the working wheels 19 with the electric motors assembly
Loosen the clamps 8 and disconnect the hoses 6 and 7 for blowing the side and windshields from the hot air distributor 9
Unscrew the screws 10 securing the snails 3 of the fans with distributors assembly to the heater panel 18 and remove the snails
Lift the front trim panel of the cabin
Loosen the clamps 16 and disconnect from the radiator 12 heater hoses: front inlet 14 and outlet 15
Unscrew bolts 13 fastening the radiator to the casing 17 of the heater and remove the radiator
Installing the heater
Install the radiator 12 of the heater in the casing 17 of the heater, checking the presence and serviceability of the seal 11
Screw in bolts 13 fastening the radiator to the hatch of the heater panel
Connect hoses 14 and 15 to the radiator pipes, secure them with clamps 16
Connect snails 3 of the fans with distributors in assembly to the panel 18 of the heater and screw in screws 10
Connect hoses 6 and 7 of the blower to the pipes of the distributors 9 of the air side windows and windshield and secure the hoses with clamps
Install 3 working wheels 19 with electric motors in assembly in snails and secure flanges 5 on snails with screws 4
Install casing 2 fans and secure it with screws 1
Connect plug connectors of electric motors of fans
Add coolant to engine cooling system to normal level
Turn on batteries
Start engine and check operation of heating system
Lower front trim panel of cabin
")

")
")
")
")
")
")
")