The car is equipped with two rectangular headlights with a halogen double-filament lamp AKG12-60+55-1, power 55/60 W (low/high beam) and an A12 side light lamp with power 4 W
Some cars are equipped with an electric headlight corrector that regulates the direction of the beams depending on the vehicle load.
The electric corrector control knob is located on the left side of the instrument panel.
The side lights, instrument lights and headlights are switched on by a central light switch, which contains a resistor for adjusting the brightness of the instrument lamps.
The headlights are switched from low beam to high beam using the left steering column switch.
Replacing lamps, removing headlights

To replace the lamps in the headlight with the ignition off, turn the headlight cover counterclockwise and remove it.

To replace the headlight lamp, remove the connecting block from the low-beam - high-beam lamp terminals.

Remove the spring clip tabs from the grooves

Remove the faulty lamp.
Install the new lamp in the reverse order.
Do not hold the halogen lamp by the glass bulb with your hands to avoid leaving fingerprints.
If this happens, wipe the lamp with alcohol. Otherwise, the lamp bulb may darken when turned on.

To replace the side light bulb, remove the socket

Lightly pressing on the lamp bulb and turning it counterclockwise, remove the lamp

To remove the headlight assembly, disconnect the connecting block of the lamp power wires

Disconnect the electric drive block for the headlight range control.

Using a 10mm socket, unscrew the headlight mounting bolt in the engine compartment.

Use a 10mm wrench to unscrew the two bolts

Remove the headlight

If the bumper prevents you from removing the headlight, first use a 10mm socket to loosen the two bolts securing the headlight bracket to the body
Install the headlight in reverse order.
Before tightening the fastening bolts, adjust the position of the headlight housing relative to the mating car parts. After assembly, check the adjustment.
Replacing the headlight electric corrector and control unit

Disconnect the connecting block from the corrector terminals.

Press with your finger the latch located on the drive body (shown on the removed device)

Turn clockwise and remove the electric corrector.
After installing the electric corrector, adjust the headlights (see Adjusting the headlights).

To replace the control unit, remove the instrument cluster (see How to remove and install the instrument cluster of a Gazelle car).
Disconnect the connecting block from the unit.

By pulling towards yourself, remove the control knob of the unit.

Using round-nose pliers, unscrew the nut, remove the washer and the unit.

fig. General view of the control unit with mounting parts.
Install the removed parts in reverse order
Adjusting headlights
Check the correct adjustment of the headlights by the location of the light boundaries on the screen. It is more convenient to adjust the headlights at night or in cloudy weather.
Checking and adjustment is carried out on a flat horizontal platform.
As a screen, you can use a sheet of plywood (approximately 1.0 m high and 1.7-2.0 m long), a light building wall, a gate, etc.
Place a fully fueled car, with a jack, tools and a spare wheel secured in their standard places, perpendicular to the screen at a distance of 5 m between the headlights and the screen.
Check and, if necessary, adjust the tire pressure to normal.
For precise adjustment, you can put an assistant in the driver's seat and rock the car several times, pushing it from the side to self-adjust the suspension.
The body will then take the desired position relative to the wheels.
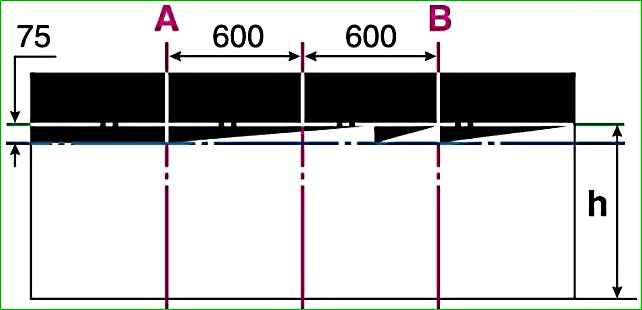
Mark the screen with chalk, as shown in the figure.
Dimension “h” must correspond to the distance from the surface of the site to the center of the headlights.
If the car is equipped with an electric headlight leveler, turn its control knob clockwise until it stops.
Cover one of the headlights with a piece of cardboard or fabric and turn on the low beam.

By rotating the adjusting screw located on the rear wall of the headlight on the radiator side, align the break point of the light beam (the intersection of the horizontal and inclined boundaries) with the vertical line of the center of the headlight.

By rotating the second adjusting screw located in the opposite upper corner of the headlight housing, align the horizontal border of the light beam with the bottom line on the screen
Adjust the second headlight in a similar way.
")

")
")
")
")
")
")
")