To troubleshoot, replace parts and assemblies, the suspension is subjected to complete or partial disassembly
Removing springs from the car
Removal of the front and rear springs is carried out in almost the same sequence
To do this you need:
- - loosen the nuts of the stepladders;
- - disconnect the lower end of the shock absorber;
- - jack up the front of the car to remove the front springs or the rear so that the springs are unloaded;
- - place technological supports of appropriate height under the raised end of the frame and lower the car onto them;
- - unscrew the nuts of the bolts securing the rubber-metal spring hinges.
Remove the bolts.
If it is difficult to remove them, knock them out with a copper drift so as not to spoil the thread;
- - unscrew the nuts of the stepladders and remove the stepladders;
- - lift the car with a jack so that the front end of the spring comes out of its bracket, and the rear end comes out of the earring.
Remove the spring.
Disassembling springs
Before disassembling the springs, clean them from dirt and determine their technical condition.
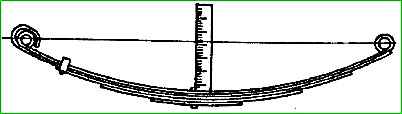
If all parts are suitable for further use, then it is necessary to check the spring deflection arrow in a free state; to do this, stretch a thread or thin wire between the axes of the ears and measure the distance from the thread to the upper surface (at the center bolt) of the first main sheet, which should be:
- - for small-leaf (2 leaves) front springs - (147±10) mm;
- - for small-leaf (3 leaves) rear springs - (150±10) mm;
- - for multi-leaf (4 leaves) front springs - (135±5) mm;
- - for multi-leaf (5 sheets) rear springs - (135±5) mm.
The difference in the deflection dimensions of springs of the same name installed on a vehicle should not exceed 10 mm.
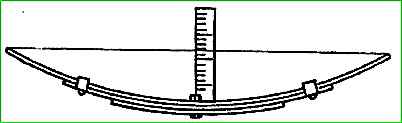
Measurement of the deflection of additional springs in a free state must be made from a tensioned thread applied to the ends of the ends of the top of the main sheet to its surface at the center bolt
This size should be (1165) mm for a single-leaf additional spring, and (815) mm for a three-leaf additional spring.
The difference in these dimensions for the left and right additional springs should also not exceed 10 mm.
If damage is found as a result of a preliminary inspection, the spring must be disassembled in the following order:
- - clamp the spring in a vice in the immediate vicinity of the center bolt;
- - unscrew the nuts of the clamp bolts, remove the bolts;
- - unscrew the nut of the center bolt and carefully release the vice, since the sheets in the tightened spring are in a tense state.
Rinse all spring leaves with kerosene, wipe and inspect for cracks.
Replace broken sheets and sheets with cracks.
If the rubber comes off the metal reinforcement in rubber-metal hinges, they must be replaced.
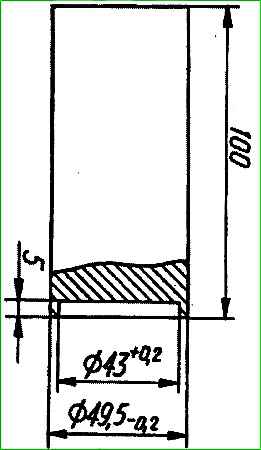
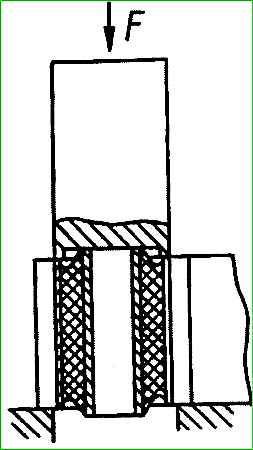
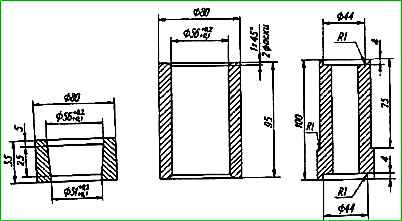
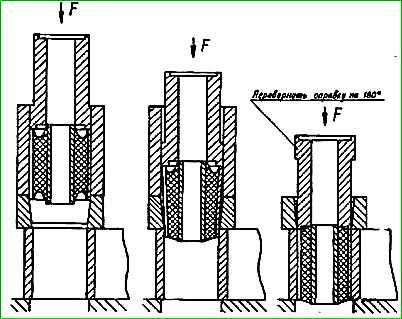
To press the hinges out of the spring ear, you must use a mandrel, as shown in the figure
Weakened rivets of clamps must be re-riveted.
Assembling springs
To increase the deflection of spring sheets, straightening them with blows of a hammer or sledgehammer is unacceptable, as this leads to rapid failure.
Straightening of sheets by rolling between rollers is allowed.
When replacing rubber-metal hinges, they should be pre-lubricated with liquid soap.
Pressing the hinges into the spring eye should be done using mandrels, as shown in the figure
Then select the required set of sheets.
For multi-leaf springs, coat the surfaces of the sheets with graphite lubricant.
For small-leaf springs, insert plastic spacers between the leaves.
The springs must be assembled in the following order:
- - assemble the sheets in the appropriate order and insert a technological rod with a diameter equal to the diameter of the center bolt into the hole under the center bolt;
- - in a vice, compress the central part of the spring as close to the rod as possible and remove it;
- - insert the center bolt with the head downwards instead of the rod and tighten the nut;
- - insert the clamp bolts and tighten them with nuts for multi-leaf springs and bend the clamps for small-leaf springs;
- - release the spring from the vice and wipe it from excess grease;
- - check the spring deflection in a free state, as indicated earlier;
- - hang the spring vertically and paint it black.
Installing springs on a car
During installation, the shorter end of the spring must face forward. For proper operation of rubber-metal hinges, the nuts and bolts should be tightened with the springs straightened.
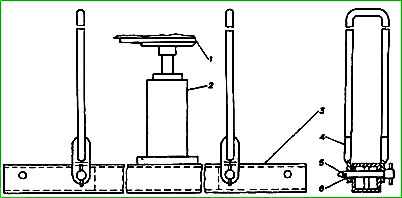
This operation can be performed using a device using a standard jack.
Installation of the spring on the car should be done in the following order:
- - lower the car so that the front end of the spring fits into its bracket, and the rear end into the lower end of the earrings;
- - install two conical and one flat washers on the bolt of the front end of the spring;
- - install the bolt assembled in this way into the front bracket and screw the nut onto it;
- - insert the bolt into the earrings and the rear spring ear, put on the lock washer and screw the nut onto the bolt;
- - straighten the spring using the device, tighten the nuts of the hinge bolts to a torque of 120-150 Nm (12-15 kgcm) and remove the device;
- - place a pad on top of the front spring, as well as the rear spring of buses, and stepladders on it, the threaded ends of which are inserted into the holes of the beam, then secure the stepladders with nuts and lock washers;
- - on the rear spring, if it is small-leaf, it is necessary to install an additional spring and pad;
- - if the spring is multi-leaf, then you should install a gasket on it, then an additional spring and an overlay on it.
Then stepladders are installed on the lining and in the holes of the rear axle cushion.
Lock washers are installed on the threaded parts of the stepladders and nuts are screwed on;
- - if the car has wheels, then it is necessary to remove the stands and jack;
- - finally tighten the stepladder nuts to a torque of 120-150 Nm (12-15 kgcm);
- - attach the lower end of the shock absorber.
")

")
")
")
")
")
")
")